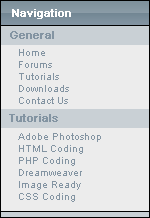
This tutorial will teach you how to code and style your own content box. For this tutorials, I will be using a basic content box, as shown below.
This content box uses only one image. This image only needs to be small, as we will repeat it along the top row.
The only image that we will need will be the one posted below. The rest of the box will be made using HTML and a css stylesheet.
![]()
Coding
Open notepad or Dreamweaver (or any other editor of your choice) and create a new .html document. Input the following code.
|
<div>
<div> </div> </div> |
Some of you will recognize it, and others won't because they are use to <tr>< and </td>. In this tutorial, I am using divs; and for a basic over view, they are almost the same as <tr>'s and <td>'s
Now it's time to create our .css document. Use any editor of your choice and create a new .css file. Refer to the example below.
|
/* Content box by TutorialFx.com*/
/* Box */ .content_box{ width:150px; } /* Nav header */ .nav_header { background-image:url(images/nav_back.gif); padding-left:5px; color:#FFF; font-weight:bold; font-size:12px; height:22px; border:1px solid #000; padding-top:5px; font-family:Arial, Helvetica, sans-serif; } /* Link headers */ .header { background:#C9D0D5; color:#8394A2; font-weight:bold; font-size:11px; padding-left:8px; border-left:1px solid #000; border-right:1px solid #000; font-family:Arial, Helvetica, sans-serif; height:17px; padding-top:2px; } /* Link areas */ .links a { color:#8394A2; background:#ECECEC; border-left:1px solid #000; border-right:1px solid #000; font-size:10px; height:12px; display:block; width:150px; font-family:Arial, Helvetica, sans-serif; padding-left:10px; } .links a:hover { display:block; background:#C9D0D5; text-decoration:none; } /* Base line */ .bottom { border:1px solid #000; background:#C9D0D5; height:6px; font-size:4px; color:#C9D0D5; } |
Here's a brief explanation of what I posted.
/* Text here */
Placing text in a / and a * makes it into a 'comment' meaning it won't actually affect the code and you can use it to make your code neater.
background-image: Is used to define a background image for the cell
background-color: defines a color forthe cell using hex codes
color: defines the color for text using hex codes
border: creates a border for the cell. (size in pixels, style, color) Eg. 1px solid #000
padding: creates a margin for the text. A padding of 5px means the text will be indented by 5 pixels
height/width: do as they appear
font-family: changes the font for the text
You can add these styles to the table by allocating them using classes. You can also use # for id's, but this tutorial only includes classes.
Save the above file as stylesheet.css
Go back to your .html document which contains the tables and divs. In the part of your document, add:
| <link href="stylesheet.css" type="text/css" rel="stylesheet" /> |
If your stylesheet is located somewhere else, change the URL of it under the href part.
After this, add a class to each div so you have an end result like mine below.
|
<div class='content_box'>
<div class="nav_header">Navigation</div> <div class="header">General</div> <div class="links"><a href="http://www.tutorialfx.com">Home</a></div> <div class="links"><a href="http://www.tutorialfx.com">Forums</a></div> <div class="links"><a href="http://www.tutorialfx.com">Tutorials</a></div> <div class="links"><a href="http://www.tutorialfx.com">Downloads</a></div> <div class="links"><a href="http://www.tutorialfx.com">Contact us</a></div> <div class="header">Tutorials</div> <div class="links"><a href="http://www.tutorialfx.com">Adobe Photoshop</a></div> <div class="links"><a href="http://www.tutorialfx.com">HTML Coding</a></div> <div class="links"><a href="http://www.tutorialfx.com">PHP Coding</a></div> <div class="links"><a href="http://www.tutorialfx.com">Dreamweaver</a></div> <div class="links"><a href="http://www.tutorialfx.com">Image Ready</a></div> <div class="links"><a href="http://www.tutorialfx.com">CSS Coding</a></div> <div class="bottom">TutorialFx</div> </div> |
You should now have something similar to this.
Note: I also added links to my navigation links.
If you have any questions, just ask! Hopefully I haven't missed anything, lol.
Enjoy!