


Step 1
Start with a new document, 75 px by 25 px with a transparent background.
Step 2
Grab your rectangular marquee tool and on the tab for its settings, use the following settings:
![]()
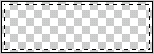
Step 3
Now click on your document and position it in the center of the image (there should be 1 pixel left above, below, on the left, and on the right of the selection).
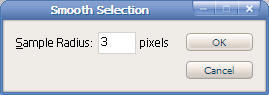
Step 4
Go to Select>Modify>Smooth and use a 3 pixel radius.
Step 5
Now fill your selection with #dddbde. Deselect by hitting Ctrl+D on your keyboard.
![]()
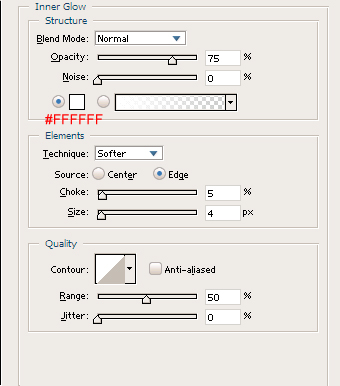
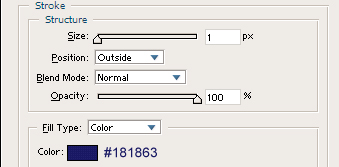
Step 6
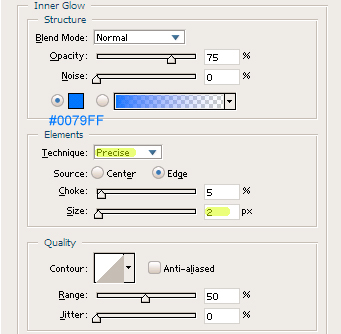
Click blending options for that layer and create an inner glow using the following settings:
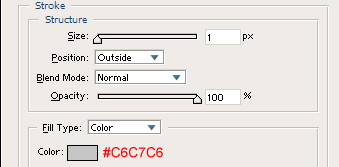
Give it a small stroke using these settings:
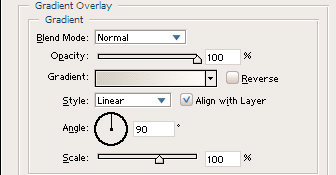
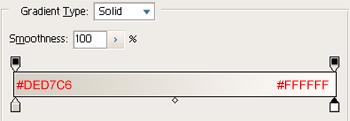
Now give it a gradient overlay with the following settings:
Step 7
Add some text to the middle of the button and you have your normal button state.
![]()
Step 8
Now we're going to make the “over” state. The over state appears when your mouse rolls over the button. Start off by duplicating what should be your only layer.
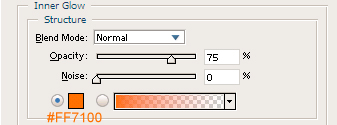
Step 9
Go into blending options and edit the inner glow settings to the following (anything different from previous settings are highlighted):
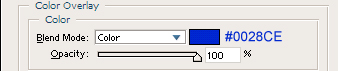
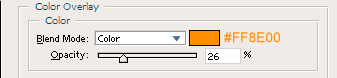
Give it a color overlay with these settings:
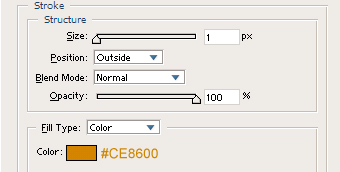
A stroke like so:
And now you have your over state!
![]()
Step 10
The last state is the “hit” state. This appears when your mouse is clicked on the button. Start off by duplicating your “over” layer.
Step 11
Edit your blending options again. First start with the inner glow:
Change the color overlay:
And lastly, change the stroke:
Lastly for this state, move the text 1 pixel to the right and 1 pixel to the left by using your move tool. You now have your hit state!
![]()
Step 12
You'll now need to save your normal, over, and hit states as separate .jpg files. You can do this by making only one of the layers visible and saving the image. Then make another layer visible and save that state. Do this for the three states.
Step 13
Create a new document in ImageReady of the size 75 px by 25 px with a transparent background.
Step 14
Now open up your other three states of your button. They should be .jpg format files. Your workspace should look like this:
![]()
Step 14
Now drag the sole layer from each of your hit states into the new document. Your new document's layers palette should look like this:
Step 15
Now click the rollovers tab and click the button below that with a mouse and a star:
Step 16
Make sure on your “Normal” state that only the “normal” layer is visible. The others should be transparent. Clicking the button should automatically add an “Over” state. Now click on that over state and make only your “over” layer visible.
![]()
Step 17
Now create a new rollover state by clicking the button right next to the mouse and star (looks like the button to create a new layer). It should automatically be the “Down” state.
Step 18
Now while that rollover is selected, make your hit (down, same thing) layer visible and the rest transparent.
Step 19
Now to save your file, go to File>Save Optimized As… Make sure it is .html and images and name your file. Now find the .html file and open it. It should work like a charm! Just insert the html in that file into your other html pages like it is entered and your button will work on your site, just like it does below.
Necessary Code
To make sure your button works on your site, the following code must be inserted. First, insert the following into your
<HEAD> </HEAD> tags:
| <!-- ImageReady Preload Script (Untitled-1) -->
<SCRIPT TYPE="text/javascript"> <!-- function newImage(arg) { if (document.images) { rslt = new Image(); rslt.src = arg; return rslt; } } function changeImages() { if (document.images && (preloadFlag == true)) { for (var i=0; i<changeImages.arguments.length; i+=2) { document[changeImages.arguments[i]].src = changeImages.arguments[i+1]; } } } var preloadFlag = false; function preloadImages() { if (document.images) { button_Layer_1_over = newImage("images/button_Layer-1-over.gif"); button_Layer_1_down = newImage("images/button_Layer-1-down.gif"); preloadFlag = true; } } // --> </SCRIPT> <!-- End Preload Script --> |
Your image names may be different.
Your next piece of code needs to go in your BODY tag:
<BODY ONLOAD="preloadImages();">
The last piece of code is your acutal button and goes wherever you want it on your page:
|
<A HREF="#" ONMOUSEOVER="changeImages('button_Layer_1', 'images/button_Layer-1-over.gif'); return true;" ONMOUSEOUT="changeImages('button_Layer_1', 'images/button_Layer-1.gif'); return true;" ONMOUSEDOWN="changeImages('button_Layer_1', 'images/button_Layer-1-down.gif'); return true;" ONMOUSEUP="changeImages('button_Layer_1', 'images/button_Layer-1-over.gif'); return true;"> <IMG NAME="button_Layer_1" SRC="images/button_Layer-1.gif" WIDTH=75 HEIGHT=25 BORDER=0 ALT=""></A> |