Step 1
Open a new file in Adobe Photoshop and choose a black background. Type what text you want in your window. I chose ".com" and a green text color.

Step 2
Ok. Now select menu option Layer > Layer Style > Outer Glow with next parameters: Color-White (#FFFFFF), Blend Mode-Pin Light, Opacity-66%, Sphere-0%, Size-4%, Contour-half round, Range-50% and Jitter-0%.
Choose Layer > Layer Style > Bevel and Emboss with: Style-Pillow Emboss, Technique: Smooth, Depth: 281%, Size-3%, Soften: 0%, Glass Contour: Cove-Deep, Highlight Mode-Opacity: 62%, Shadow Mode-Opacity: 42%.
Now Layer > Layer Style > Satin, Layer > Layer Style > Color Overlay, Layer > Layer Style > Stroke with default parameters.
Here is what you should get:

Step 3
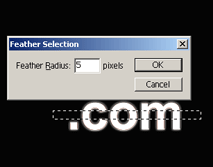
Duplicate the layer and remove all effects in the new layer. Set the text color white (#FFFFFF). Rasterize the new layer and select Rectangular Marquee Tool in the Tools Tab. Select an area like in the next picture and Select > Feather - Feather Radius: 5 pixels and delete the selected area. The result should be this:
Delete the selected area:

Step 4
In the Layers Tab set the Color Dodge in the Blending Mode options. And "voila" the text effect: