Start a new document, size 20px wide by 4px high, and set Background Contents: Transparent
Zoom into the document so you can see what your doing.
Select the pencil tool
![]() brush size 5, then stroke the left edge of the canvas, with black.
brush size 5, then stroke the left edge of the canvas, with black.
Then go to Edit->Define Pattern.
In the Name field, give it a name "Horizontal" then click ok.
Now to go Image->Rotate Canvas->90CW
Then Edit->Define Pattern.
In the Name field, give it a name "Vertical" then click ok.
Now you can close this document, without saving.
Now open a NEW document, 500x500 of whatever size you want, with white background.
In this new document, create a new layer
Then select the Elliptical marquee tool
![]() , then while holding down the SHIFT button, use the marquee tool to create a circle, as large as you can fit it in the canvas
, then while holding down the SHIFT button, use the marquee tool to create a circle, as large as you can fit it in the canvas
Now go to Edit->Fill
In the "Use:" section, select "Pattern"
In the "Custom Pattern" option, select the "horizontal" pattern you created earlier.
This will fill the selection with some vertical lines.
Do not deselect yet.
Then do the Edit->Fill step above again, but this time, select the "vertical" pattern you created earlier.
You should still have the selection
Now duplicate this layer: Right click on the layer name, then select "Duplicate Layer"
Now, with the top layer as the working layer, go to Filter->Distort->Spherize.
Set Amount: 100%, Mode: Normal
Now with the bottom layer as the working layer, go to Filter->Distort->Spherize, this time:
Set Amount: -100%, Mode: Normal
Now you can Deselect by pressing CTRL+D
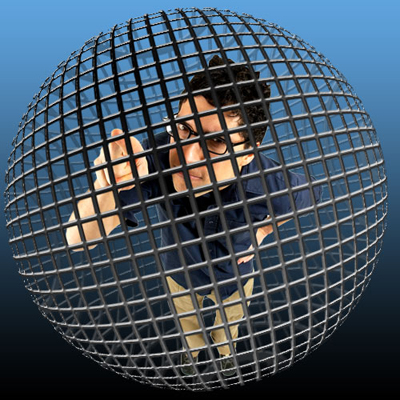
Now you should have 2 layers, the bottom layer bulge inward, and the top layer bulge outward, creating a sphere.
But the sphere is looking very messy and undefined.
Lets clean it up a little
Apply the following layer style to both layers
Bevel and Emboss
Gradient Overlay
Now set the Opacity of the bottom layer to about 30%
Now, if you want to put anything inside the sphere, add that layer into between the 2 layers.
Download .psd file here.