

Result:
1. Create a new file in Adobe Photoshop. I used size of 800*600 (you can use your monitor resolution size to create a new wallpaper) with black background.
2. Type any text you want. I took Arial Black (Regular) font, my size is 170 pt.
3. Merge layers by pressing Ctrl+E.
4. Duplicate layer. Right click on the layer and choose Duplicate Layer
5. Now we have two layers: "Background" and "Background copy". Make "Background copy" invisible for now by pressing on the eye icon.
6. Choose "Background" layer and rotate it clockwise for 90 degrees. Image-Rotate Canvas-90 CW.
7. Apply some wind effect: Filter-Stylize-Wind with such settings:
Method: Wind, Direction: From the left.
Repeat wind effect two more times by pressing Ctrl+F two times.
8. Blur your picture a little bit: Filter-Blur-Gaussian Blur.
Radius: 2 pixels.
9. Image-Rotate Canvas-90 CCW.
10. Filter-Stylize-Solarize.
11. Ctrl+Shift+L.
12. You should get something like that:
13. Hide this layer by pressing on the eye icon. Then choose "Background copy" and make it visible by pressing on the eye icon.
14. Image-Rotate Canvas-90 CW.
15. Apply wind effect. Filter-Stylize-Wind
Method: Wind, Direction: From the right.
Press Ctrl+F one more time.
16. Filter-Blur-Gaussian Blur.
Radius: 2 pixels.
17. Image-Rotate Canvas-90 CCW.
18. Filter-Artistic-Plastic Wrap
14-15-8
19. Take "Magic wand", hold Shift and choose all letters one-by-one, selecting their white parts.

20. Then go to Filter-Sketch-Bas Relief
Detail: 15, Smoothness: 2, light Bottom.
21. Invert Ctrl+I
22. Go to Filter-Sketch-Chrome
Detail: 10, Smoothness: 10.
23. Invert once again Ctrl+I
24. Deselect Ctrl+D
25. Filter-Stylize-Solarize.
26. Auto levels Ctrl+Shift+L
27. You should get something like that:
28. Change Blending mode to Lighten.

29. Let's add some color. Press Ctrl+U and choose any color you want. Don't forget to check colorize box I took Hue 27, Saturation 43, Lightness 0.

30. Click on the "Background" layer, and make it visible by pressing on the eye icon.
31. Colorize this layer as well: Ctrl+U, check Colorize. I took Hue 27, Saturation 30, Lightness 0.
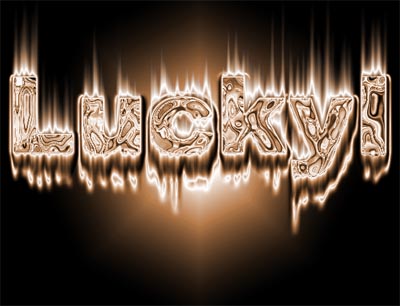
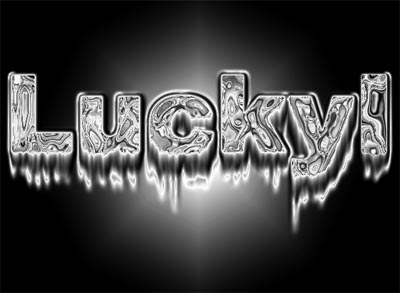
32. That's about it! Congratulations! Here is my final result: