
Example:
No emails will be sent using this form as the function has been disabled for the purpose of the tutorial
In this tutorial you are going to learn is how to Create A contact Form
Start by opening SwishMax
I have used a movie size of 405 x 410.
Step. 1
Create an input text box and name it Input_Name and the variable name of FromVariable
Now create another input text box and name it Subject and the variable name of SubjectVariable
Now create static text for the 2 boxes one call Email: and the other Subject:
You should have something looking like Fig.1
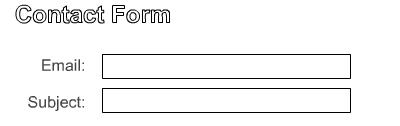
Fig.1
Step. 2
Now create another input text box and name it Message with a variable name of InfoVariable
Create a static text and type Message: place this text on top of the message input box.
You should now have something looking like Fig.2
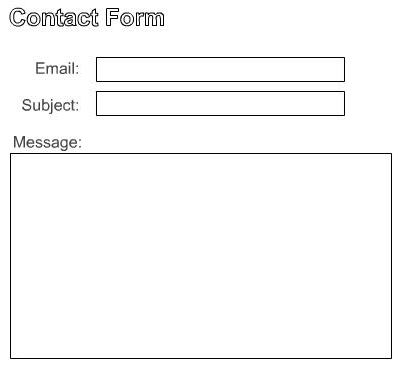
Fig.2
Step. 3
Now create a dynamic text box name it Info with the variable name of Status
This will be the information box that alerts users of errors.
Now create 2 buttons one called Send and the other Reset
You should now have something looking like Fig.3
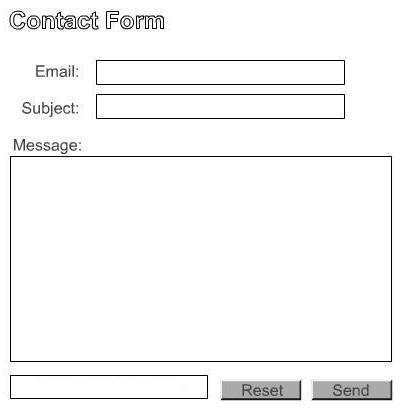
Fig.3
Step. 4
Now you have the layout, you are ready for adding the code to link it all together.
On Scene_1 add the following code.
|
onLoad () {
//this sets email input box to be clear FromVariable=""; //this sets subject input box to be clear SubjectVariable=""; //this sets message input box to be clear InfoVariable=""; //this sets the status message to "Please Fill All Fields" Status="Please Fill All Fields"; } |
Code Explained
The above code sets Email, Subject and message to empty, and the Info box to say "Please Fill All Fields"
Step. 5
Now add the following code to the Send Button
|
on (release) {
stop(); // checks to see a message has been entered, if not sets the error message. if (InfoVariable eq "") { Status = "Sorry No Message Found"; // checks to see a subject has been entered, if not sets the error message. if (SubjectVariable eq "") { Status = "Sorry No Subject Found"; } //checks to see if an email has been added. if (FromVariable eq "") { Status = "Sorry No Email Found"; } return; } //if all the above have passed the checks, this allows the send. Status = "Message sent Successfully"; this.loadVariables("http://www.yourdomain.com/mail.php",'POST'); } |
Code Explained
The above code checks all the fields have been filled in, if not it displays the relevent error message
Inside the info box, if all fields have been filled, it allows the message to be sent.
Step. 6
Now add the following code to the reset button.
|
onLoad () {
//this sets email input box to be clear FromVariable=""; //this sets subject input box to be clear SubjectVariable=""; //this sets message input box to be clear InfoVariable=""; //this sets the status message to "Please Fill All Fields" Status="Please Fill All Fields"; } |
Code Explained
The above code sets Email, Subject and message to empty, and the Info box to say "Please Fill All Fields"
Step. 7
Now for the php script, open up a text editor such as notepad or dreamweaver.
Add the following code and save as mail.php.
|
<?
mail("your mail address goes here", "$SubjectVariable", "$InfoVariable", "From: $FromVariable"); ?> |
Upload to your server an test, if you wish to generate your php script for the contact form, use the generator below.