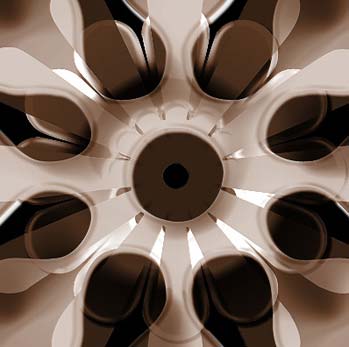
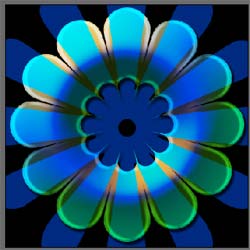
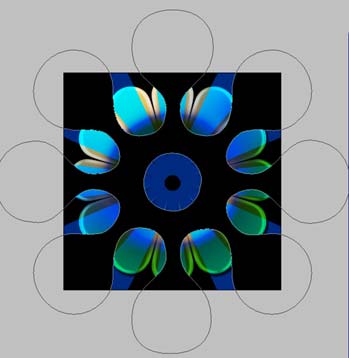
In this tutorial you will learn how to create a very impact Coffee Copper effect by using the custom shape tool, and a very unique blend of layer styles. The purpose of this; is to teach you to experiment with several different effects and combinations while using photoshop to create amazing, unique results. Here is an example of what we will be creating with this tutorial:
Note: This tutorial will use slightly moderate to advanced techniques and tricks so please be sure you have a good understand of photoshop and know your way around the program before proceeding. If you are completely or even pretty new to photoshop might I suggest trying some of our other tutorials before proceeding with this effect.
Step 1.
Create a new new document that is 400x400 in size, and fill the background with black #000000.
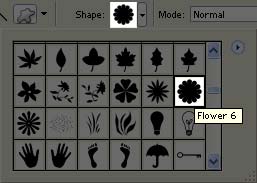
Get out the custom shape tool (
![]() ) and select the "Flower 6" shape as I have done here:
) and select the "Flower 6" shape as I have done here:
Now draw your shape in the center of the canvas as I have done here:

Step 2.
Enable 'Subtract from shape area' from the top tool bar:
![]()
Create a smaller flower shape inside of the first flower as I have done here:

Step 3.
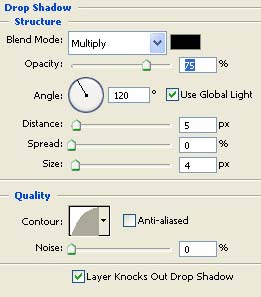
Double click on this layer and apply the following layer style:
Drop Shadow:
Bevel & Emboss:
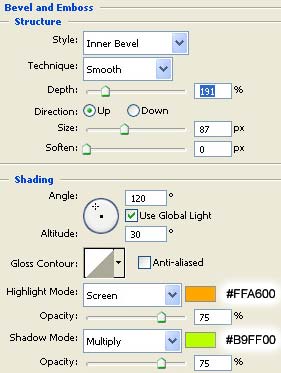
Gradient Overlay
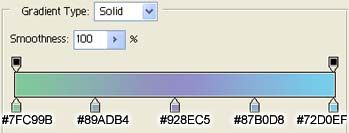
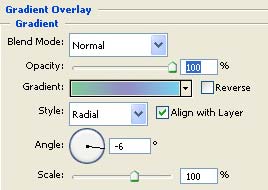
Satin:
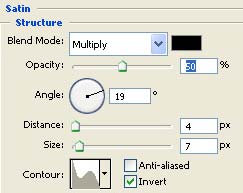
Result:

Change the name of this layer to "Flower 1" as I will refer to this layer later in the tutorial.
Step 4.
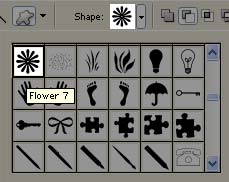
Get out the custom shape tool (
 ) and select the "Flower 7" shape as I have done here:

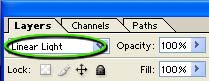
Step 5.
Change the blending option of this layer to "Linear Light":
Result:

Step 6.
Now click on the layer named "Flower 1" (created in step #x) to select it.
Press Ctrl + J on your keyboard to duplicate this layer.
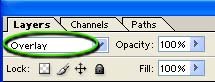
Move this layer above all other layers in the layer palette, and change the blending mode of this layer to "Overlay":
Result:
Step 7.
Get out the custom shape tool (
![]() ) and select the "Flower 7" shape as I have done here:
) and select the "Flower 7" shape as I have done here:

Step 8.
Double click this layer, and apply the following blending options:
Drop Shadow:
Bevel & Emboss:
Gradient Overlay:
Satin:
Result:

Step 9.
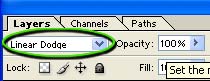
Change the blending mode of this layer to "Linear Dodge":
Result:

Step 10.
Select and merge all the layers (other than the background layer).
Adobe PS 7: Click on the topmost layer, and press Ctrl + E on your keyboard 4 times to merge all layers together.
Adobe PS CS(2): Hold the Shift key down on your keyboard, and click each layer (other than the background) and press Ctrl + E on your keyboard.
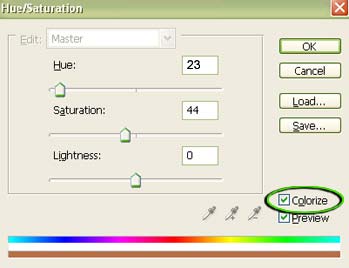
Press Ctrl + U on the keyboard to open up the Hue/Saturation window, and apply the following settings:
Note: Make sure the 'Colorize' box is checked
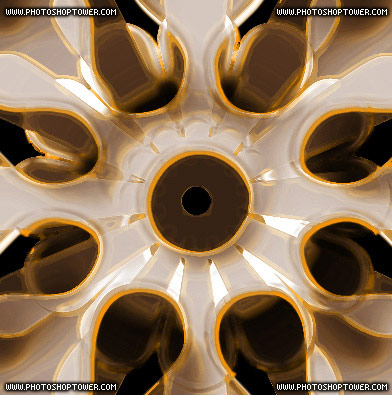
Result: