


Step 1.
To start off, create a new document in photoshop of any size, and fill the background with your designed background color. This type of effect works best on a light background, such as white or a pale grey.
Step 2.
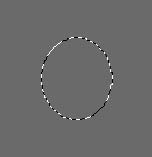
Create a new layer by pressing Ctrl+ Shift + N on your keyboard, and name this layer "Base". Get out your Elliptical Marquee Tool (
![]() ) and make an ovular selection near the center of your canvas as I've done here:
) and make an ovular selection near the center of your canvas as I've done here:
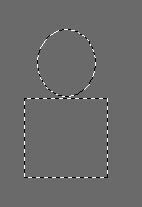
Next get out the Rectangle Marquee Tool (
![]() ), hold down the Shift key on your keyboard, and add to our selection by creating what will be the upper body of our logo as I've done here:
), hold down the Shift key on your keyboard, and add to our selection by creating what will be the upper body of our logo as I've done here:
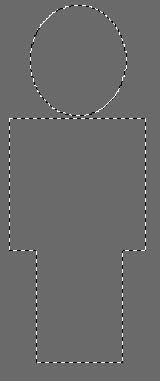
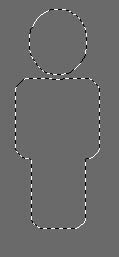
Still holding down the Shift key on your keyboard, make another addition to our selection for our logo character's legs as I've done here:
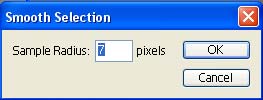
Go to Select->Modify->Smooth, with a setting of around 7 pixels:
Note: The setting of pixels may need to be adjusted depending on the size of your logo design.
Your selection should be somewhat similar to what I have here:
Set your foreground color to #DEB32F, and fill this selection with the Flood Fill Bucket Tool (
![]() )
)

Step 3.
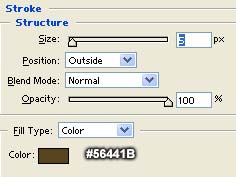
Double click this layer, and apply the following blending options:
Stroke:
Note: you may need to adjust the "size" of the stroke depending on how large, or small your logo is.
Result:

Step 4.
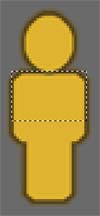
Create a new layer by pressing Ctrl + Shift + N. Get out the Rectangular Marquee Tool (
![]() ) again, and make a selection over the chest of our logo as I've done here:
) again, and make a selection over the chest of our logo as I've done here:
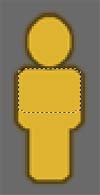
Go to Filter->Modify->Smooth, and apply the same settings that you did in step #2, mine was a setting of 7:
Result:
Set your foreground color to white (#FFFFFF), get out the Gradient Fill Tool (
![]() ), and set up the gradient fill tool with a foreground to transparent gradient as I have here:
), and set up the gradient fill tool with a foreground to transparent gradient as I have here:
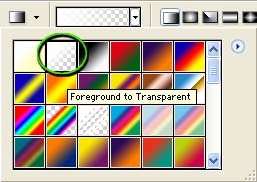
Now fill this selection with a white to transparent gradient, from the top to about the third of the way down your logo's chest as I have done here:

Step 5.
Create a new layer by pressing Ctrl + Shift + N on your keyboard.
Get out the Elliptical Marquee Tool (
![]() ) and make a selection as close to the exact same shape as the logo's head as you can possible do, as I've done here:
) and make a selection as close to the exact same shape as the logo's head as you can possible do, as I've done here:
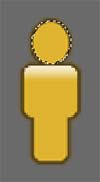
Now hold down the Alt key on your keyboard, and deselect a portion of this selection as I've done here:

Get out the Gradient Fill Tool (
![]() ) again, your foreground should still be set to white (#FFFFFF), and your gradient tool, should still be set up with the foreground to transparent setting.
) again, your foreground should still be set to white (#FFFFFF), and your gradient tool, should still be set up with the foreground to transparent setting.
Now fill this selection with a gradient from starting with the top of the head, as I've done here:
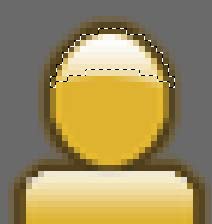
Press Ctrl + D on your keyboard to deselect the selection.
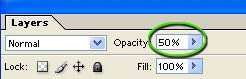
Drop the opacity of this layer down to 50 percent:
Result:

Step 6.
Create a new layer, get out your Elliptical Marquee Tool (
![]() ) again, and make an ovular selection as I've done here:
) again, and make an ovular selection as I've done here:

Get out the Gradient Fill Tool (
![]() ) again, your foreground should still be set to white (#FFFFFF), and your gradient tool, should still be set up with the foreground to transparent setting.
) again, your foreground should still be set to white (#FFFFFF), and your gradient tool, should still be set up with the foreground to transparent setting.
Fill this selection with a gradient as I've done here, starting at the top of the head:

Press Ctrl + D on your keyboard to deselect the selection, here's how the entire thing should look so far:

Step 7.
Now we're going to group the layers together. To do this, first create a new layer, directly above our background layer, so that it is directly under the layer named "Base".
Now click on the layer named "Base" to select it, and press Ctrl + E to merge it with our previous layer.
This may seem pointless, however what we are doing is "locking" in that layer style so that it won't apply itself to any other layer we merge with this one.
So now go ahead and click on the top most layer of our logo, and press Ctrl + E four times to merge all of our layers together, so we have one solid layer with our logo design so far.
Step 8.
Okay, now press Ctrl+ J on your keyboard to duplicate this layer. Press 'V' on your keyboard to get out the Move Tool (
![]() ) and position the duplicate as I've done here:
) and position the duplicate as I've done here:

Press Ctrl + J on your keyboard again, to make another duplication of our logo, and position it as I have done here:

You can optionally merge these three layers together by pressing Ctrl + E twice on your keyboard, just make sure you are happy with the alignment of the three characters before doing so ;)
Step 9.
Okay, now we're going to add that fancy arrow to our logo, and it's good to go. There are only a few steps to create the little arrow, and here's how it was done.
Create a new layer by pressing Ctrl + Shift + N on your keyboard. Name this layer "Arrow Base"
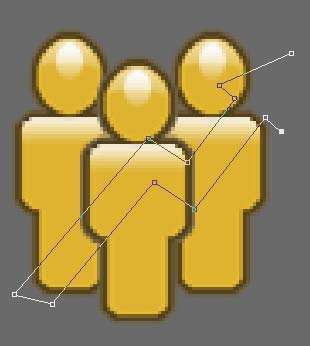
Start off by getting out the Pen Tool (
![]() ), now you want to trace the shape of our arrow onto. You do this by clicking on each of the corners that will be your arrow as you can see here:
), now you want to trace the shape of our arrow onto. You do this by clicking on each of the corners that will be your arrow as you can see here:
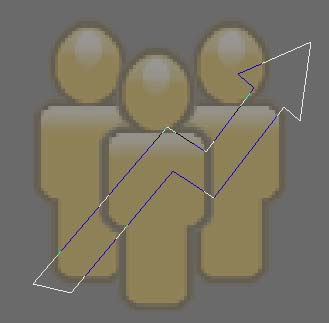
After everything is said and done, here's how the shape looks:
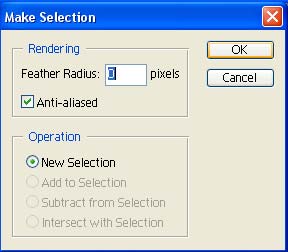
Now right-click anywhere inside of the arrow shape, and choose "Make Selection":
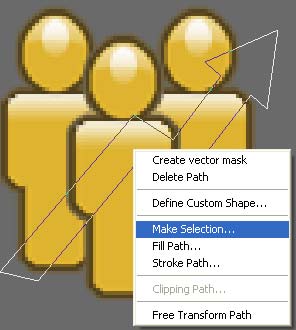
Leave these settings default, and click "Okay".
Set your foreground color to #F77712, and fill this selection using the Flood Fill Bucket Tool (
![]() ), result:
), result:

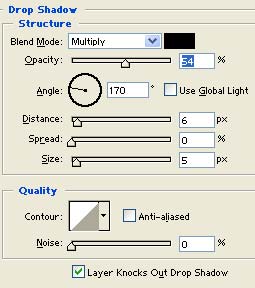
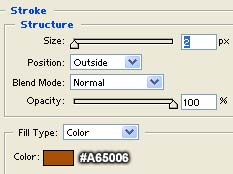
Step 10.
Double Click this layer, and apply the following blending options:
Drop Shadow:
Stroke:
Result:

Step 11.
Now we'll add the Gloss to our arrow. Create a new layer by pressing Ctrl+ Shift + N on your keyboard. There are many ways to add this gloss, but we'll use a Layer Group, or Masking Path.
Press Ctrl + Alt + G on your keyboard to Group this layer the "Arrow Base" layer.
CS and CS2 users, you'll want to right-click and choose "Create Clipping Mask"
Set your foreground color to white (#FFFFFF), and get out your Paint Brush Tool (
![]() ), and set it up with a soft 20 pixels in diameter:
), and set it up with a soft 20 pixels in diameter:
![]()
Now lightly brush around the north facing corners of our arrow as I have done here. Just don't go over-board with it, you should be able to do this with as little as two or three clicks.

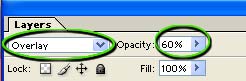
Now Change the blending option of this layer to "Overlay" and drop the opacity down to around 60 percent:
Result:

Step 12.
Finally we'll add the finishing touches to our arrow logo. Go ahead and create a new layer by pressing Ctrl + Shift + N on your keyboard, and group it with the previous layer by pressing Ctrl + Alt + G on your keyboard.
CS and CS2 users, you'll want to right-click and choose "Create Clipping Mask"
Drop the size of your brush from 20 down to around 10 pixels:
![]()
And lightly brush around the very tips of the corners, this will bring out our gloss a little more.
And there you have it, our logo is finished, here's how the completed work looks for me:

To see it in action, in a real world work environment please visit: www.helpmyhits.com.
I hope you've enjoyed following along with this tutorial, and that you've picked up a few ideas, and techniques. Try experimenting with these techniques with different colors, and on different shapes. As proven by this tutorial, you can use these tips and tricks on literally any shape imaginable. If you can't think of a logo shape to use it on, go ahead and try adding it to your favorite thick/bold font just for practice. It's fun to do, and looks great!