


Step 1.
Open a new document in photoshop, or open an existing one. I will be working with the background of the helpmyhits.com website:
Step 2.
Set your foreground color to #DEB32F, and choose a font you would like to use. Thicker, bold font faces seem to work best with this technique. The font I'm using here is called AddCityBoy.
*Free registration required
Set your font up like I have here. It is very important to use the "sharp" setting to make your text look crisp and clearly:

Go ahead and type your text out onto the canvas as I've done here:
Step 3.
Double click this layer, and apply the following blending options:
Stroke:
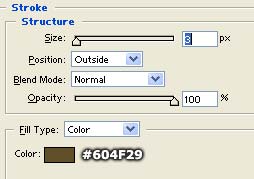
Result:
Step 4.
Press Ctrl+ J on your keyboard to duplicate this layer.
Go to: Edit->Transform->Flip Vertically:
Press 'V' on your keyboard, to get out the move tool (
![]() ) click and drag this duplicate layer downward a little bit as I've done in the image below:
) click and drag this duplicate layer downward a little bit as I've done in the image below:
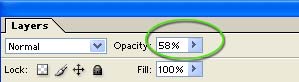
Step 5.
Drop the opacity of this layer down to around 58 percent:
Go to Layer->Add Layer Mask->Reveal All
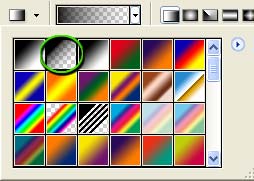
Set your foreground color to black (#000000).
Get out the Gradient Fill tool (
![]() )
)
Set your Gradient Fill Tool up with a foreground to transparent gradient as I've done here:
Now drag a gradient onto the canvas starting from the bottom of the canvas up towards the center. Until you have a similar effect to what I have here:
Now that gave us a nice "reflection" look, very quick and easily.
Step 6.
Create a new layer by pressing Ctrl + Shift + N on your keyboard. Here we'll create a custom glossy look to our text. Get out the Lasso Tool (
 ) and make a selection similar to what I've done here across the top of each of the letters in your logo. Try to avoid making straight lines, make nice smooth curves as I've done:

Set your foreground color to white (#FFFFFF), get out the Gradient Fill tool again (
![]() ).
).
It should still be set to Foreground to Transparent
One our new layer, fill this selection with a gradient as I've done here:

Step 7.
Now press Ctrl + D on your keyboard to deselect this selection.
Now press and hold the Ctrl button, and click on our original text layer.
Doing so should make a selection of our text, here is how your canvas should look:

Go to Select->Inverse to invert the selection.
Make sure you are still on our "Gloss" layer, and tap the Delete key on your keyboard to delete everything outside of our text.
Press Ctrl + D to deselect the selection.
Result:
Step 8.
Now get out your Brush Tool (
![]() ). And set it up with a SOFT 20 pixel brush as I've done here:
). And set it up with a SOFT 20 pixel brush as I've done here:
![]()
Create a new layer on top of everything else.
Hold down the Ctrl key on your keyboard, and click on your original text layer, once again to make a selection of your text once again.
Now lightly brush along the very tip top of the text so that only the very outside of your soft paint brush runs along the top of the text as I've done here. As you can see, this adds a little more depth to our text, and makes it look much more impact. The trick is just to pay special attention to "not going overboard" with it.
Do Not deselect
Step 9.
Create a new layer by pressing Ctrl + Shift + N on your keyboard.
Set your foreground color to Black (#000000).
Get out the Gradient Fill Tool (
![]() ) again, it should still be set up with foreground to transparent.
) again, it should still be set up with foreground to transparent.
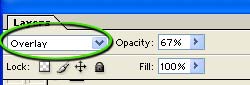
Now fill the selection with a black to transparent gradient on the bottom of our image, as I've done here:
Change the blending option of this layer to "Overlay":
Press 'V' on your keyboard to get out the Move Tool (
![]() ).
).
Tap the Down Arrow on your keyboard one time, and the Right Arrow on your keyboard one time.
Doing so will move this layer down one pixel, and to the right one pixel if you hadn't figured that out.
And that completes the effect, here I've added a little arrow to the back of the text, but this was just a little design idea I had from the beginning.
I hope you've enjoined this tutorial, and have learned a nice text effect that you will use on future logos, headers, or signatures that you design for yourself, or for your clients. It's a very easy effect to achieve, but the final result looks great!