Step1: Learning how to create the Glass Effect.
I found this effect on www.depiction.net , the reason I used this effect is because it is a nice effect and very simple to recreate. You can click here to download the style and import it into Photoshop.
Ok, let us get started. Create a new image using the dimension 800 x 600. Set the background color to white. You can change the background depending on you web site color. Create a new layer, Layer > New > Layer... (Shift+Ctrl+N). Using the Rounded Rectangle Tool
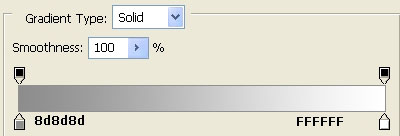
![]() create a rectangle using the dimensions below. Change the foreground color to #dcdcdc
create a rectangle using the dimensions below. Change the foreground color to #dcdcdc
![]()
With that, you should have the effect below.
![]()
Now click here to download the style, import it into Photoshop, and add the effect to the bar above. With the effect added, you should have what i have shown in the image below.
![]()
Step2: Creating the on/off button.
At this point, you should have the button above. Create a new layer, Layer > New > Layer... (Shift+Ctrl+N). Using the Rounded Rectangle Tool
![]() create a small rectangle using the dimensions below. Change the foreground color to #FFFFFF, and place the smaller rectangle as shown in the image below.
create a small rectangle using the dimensions below. Change the foreground color to #FFFFFF, and place the smaller rectangle as shown in the image below.
![]()
![]()
We need to create the effect of the embedded button. Still on the same layer, click here to download the style and import it into Photoshop and add the effect to the small rectangle. You should have the effect I have below.
![]()
Create a new layer, Layer > New > Layer... (Shift+Ctrl+N). Using the Rounded Rectangle Tool
![]() create a small rectangle using the dimensions below. Change the foreground color to #c5c5c5.
create a small rectangle using the dimensions below. Change the foreground color to #c5c5c5.
![]()
Your rectangle should look like the image below.
![]()
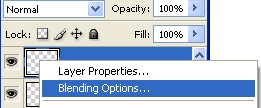
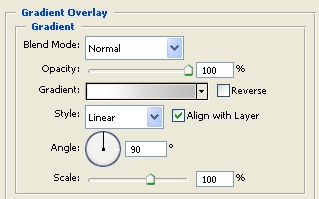
Right click on the small rounded rectangle and click Blending Options as shown below.
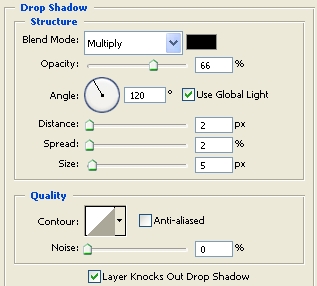
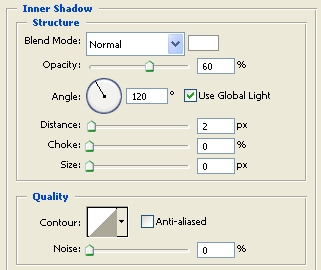
Now add the Blending Options setting below.
Drop Shadow
Inner Shadow
Gradient Overlay
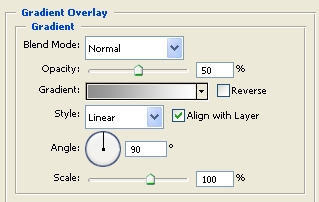
Gradient Overlay (Gradient)
Click ok when you have added the setting.
With that, you should have the effect below.
![]()
Now position the button over the gradient you created previously to get the effect in the image below.
![]()
Step3: Creating the display screen
Create a new layer, Layer > New > Layer... (Shift+Ctrl+N). Using the Rounded Rectangle Tool
![]() create a small rectangle using the dimensions below. Change the foreground color to #b1b1b1.
create a small rectangle using the dimensions below. Change the foreground color to #b1b1b1.
![]()
By using the setting above, create the rectangle below.
![]()
We need to add a gradient to the bar above. Right click on the layer you have just created and click Blending Options and add the setting below.
Gradient Overlay
Gradient Overlay (Gradient)
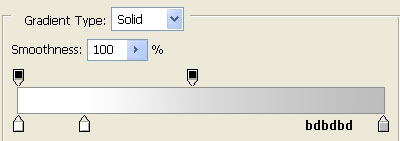
Click ok when you have added the setting.
With that, you should have the effect below.
![]()
Step4: Creating the Blue Screen.
Create a new layer, Layer > New > Layer... (Shift+Ctrl+N). Using the Rounded Rectangle Tool
![]() create a rectangle using the dimensions below. Change the foreground color to #7dcafc. This rectangle has to be smaller than the previous rectangle to give it the effect that it is imbedded into the display.
create a rectangle using the dimensions below. Change the foreground color to #7dcafc. This rectangle has to be smaller than the previous rectangle to give it the effect that it is imbedded into the display.
![]()
At this point, your image should look like the image below. Place that rectangle above the previous rectangle.
![]()
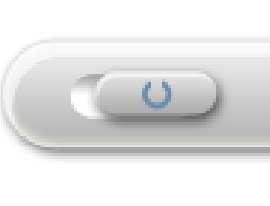
At this point, you should have the effect below.
![]()
Right click on the blue screen layer, click Blending Options and add the setting below.
Inner Glow
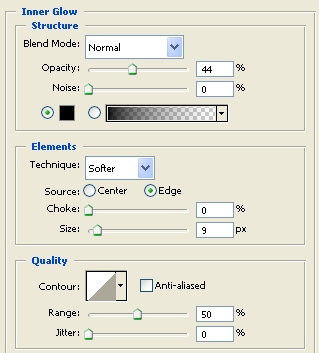
Click ok when you have added the setting.
Click on the layer and change the Opacity to 75 % as shown below.
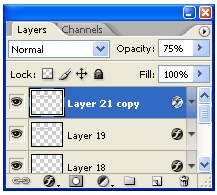
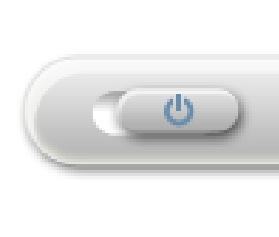
With that, your image should look like the screenshot below.
![]()
Step5: Power button logo.
I created this button using custom shapes as shown below.
![]()
Create a new layer; change the foreground color to 688cab. Click on the circular shape. Draw the circle while holding the shift key to get a perfect circle. Using the Rectangular Marquee Tool
![]() delete the top to get the effect below.
delete the top to get the effect below.
Using the Pencil tool at 1 pixel (px) with the same color (688cab). Draw a line on a new layer in the middle of the circle to get the effect below.
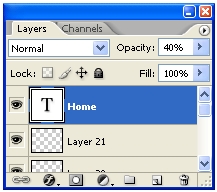
Step6: Adding Text.
When you are adding the text, make sure you change the Opacity on the text layer. Doing this will blend the text with the background, giving the effect off the text behind glass.
Finished:
Well that is it, hope it came out to what you expected.