Step1: Setting up work space.
Create a new image 800x600, Change the background color to white. Press Alt+Ctrl+0 to view the actual pixel of your work area. Create a new layer, Layer > New > Layer... (Shift+Ctrl+N) and name it Header1. Click on the Rectangular marquee Tool
![]() and create a rectangle using the settings below.
and create a rectangle using the settings below.
![]()
Fill the rectangle using the paint bucket
![]() with this color #3b5086. with that you should get the image below. (Had to resize the image for it to fit onto the page)
with this color #3b5086. with that you should get the image below. (Had to resize the image for it to fit onto the page)

Create a new layer, Layer > New > Layer... (Shift+Ctrl+N) and name it Header2. Click on the Rectangular marquee Tool
![]() and create a rectangle using the settings below.
and create a rectangle using the settings below.
![]()
Fill the rectangle using the paint bucket
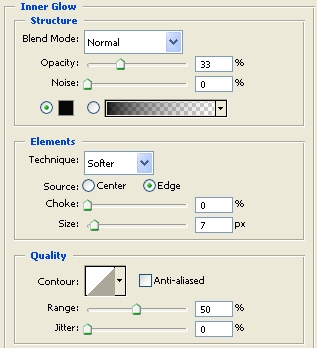
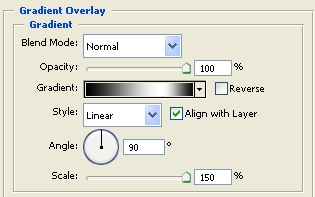
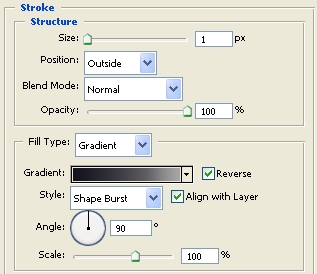
![]() with this color #c6c6c6. Now right click on the Header2 layer, click Blending Options and add the settings below.
with this color #c6c6c6. Now right click on the Header2 layer, click Blending Options and add the settings below.
Inner Glow
Gradient Overlay
Stroke
Click ok to add the settings. Position the image as shown below.

Create a new layer, Layer > New > Layer... (Shift+Ctrl+N) and name it Header3. Click on the Pen Tool
![]() and draw the selection below.
and draw the selection below.

Click here to download shape
Right click o the selection with the Pen Tool
![]() and click Make Selection, when the make selection window comes up set the Feather to 0 and click ok. Using the Paint Bucket
and click Make Selection, when the make selection window comes up set the Feather to 0 and click ok. Using the Paint Bucket
![]() fill the selection with #c6c6c6. With that you should have the image below.
fill the selection with #c6c6c6. With that you should have the image below.

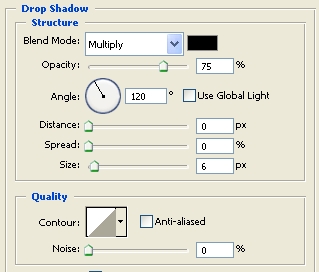
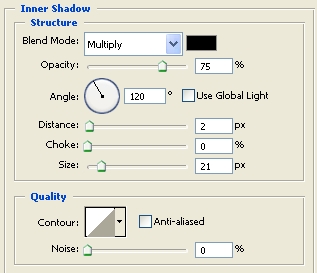
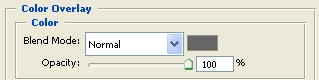
Right click on the Header3 layer and click Blending Option and add the settings below.
Drop Shadow
Inner Shadow
Color Overlay
Click ok to add the settings. With that you should have the image below.

Create a new layer, Layer > New > Layer... (Shift+Ctrl+N) and name it Line. Now click on the Pencil Tool
![]() set the Brush size to 1 pixel and the foreground color to black. Draw a line onto the white bar as shown below.
set the Brush size to 1 pixel and the foreground color to black. Draw a line onto the white bar as shown below.

Finished:
That's it, hope it came out to what you expected.