


This tutorial requires Adobe Imageready.
1. Make a new document in Adobe Photoshop, 88x31 or 88x11, with a white or transparent background.
2. Create a new layer:
![]()
3. Delete the layer called Background.
4. On the layer you just created, design the background for your button.
5. Put the text you want on a new layer, and rasterize it by right clicking on the text layer in the Layers Palette and clicking Rasterize Layer.
6. Ok here's the tricky part: We need to delete the part of the background which is behind the text, so we can move the text layer behind the background layer. To do this, Ctrl + click the thumbnail of the rasterized text layer in the Layers Palette to select it.
7. Now, with the text selected, single click your button's background layer in the Layers Palette and hit delete.
8. Move the text layer you made to the bottom by clicking it in the Layers Palette, and dragging to the bottom of the other layers. You should still see the text. If you don't, then you didn't do the last two steps correctly.
9. Now, the background layer you created should be on the top, and your rasterized text layer should be on the bottom, with the text showing through. That's all the layers you should have. Yes, this sounds pointless but it will allow the moving bar to only appear on the text.
10. We're going to make the moving bar now. Choose a color that you want the moving bar to be. I chose red.
11. Click on the text layer in the Layers Palette and hit the new layer button below:
![]() This should create a new layer above your text layer. Make sure it's completely clear. (has no content)
This should create a new layer above your text layer. Make sure it's completely clear. (has no content)
11. Ok now select the pencil tool by clicking and holding on the paintbrush tool. It's next to the thing that looks like a band-aid.
![]()
12. Draw a little vertical line to the left of your text on this new blank layer.
13. Go to File > Jump To > ImageReady or hit Ctrl + Shift + M.
14. On the ImageReady screen, if there isn't an Animation window, (probably on the bottom,) then go to Window > Animation.
15. Duplicate the first frame by clicking on the first frame, then hitting the little
 button in the Animation Window.
16. Now you will have two frames. Click on the second frame. Then click on the moving bar layer.
17. Hit V to select the move
![]() tool.
tool.
18. Now hold the right arrow key until the bar is all the way across your text.
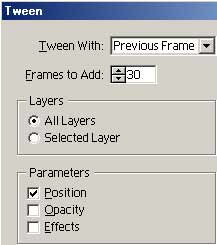
19. Hit the Tween button.
![]()
20. Use the following settings. You can change the number of frames, depending on how fast you want your stuff to move around.
21. Now you can hit play on the Animation Window and see it go.
22. To save, go to File > Save Optimized As...
23. Save it as a gif because jpg's don't show the animation.
24. Here is my final result (with a little more advanced layer and motion concepts):
![]()