Step 1.
Create a new 250X150 pixels document with the black background. Compose a text by 50% grey and rasterize this layer.

Step 2.
Choose the Magic Wand Tool (W) and select a text (holding Shift). Now save the selection (apply Select > Save Selection).
Step 3.
Go to channels palette. We have a new channel ("GOLD") there. Now press the right button of your mouse and choose "Duplicate Channel". Go to "GOLD COPY" and apply Filter > Blur > Gaussian Blur with the following settings: Radius->2,5.
Step 4.
Now press RGB channel and go to layers palette. Apply Filter > Render > Lighting Effects with the following settings: Light Type->Omni, Texture Channel->gold copy.

Step 5.
Apply Image > Adjustments > Curves (Ctrl+M) and use the following settings:
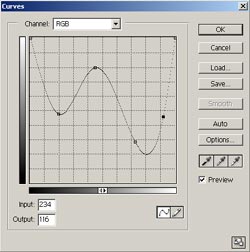
Step 6.
We have got a chrome text. Now apply Image > Adjustments > Hue/Saturation (Colorize->ON, Hue->+58, Saturation->+68) and we have got a gold text. And that's it.