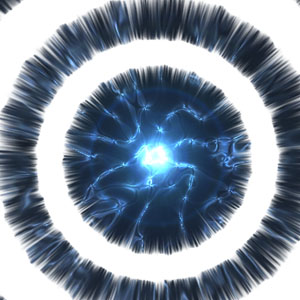
This effect... WOW... im jsut speechless! pretty easy also, this reminds me of a program from skyone... called Stargate, or a program like that
1. Make a new image, ours is 1000px x 1000px - with a white background
2. Fill the background with Dark Blue - we used #141A23
3. Create a new layer, and grab the marquee tool
4. Make a rectangle reaching from the very left hand side of your page, to the very right hand side at approximatley 125px high
5. Fill this with white - Hold CTRL and press D to deselect

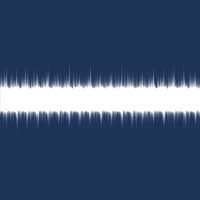
6. Click Filter > Distort > Ripple, and leave it at default settings - repeat this process another 3 times
7. Click Edit > Transform > Rotate 90 clockwise
8. Click Filter > Stylise > Wind = Wind - From the left
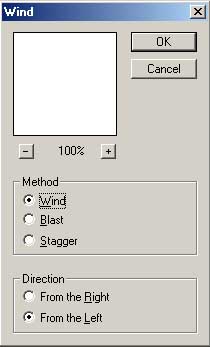
9. Do this 2 times in total - then the same again, but from the right
10. Click Edit > Transform > Rotate 90 counter clockwise
11. Hold CTRL and press T
Slightly drag the middle right hand side, and left hand side boxes, about 2cm past the borders of the canvas - then hit enter
12. Click Filter > Distort > Polar Coordinates - rectangular to polar

13. Duplicate that layer, and hold CTRL and press T to transform it - make it into a shape a little smaller than the current one - Hit enter

14. Hold CTRL and press A - then Edit > Cut - then Edit > Paste
15. Click the 2nd layer from the bottom on your layers palate, and do step 14 to that
16. Select your background layer. Click Layer > New > Layer and call it Lens flair!
17. Fill this layer Black
18. Click Filter > Render > Lens flair - and center it to the best you can
19. On the layers palate, set the blending options to colours dodge
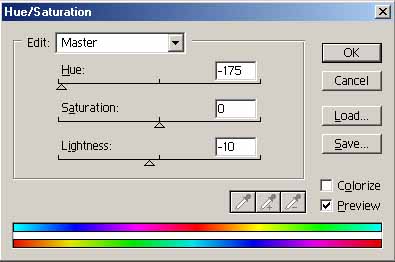
20. Hold CTRL and press U - and enter the following settings
21. Make a new layer called clouds, press D to reset your colours, and click Filter > Render > Clouds
22. Click Filter > Distort > Pinch - and give it 100% - then repeat this another 2 times
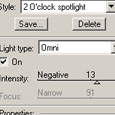
23. Click Filter > Render > Lighting Effects and give it the following settings :
24. Set the blending options on the layers palate to colour dodge. Then click Filter > Sketch > Chrome and give it defauly settings
25. Click Image > Adjust > Brightness + contrast - and set the contrast to +50
Merge all the layers by clicking Layer > Merge visible