Step 1
Open up a 500x500 white document
Step 2
Fill the background with a colour of your choice, in this tutorial I decided to fill it in with a darkish brown gradient. Now create a new layer, and select your rectangular marquee tool. Create the shape of your paper size, it can either be a perfect square, or a rectangle, it doesn't really matter. Fill the selection in with a very light gradient, I chose a very light grey, and a very light yellow.
Step 3
Now select your "Lasso Tool" which is located near the top left of your tool bar. Go around your rectangle/square and start deleting the sides of the square. The trick to this part is to gently go around the sides, and create ridges while your going down the sides. Once that is complete, your image should look like this.

Step 4
Now it's time to add a bit of colour to the piece of paper. There's two ways you could do this step, either use the burn tool and burn the tips of the paper, or use a soft brush tool and go over it with the sides. In this tutorial, I mostly used the burn tool, but you could use any method you like.
Step 5
Now it's time to add a little fold effect to the piece of paper. Create a new layer and then Alt+click the layer between both layers, and the layers should mask. Now pull out your rectangular marquee tool, and select 1/3 from the top of the paper and add a simple, light gradient.
Step 6
With your gradient placed on the top portion of the paper, right click "Layer 2" and goto Blending Options. Lower the opacity to 25% and while your in the blending options, add a Drop Shadow effect.
Step 7
Continue step 5 & 6 for the 2/3 portion of the piece of paper. Your image should now look like this.
Step 8
Merge all the layers that were masked into one. So now you should have Layer 1(paper layer) and a background layer with a dark brownish gradient. At this time, if your paper looks a bit uneven in colours, you could always select the burn tool and darken it up a bit. The next step to this tutorial is to add a simple noise, you can do this simply by going to (Filter - Noise - Add Noise). I suggest a 1-2% noise should do the job.
Step 9
So now your paper has a little texture, lets add a bit more! Create a new layer, and Ctrl+click on Layer 1(paper layer). By doing this, the selection of the paper should pop up. Select your Gradient Tool and use these settings.
Now go while in the selection with the gradient tool! After that step is completed, goto (Filter - Stylize - Emboss) and use the default options. With the embossed completed, change the opacity of the layer from 10-20%. Your image should now look like this now.
Step 10
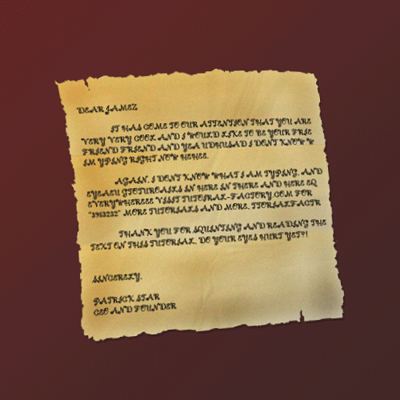
The discarded paper effect should now be done, you could go beyond this tutorial and add some perspective to the image, or even text. And here's what I came up with!