


Let's set up the image:
Width= 9 in
Height= 5 in
150 dpi
RGB
Background= White
Create a new layer and enter your type with the type mask tool. I'm using a large font set to 130 pts called Flat Iron. I found it on a free font site online... that is where most of my fonts come from, and if you enjoy typography there are some great ones available with a little searching. Fill the selection with black and duplicate the layer.
We are going to work with channels a bit for this one, so if they make you nervous have no fear. We'll take it nice and easy!
Select your channels pallete. Duplicate the green channel by dragging and dropping it to the new channel icon. Deselect your text and invert the color, so your type is now white on a black background. Rename this channel to 'shape' or something you will remember later.

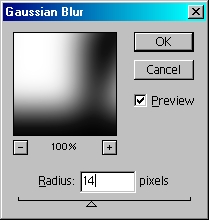
Run a gausian blur on this channel set to 14:
Hit Command/Control+L to bring up the levels. Move the sliders closer together until you have your type with the corners rounded off.
Go back to your layers, selecting the top layer, or the duplicate of the type layer. Go to Select>Load Selection and choose shape from the menu (or whatever you names your channel as). Create a new layer, and fil this with the radial gradient, upper left to lower right, white to green.

Drop the layer opacity to 92%, so you can just see the type beneath it.
Looks kind of ugly yet, huh? We'll fix that. First, go back to the channels. Duplicate the shape layer, and offset the selection down 8 pixels and to the right 8 pixels. Fill the selection with black, deselect, apply a gaussian blur 0f 4 and again round it off with the levels. Name this channel 'reflections'. Create a new top layer, go to Load Selection and choose this channel. You may need to contract the selection a bit so it doesn't go outside the bounds of our gradient fill. Fill the selection with white.

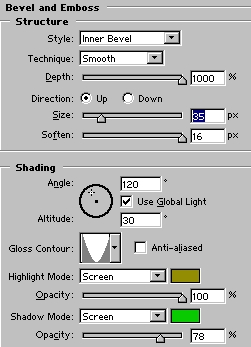
Now apply a bevel:
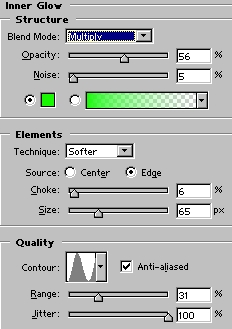
...and an Inner Glow:
We are going to work on the type below now, so save these settings as a layer style. I'm naming my slimey.
Make a selection of the slime layer and invert the selection. On the other 2 type layers delete the selection so the corners match the slime layer. Apply your new Layer Style to these layers... actually we only need one, so you can discard the other layer entirely.
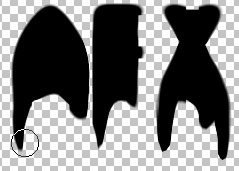
Apply Slimey to the lower type layer. Select the Liquify tool and make some 'drips' along the bottom of your type.
We need to tweak the layer style a bit. Add a drop shadow, a dark green inner glow, a lighter green color overlay, and another bevel:

Drop your layer opacity to 80.
Here's my image:
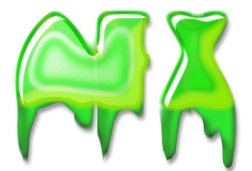
Now try applying some backgrounds and highlights. You can do this at your leisure... say, with the paintbrush tool, etc.

 Al Ward, a certified Photoshop Addict and Webmaster of Action FX Photoshop Resources (