

This tutorial with guide you through how to make company logos with the wind filter:
This tutorial takes in to account that you know the basics of Photoshop.
![]()
![]()
1. Open Photoshop and create a new image, 80x80
2.Set the Foreground Colour to #333333 and fill the background with it.
3.Create a new layer and draw a circle with the Elliptical Marquee Tool and fill it with #FFFFFF
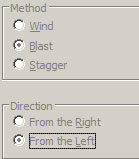
4.Go to Filter >> Stylize >> Wind and use these settings:
5.Press Ctrl + F to repeat this
6.Create a new layer and draw a smaller circle to go inside the other circle and fill this with any colour you like.

7.Now apply wind again but choose From the Right this time and only do it once.

8.Duplicate the layer and flip it horizontal and vertical
9.Ctrl + Click the layer to select it and fill it with another colour
10.Set the opacity of both of these layers to 80%
11.Add a reflection and a shine effect to the coloured areas and there you go:
![]()
![]()