
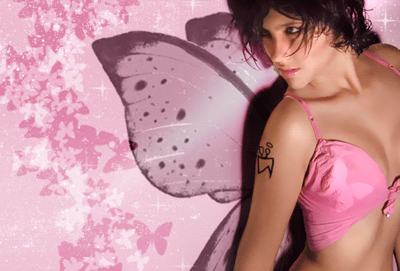
Hello! Today we area going to make a very cute Fairy Photo Composition, it looks very nice, and you can use it for any of your Beauty-Fashion photos.
For this tutorial we have prepared a nice Fantasy Brush set, you can download it here, inside you will find all the pre-designed images so you won't have to draw all of them and waste a lot of time.
If you don't now how to install the set follow this steps:
Loading Brush:
Now that you have download the Brush and placed it in your chosen directory just select your Brush Tool.

Then click on the down arrow on the Brush Options bar...
Now click the little right arrow and select the Load Brushes Option, and now just browse for your Brush on your Hard Drive.

Your Fantasy Brush set should be there by now, let's start the tutorial
Step 1:
Choose the photo you want to use, it can be a pro or a home photo, it doesn't matter, just - as always - try to get a photo with a solid background, you can take it in a wall, or something.
We recommend a pink background too, here we got a few steps background change tutorial. But you can do it with other colors too.
Step 2:
Then, select your brush tool.

Now, you have a set with 3 fairy wings brushes, you'll have to decide if you're using the two side brushes (left/right) or the brush with the two wings on it, it depends on the position of your photo character.
Now press Ctrl + Shift + N (to make a new layer) call it wings.
In your now layer, put the fairy wings, we use the color: #6c3d4e for them.
Now with the Eraser Tool, erase the parts of the wings that are covering the body.
Step 3:
Now, make a new layer (Ctrl + Shift + N) call it, "bttfly" or butterflies.
And with the Butterfly Brush, make the butterflies like this:
(we are using black #000000 for them, and remember that you have to change the Master Diameter setting cause every photo is on a different size.)
Ok, now change your bttfly's layers Blending Mode, choose: Overlay.
It will look like this: (the overlay color depends on your background layer)
Now make a new layer again (Ctrl + Shift + N) call it "little bttfly's" , reduce your brush master diameter and choose white color with the same Brush:
Change your "little bttfly's" Blending Mode, choose: Soft Light

Alright! Now it will look like this:
Step 4:
Make a new layer (Ctrl + Shift + N) call it "shine", now select your brush tool, and white color and choose one of the two shine Brushes in the set (the one you like most) and make something like this:
And we're finally you are done! We hope you like the effect, you can add some other details like the butterfly we've done in the shirt.