


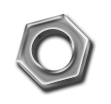
This is a great tutorial because you will never have to do it again. Once your are ready you have a custom shape with a layer style and can start doing screw nuts all over the place.
First create a new document, 300*300 pixel. Now you are going to create your own custom shape using the polygon tool. Make sure that Shape layers are checked (
![]() ). The polygon shall have six sides.
). The polygon shall have six sides.
Start exactly in the middle of the pic. You can see this in the infopalett under X and Y or use a guide.
When you are ready use the Ellipse tool (
![]() ) and make sure that Subtract from shape area are checked (
) and make sure that Subtract from shape area are checked (
![]() ). This time you also start from the middle. Holding Shift+Alt while doing this makes the circle expand from where you start. Try without holding down Shift+Alt one time and see the difference.
). This time you also start from the middle. Holding Shift+Alt while doing this makes the circle expand from where you start. Try without holding down Shift+Alt one time and see the difference.
When you are ready go to Edit>>Define Custom shape and name it Screw_Nut. Close the document.
Create a new document 300*300 pixel with white background. Use the custom shape tool and your new Screw_Nut shape and draw. Holding Shift down makes the shape keep it's original shape.
The layer style below are made when the screw nut is 200*200 pixels. Therefore look in the infopalett so that the width and height is 200*200 pixels. This is important.
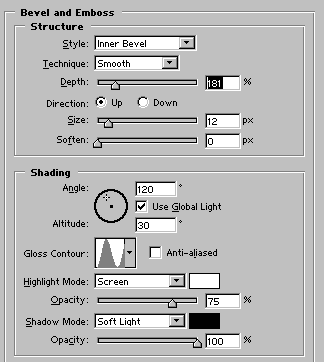
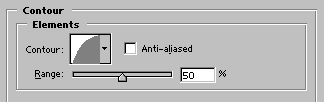
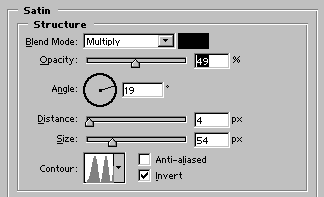
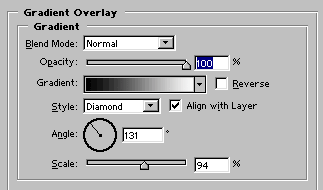
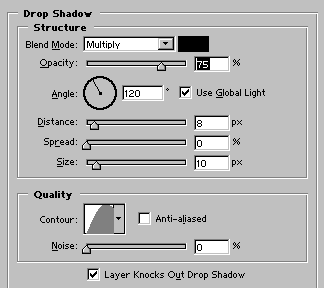
Here are my layer styles:
When you are ready you don't have to do another screw nut in the rest of your life:). Combine the custom shape and the layer style and start playing around. If you have any questions mail mail me.