In this tutorial, you will learn to create a nice looking Fire Text effect. Final output of the tutorial can be seen below :

Create a new file. Fill the background color with #870000. Type "TEXT" with VAG Round font, selecting 120 point size and having white color.

Press control+j to duplicate the layer. Hide the original text layer by clicking on eye icon in the layer palette. Now, rasterize this text layer. Control+click on its layer name in layer palette to select it.

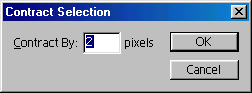
Go to Select>Modify>Contract and Contract the selection by 2 pixels :
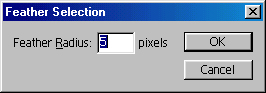
Right click on the selection while selecting any selection tool. Click on feather and set the feather radius to 5 pixels.
Press delete and deselect the selection by pressing control+d :

Press control+j for two more times.

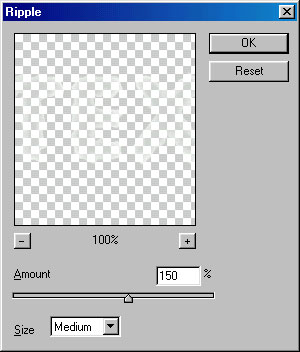
Now, go to filter>Distort>Ripple and apply these settings :

Press control+f for 8-10 times until you get the effect as shown in the picture :

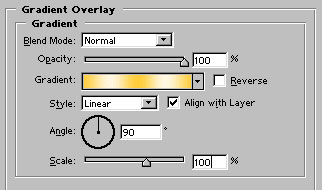
Apply gradient overlay in this layer as shown:

Now, click on first text layer to unhide it.

Apply these layer styles in it:
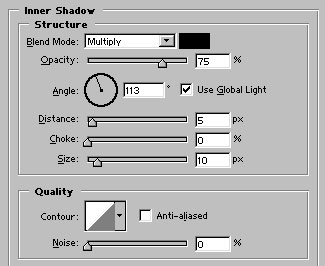
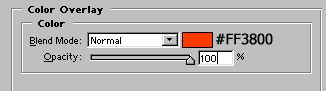
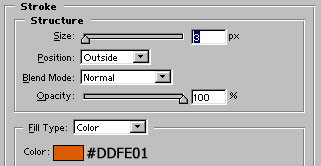
Image after applying above layer styles :

Click on the top layer (the layer in which we applied ripple filter). Press control+j to duplicate the layer. Press control+t and enlarge its size as shown. Press control+shift+{ to send it back.

Group and merge all the layers. Press control+j to duplicate the layer and change its layer style to overlay. You now have nice looking fire text :)