

Open a new file (File>New) that would have 450x450 px and 72 dpi.
Select after that Ellipse Tool (U) to represent the primary layer of loud speaker to be next.

The layer's parameters:
Fill 0% on the layers.
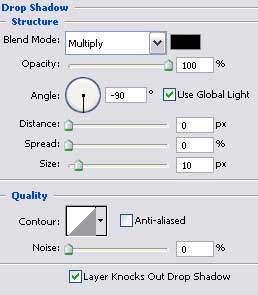
Blending Options>Drop Shadow
Blending Options>Gradient Overlay
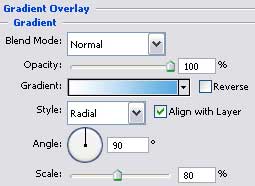
Gradient's parameters:

Blending Options>Stroke


Applying the same instrument, represent after that the lowest part of the loud speaker, which layer should be placed a little lower.

The layer's parameters:
Blending Options>Drop Shadow

Blending Options>Inner Glow

Blending Options>Gradient Overlay

Gradient's parameters:


Using the same instrument, (Ellipse Tool (U)), represent then the mobile part of the speaker.

The layer's parameters:
Blending Options>Outer Glow

Blending Options>Inner Glow

Blending Options>Gradient Overlay

Gradient's parameters:

Blending Options>Stroke


Apply the earlier used instrument to create now the inside central part of the loud speaker, colored in #313131

The layer's parameters:
Blending Options>Drop Shadow

Blending Options>Inner Shadow


Using again the same instrument, we have to picture now a flare situated on the central loud speaker's part.

The layer's parameters:
Fill 0% on the layers.
Blending Options>Gradient Overlay

Gradient's parameters:

