ActionScript for Newbies Contents:
- ActionScript for Newbies
- Starting with: What is ActionScript and what can you do with it?
- The ActionScript syntax
- Variables
- Using Functions
- Operators
- If...Else
- Creating functions
- Buttons
- Array
- Loops
- ActionScript math functions
- Movieclips and the dot syntax
- Movieclip properties
- Movieclip events
- Drawing with ActionScript
- Prototypes
- The Debugger
- Last Words
ActionScrpt for Newbies
This is the first part of the ActionScript for Newbies series of tutorials. In this tutorial we'll be covering the basics of ActionScript. Stuff you'll need to know before you use ActionScript.
I wrote this tutorial using Flash MX Professional 2004 but everything will apply for Flash MX and most also for Flash 5. I expect you to know how to use the Actions panel before reading this tutorial
Starting with: What is ActionScript and what can you do with it?
Flash has it's very own programming language. It looks very much like JavaScript but has (to my opinion) much more functions. It's possibilities are allmost endless. You can create whole programs using Flash (though not as extensive as 'real' programming languages like C++) and you can create rich and dynamic internet applications. A Flash-site cannot live without a bit of ActionScript and most eye-candy is scripted in ActionScript. Some animation tricks are easily made in ActionScript where as if you use motion tweens it would be much more complex. But here's the downside: it will take some time and practise before you can do these things. In this tutorial we'll start simple by introducing some common and usefull programming tactics and to make a simple calculator. The best way to learn ActionScript is to look at the code other people wrote and learn how they dit it. You can find open source fla files on allmost every flash site.
The ActionScript syntax
ActionScript has a syntax just like every language. Like the full-stop we put after each sentance you need to put a semi-colon on the back of each ActionScript statement. If you don't do this, Flash could get confused what to do. A missing semi-colon is often the source of a lot of trouble. So don't forget them.
Each string (group of characters) needs to be between single or double quotation marks. Each quotation mark you start, must be ended unless it's part of the string like the sentence: My teacher says: "Mark! Get out of my sight!". If you would enclose it in double quotation mark's you would get this problem (the actual string is in bold and what the computer sees as ActionScript is normal):
"My teacher says: "Mark! Get out of my sight!".";
So the problem would be that the computer sees the text Mark! Get out of my sight! as ActionScript thus, displaying a error message because it isn't valid ActionScript. There are two ways of fixing this problem. The first and most simple is to use single quotation marks so the string won't terminate itself:
'My teacher says: "Mark! Get out of my sight!".';
This way is based on the rule that if a string is started by a certain character, it must also be ended by the same one. So the double quotation mark's can't be mistaken for characters that terminate the string.
If you type a string without quotation marks, it will be used as a variable. What that is we will learn later.
Moving on, a number that is between a set of quotation marks isn't used as a number, but as a string. So if you want to use mathematical functions on it, it won't work because you need to use a number for that. So if you want a number to be used as a number you need to type it without any quotation marks.
Boolean values (true or false) are never set between quotation marks, just like numbers. If you do put true or false between quotation marks it will be used as a string (maybe boolean values puzzle you now, but they can be pretty handy sometimes).
Any code between brackets is executed first just like in math. Remember all brackets that are opened must be closed again. This is a very frequent mistake.
You can also have code between {'s and }'s. We will see later when this is used.
This is basicly the syntax. There's a bit more to come in the next few chapter though...
Variables
Variables are the most used things in any programming language. Without variables, programming won't be able to exsist. Variables are pieces of memory which can hold information like strings, numbers and boolean values. You can create a variable pretty simply. Just type the name of you variable and then close the statement with a semi-colon. A variable name can be made up of letters, numbers and underscores. A variable name cannot start with a number. Here's the way to declare a variable:
| myvariable; |
This way, it doesn't do much good though. To make it usefull you need to be able to assign a variable:
| myvariable;
myvariable = 12; |
First the variable is declared (myvariable;) and then it's assigned a value (myvariable = 12;). You don't need to use the two lines of code for it though. You can also declare a variable and then assign a value to it at the same time:
| myvariable = 12; |
This is probbely the best programming practise because otherwise you could use the variable without any value assigned to it. This can result in chaos. Even if you don't know the initial value it's best to set it to 0 or if it's a string, make a empty one ("" or '').
Using the value in a variable is pretty easy. Just type the name of the variable in a statement and the value in the variable will be used as if it's a normal value.
There's also a second way to make a variable: var myvariable; or var myvariable = 1; If you use this way, the variable will be deleted if it isn't used afterwords. This is better because it's deleted from the memory which stops the memory to klog up (PDA's will be thankfull if you use var when possible thank's to their low memory).
Using functions
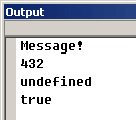
Functions are fragments of code that can be used over and over again. Flash has a lot of built in functions to make life easy. Like the function random to generate a random number. Functions can have a few parameters passed to it so it can become more usefull. Like the function trace. That function displays a message in the output window. Without the parameter it could only show one text, so that's when a parameter comes in handy. Heres how you use trace:
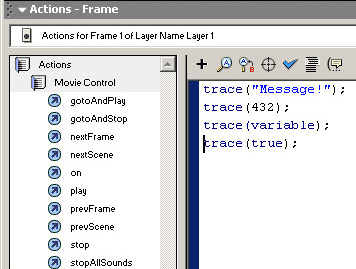
| trace("Message!"); |
or
| trace(432); |
or
| trace(variable); |
or
| trace(true); |
The parameter that needs to be passed is the message to be displayed. If a function doesn't need a parameter then you use it like this:
| function_name(); |
Or if the function has more than one parameter:
| function_name("parameter1", "parameter2", "parameter 3"); |
Let's use the function random() and see what happens. First random() needs one parameter: The range of the number to be generated. So if you want a number between the 0 and 9 you set 10 as parameter. Random() also gives us a return value, which can be read into a variable for later use or used in a statement directly. This simple program displays a random number in the output window:
| var randomnumber = random(11);
trace(randomnumber); |
You can also do it a bit quicker:
| trace(random(11)); |
Note that this is better for memory usage, but if you want to use the same number ever again in you program, it's not an option.
Operators
Working with operators is unavoidible when working with ActionScript. Operators can do loads of things very quickly. One could say that a operator is a substitute for a simple function. Like the '=' operator you use to assign values to variables. Flash could also have had a functuion like: assignVar(variable, 'value'); Instead you just do: variable = 'value'; The '=' operator is called a assignment operator because you assign something with it. There are more assignment operators. Here's a list of them and what they do:
Assignment Opperators
= assign a value to a variable;
+= add the given value to the variable;
-= subtract the given value to the varialbe;
/= divides the variable by the given value;
*= multiplies the variable by the given value;
%= sets the variable to the remainder of the division of the variable by the given number
To explain everything here's a little example:
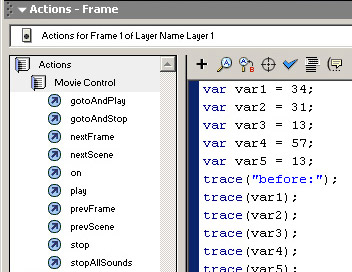
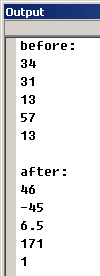
| var var1 = 34;
var var2 = 31; var var3 = 13; var var4 = 57; var var5 = 13; trace("before:"); trace(var1); trace(var2); trace(var3); trace(var4); trace(var5); trace(""); var1 += 12; var2 -= 76; var3 /= 2; var4 *= 3; var5 %= 2; trace("after:"); trace(var1); trace(var2); trace(var3); trace(var4); trace(var5); |
Arithmatical operators
+ adds the two given values and returns the result;
- subtracts the two given values and returns the result;
* multiplies the two given values and returns the result;
/ divides the two given values and returns the result;
% divides the two given values and returns the remainder;
Basicly these operators are exactly the same as the assignment operators except for the fact that they don't assign but just do math. Note that the + operator can also stick two or more strings and variables to eachother. This happens as soon as a string gets stuck with something else. So ""+9+3 will give you a string containing 93.
Comparison operators
== returns true if the two values are the same;
!= returns true if the two values are different;
>= returns true if the left value is bigger or the same to the right value;
<= returns true if the left value is smaller or the same to the right value;
> returns true if the left value is bigger than the right;
< returns true if the left value is smaller than the right;
=== returns true if the two values are the same in both content and type;
!== returns true if the two values are different in both content and type;
The last two aren't used very often.
Logical Operators &&
The AND operator. Returns true only if both values are true;
|| The OR operator. Returns true if one of the values are true;
! The NOT operator. Makes true from false and false from true;
Other operators
There are some other operators that I didn't write down (like the bitwise operators). Those operators are practicly not used, and confusing if you don't know how a computer exactly works.
If..Else
This is one of the most used things. This makes it possible to react to things. And the best thing is... it's really easy! Here's how it basicly works: A statement is done and if it's true, some actions will be executed. If false nothing will happen unless... there's a else block. Here's a little code fragment:
| var var1 = 10;
var var2 = 9; if (var1 == var2) { trace("var1 is equal to var2!"); } else if (var1 == 9) { trace("var1 is 9!"); } else { trace("var1 is not equal to var2 or 9..."); } |
Look! The comparison operators are here! The first one returns true only if var1 is equal to var2, and the second one returns true if var1 is equal to 9. Try playing with the values a bit, see what happens. Try making your own comparisons. You can add as much else if blocks as you want and you can leave the else block if you want. You can also nest another if block inside a if, else if or else block. Of course, now this isn't a very usefull piece of code. This becomes very usefull if you get user-input.
Creating Functions
Knowing how to create functions is pretty handy in bigger projects and can save loads of time, because once you made a function, you can use it a unlimited number of times. And if it's a function that can be used by more people, you could put it on internet so that other people can learn from it. Anyway, back to creating functions. It's pretty easy. You only need to declare a variable which is a function. Pretty wierd huh? It's easier than you think. Here's a little code fragment:
| myFunction = function() { trace("myFunction called!");
} |
This function has no parameters, no return value, and is called myFunction. Whenever you call this function (with myFunction();) the text 'myFunction called!' will appear in the output window. If you want to add some parameters, you can do something like this:
| addValues = function (value1, value2) {
trace(value1 + value2); } |
This function has no return value, but two parameters called value1 and value2. The two values are added up and then traced onto the output window. Note that the variable names specified in the function decleration can be used as variables in the function. Now we'll go for the gold and make a function with a return value!
| addValues = function (value1, value2) {
return (value1 + value2); } |
The function return quits the function and returns the value in it's parameter! Pretty easy huh?
Buttons
You can also add actions to buttons. This can give a nice action-reaction response. Like when you click on a button, it takes you to another place in the move. To use actions on a button, you need a event-handler to specify when the actions need to be executed. The most common is the release event handler. This event is triggered when the user clicks on a button and releases with the mouse still over the button. So let's do some coding. Make a button, and then put this code on it:
| on (release) { trace("button is clicked");
} |
The on keyword is a indication that a event handler is coming up. In our case, release. Between the { and the } you can put any code that needs to be executed when clicked. In our case, just a simple trace() function.
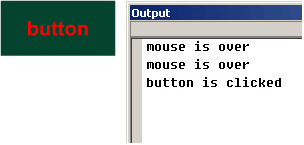
You can also add more events, like the rollOver event:
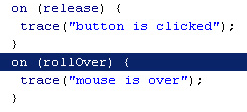
| on (release) {
trace("button is clicked"); } on (rollOver) { trace("mouse is over"); } |
You can add as many event handlers as you want on a button. Here are all the events:
press - Called when the user clicks. The mouse doens't have to be released;
release - Called when the user clicks and releases the mouse;
rollOver - Called when the user takes takes the mouse over the button;
rollOut - Called when the user takes the mouse out of the button area;
dragOver - Called when the user clicks outside and drags inside the button area;
dragOut - Called when the user clikcs inside and drags outside the button area;
keyPress - Called when the user presses a key (old event, I'll descuss this later);
Array's
When using a lot of data seperate variables isn't the way to go. It's only difficult to manage. So that's why something exists called a array. A array is like a row of books that are assigned a number. If someone tells you the number, you just look it up and there you've got your book. It works the same way with data. You create a array, and you populate (=fill) it with data. Array's are very usefull when you want to apply things on cimilar objects. Like with a array you can increment all the numbers without having to acces all the variables seperately. You'll discover how to do that in the next chapter. Now here's how to make and populate a array:
| myArray = new Array("thing1", "thing2", "thing3", "thing4", "thing5"); |
You can acces a certain thing like this:
| myArray[0]; |
The number between the square brackets is the index-number. It starts at zero, so the first one has a index-number of zero. The second one a index number of one and so on.
A popular use for array's is to make a kind of database. Like if you want to save all the data of your friends in a array, you just create a few array's. One for his/her name, another one for his/her email etc.
| name = new Array("Mark", "microchip");
mail = new Array("markd[at]mydomain[dot]nl", "mark[at]mydomain[dot]com"); |
You can simply acces both pieces with the index number:
| trace(name[0]);
trace(mail[0]); |
If you use this tecnique make sure you give the name and the corresponding data the same index number. There is also another way to populate you array. First define a array:
| myArray = new Array(); |
And then:
| myArray[0] = "thing1";
myArray[1] = "thing2"; |
That's also what you do if you want to edit a record in a array. So:
| myArray[0] = "thing1";
myArray[0] = "edited"; |
Believe it or not, there is still another way to make a array:
| myArray = ["thing1", "thing2"]; |
This way you don't need to use the new Array() function. It work's the same as the first way, only it's shorter. I prefer this method.
Array Functions
Using index numbers isn't allways the best way to handle arrays. Specialy if your dealing with user input you don't know how many things there in a array. And sometimes it's just shorter. So now I'll tell you something new. A array is what you call a object. A object is made from a class which is like a bilding paper for something. A object can contain some functions. A object can also contain properties. Some properties are read-only (like the length property of the Array object), but some you can assign a value to just like a normal variable. Here are the functions and properties contained by any Array object:
lengte = array.length; - This property holds the number of elements in a array.
element = array.pop(); - This function returns the last element of a array and deletes it.
lengte=array.push(extravalue:string, [etc...]); - This function add's one or more elements to a array.
array.reverse(); - This function reverses the array.
array.shift(); - The same as array.pop() only with the first element.
array.splice(from:nummer, to:nummer) - This function deletes all the elements between the two numbers.
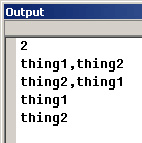
Here's a little example:
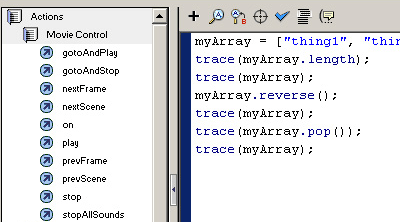
| myArray = ["thing1", "thing2"];
trace(myArray.length); trace(myArray); myArray.reverse(); trace(myArray); trace(myArray.pop()); trace(myArray); |
Try it. Also try making your own little test programs. That's the best way to learn.
Loops
Loops are extremely nifty things in ActionScript. With loops you can repeat a piece of code loads of times. At first, it doesn't look nifty at all (at least that was my first reaction), but look closer and see the possibilities. Right! You can use them to loop throug an array, and do stuff with their values! There are 3 types of loops. The while loop, the for loop and the do...while loop.
The while loop
The while loop is a very all round loop. It can be used for anything. You won't use it much in the beginning though you'll learn to appreciate it later.
| while (condition) {
to be executed code; } |
This loop is pretty easy to understand: It will repeat the code UNTIL the condition turns false. So if the condition is true, the loop will be done. Let's make a little sample program. This program will be run until the random number that is generated is 5. So...:
| randomNrs = [];
rndnr = Math.round(Math.random()*10); while (rndnr != 5) { randomNrs.push(rndnr); rndnr = Math.round(Math.random()*10); } trace(randomNrs); |
This program keeps adding random numbers to a array until the number 5 is generated. If 5 is generated the first time, no number will be added because the condition is false the first time.
The for loop
The for loop is the most used loop in Flash. It's very easy to make the loop run a certain number of times. Here's the syntax: for (start; condition; end) { to be executed code; } The start 'parameter' (between quotation marks because it isn't really a parameter) is the line of code that needs to be executed before the loop starts. Normally this is a number definintion. The condition is the same as the while loop, and the end line is the piece of code that's executed each time a iteration has finished. Here's a example: for (var i=0; i!=100; i++) { trace(i); } Not much of a use but it demonstrates what it can do. The variable normally has the name of 'i' because it stands for iterator. Just remember the name doesn't have to be 'i'. You can also achieve this result with the while loop. It's just a matter of preference:
| i=0;
while (i!=100) { trace(i); i++; } |
The do...while loop
Here's the last loop in ActionScript and thus also the last loop I'm discussing. Here's the syntax:
| do {
to be executed code; } while (condition); |
Notice that the condition is checked AFTER the loop is done. So let's get back to the example of the while loop. Let's say you want the 5 to be in your array. You do this:
| randomNrs = [];
do { rndnr = Math.round(Math.random()*10); randomNrs.push(rndnr); } while (rndnr != 5); |
Now the 5 is put in the array, just like all the other numbers.
Break and continue
You can use these to statements to control loops. The continue statement skips the rest of the current iteration and goes on to then next. Break terminates the whole loop. Continue is very nifty when you want to apply some changes to let's say a array, except for one. Here's a example:
| myArray = (1, 2, 3, 4, 5, 6, 7, 8, 9, 10, 11, 12);
for (var i=0; i!=myArray.length; i++) { if (myArray[i] == 5) { continue; } myArray[i]++; } |
This code incremets each element of the array myArray with one, except for the element with the content of 5. Now for the break statement. Let's say you want the loop to stop if the random number generated is 5 or 9:
| while (Math.round(Math.random()*10) != 5) {
if (Math.round(Math.random()*10) == 9) { break; trace('loop is broken by break statement'); } } |
Danger: Endless loops
Loops come with one catch: If you design them incorrectly they will be a endless loop. That means they just can't stop. This can result in the viewers computer slowing down until Flash comes into action (it will display a message that a script is making the computer slow). Here's a example of a endless loop:
| for (t=0; t!=-1; t+) {
trace('loop done'); } |
This loop will go on for ever because if the iterator get's higher each time, how can it ever reach the value of -1?
ActionScript Math Functions
ActionScript comes with a set of mathematical functions. If you know how to use them (and if you know the math behind them), you can do great things with Flash (very nice effects). If you don't know how to use them, you can still do nice things, but with math everything can be taken to new heights. But, there's still some time between now and then. Anyway, here they are the most important: Math.abs (number) This function returns the absolute value from zero. Very usefull if you want to know the absolute difference between two numbers
Math.ceil (number) - Rounds the number up to the nearest integer (1.000001 becomes 2).
Math.floor (number) - Rounds the number down to the nearest integer (1.99999 becomes 1).
Math.max(number1, number2) - Returns the highest number.
Math.min(number1, number2) - Returns the lowest number.
Math.pow(base, exponent) - Returns the power of the two values (Math.pow(2, 16) returns 65536)
Math.random() - Returns a random number between 0 and 1.
Math.round() - Rounds the number (1.5 becomes 2 and 1,49 becomes 1).
Math.sqrt(number) - Returns the square root of number.
Math.sin(angle) - Returns the proportion of the opposite side over the hypotinuse. Angle in radians.
Math.cos(angle) - Returns the proportion of the adjacent side over the hypotinuse. Angle in radians.
Math.tan(angle) - Returns the proportion of the opposite side over the adjacent. Angle in radians.
Math.asin(proportion) - Returns the angle in radians of the proportion of the opposite over the hypotinuse (arc-sine).
Math.acos(proportion) - Returns the angle in radians of the proportion of the adjacent over the hypotinuse (arc-cosine).
Math.atan(proportion) - Returns the angle in radians of the proportion of the opposite over the adjacent (arc-tangent).
Here are the most important mathematical constants:
Math.PI - Contains the number PI (approx 3.14159).
Math.SQRT1_2 - Contains the sqare root of a half.
Math.SQRT2 - Contains the sqare root of 2 (approx 1.4).
Movieclips and the dot syntax
Now were going to use movieclips and the dot syntax. The dot syntax was introduced in Flash 5. It's pretty easy to understand. Think of a movie with movieclips as a harddisk with folders. First you've got the root-folder (_root in Flash), and then you have various other folders. Each folder has it's name. So do movieclips (called instance names. Often confused with symbol names and id names). You can acces all the variables, properties and functions in a movieclip with the dot syntax. Just type the path with each movieclip seperated by a dot. After that you type the variable/property/function name. Here's a example. Let's say you have two movieclips in your _root. The first's instance name is mc1 and the second has a instance name of mc2. In mc2 there are three other movieclips, with the instance names of mc1, mc2 and mc3. You CAN give two movieclips the same instance name provided they are in different timelines. Otherwise Flash doesn't know which one you want to acces. Anyway here's a piece of code for testing the dot syntax.
| _root.mc1.var1 = "Hi, I'm var1";
_root.mc1.arr1 = new Array("first", "second"); _root.mc2.var1 = "Hi, I'm var1. Same name as the one in _root.mc1 but, I'm in _root.mc2!"; _root.mc2.mc2.var1 = "Same 4 me: "+_root.mc2.var1; _root.mc2.mc1.var1 = "Quote: "+_root.mc2.mc2.var1"; |
See how each movieclip has a different variable with the same name. Movieclips are like seperate worlds. They don't intefere with eachother. Try tracing them:
| trace(_root.mc1.var1); |
You don't have to do it this way. You can also define the variables seperately in all the movieclips:
| _root.mc1:
var1 = "Hi, I'm var1!"; _root: trace(_root.mc1.var1); |
It's as easy as that. It works the same way with functions:
| _root.myMc.gotoAndPlay(3); |
| _root.myMc.myFunction = function (param1) {
//stuff } |
the same with properties (we'll cover this a bit later):
| _root.myMc._x = 50; |
So far we have used normal absolute paths. You use these when you know for sure that a certain movieclip is in a certain place. With these absolute paths, you can call the movieclip from every place in the movie, no matter where, without having to change any code. But sometimes (specially when developing 'universal' movieclips that can be used in a lot of occasions) you want to use relative paths. You need them if you know how a part of the movieclip structure looks like - and that it's allways the same - and you want your movieclip to work everywhere, no matter where. So let's say you have mc1 in _root and mc2 in mc1. To acces mc2 from mc1 you would normally do: _root.mc1.mc2. But with relative paths, you just do mc2. It copies the path in which the calling movieclip is in, and uses it to create the path of the called. Neat! Sometimes you also need to use the relative path 'this'. This allways referres to itself. This is usefull when defining functions outside the targeted movieclip. In some cases you might need '_parent'. _parent referres to the movieclip in which the calling movieclip is. You can use _parent as much times as you want, like: _parent._parent._parent.mc2. This referres to the movieclip with the instance name mc2 in the parent of the parent of the parent of the calling movieclip. There's a nice little macro in Flash that creates relative paths for you. It's the button with the thing that guns use to hit their target. Just select the movieclip and voila, you have a relative path in you actionscript.
MovieClip properties
MovieClips have certain properties that change the apperance. Like the property that holds the x-coordinate of the movieclip. Or the property that dertermines if a movieclip is visible or not. When you change a property, the changes to the movieclip are done automaticly. Here are the most important:
_alpha - Holds the see-through-ness of a movieclip. It ranges from 0 to 100. 100 is fully visible and 0 is totally see-through.
_currentframe - Read-only. Holds the frame-number of the frame that is being played.
_height - Holds the height of a movieclip. If you change it, the _yscale property will also be affected.
_rotation - Holds the rotation of a movieclip in degrees.
_target - Holds the full path of the movieclip.
_visible - Determines if a movieclip is visible or not. This is not the same as setting the _alpha to 0. When _alpha is 0, things like button events will still be executed. When _visible is false, this won't happen.
_width - Holds the width of a movieclip. If you change it, the _xscale property will also be affected.
_x - Holds the x coordinate of a movieclip.
_y - Holds the y coordinate of a movieclip.
_xmouse - Holds the x coordinate of the mouse, in a movieclip.
_ymouse - Holds the y coordinate of the mouse, in a movieclip.
_xscale - Holds the scaling by x in percent.
_yscale - Holds the scaling by y in percent.
You can acces/change the properties the same way as you change variables. Just with the path and the name:
| _root.bleh_mc._xscale = 300; |
Movieclip events MovieClips have a set of events, just like buttons. MovieClip's also have acces to the button events like onPress and onRelease AND they have more advanced events like onEnterFrame. onEnterFrame is by far the most used. To use events you need to know a few things. First is that when you assign a function to a event, something happens. First a function is made. That function consitst of commands. Those commands are saved in the computer memory. The name of the function is like a adress to the part of the memory where the commands are held. So there is a difference between functionName() and "functionName". If you use the first, the function will be executed. If you use the second the adress TO the commands are given. That said, let's start events:
| MovieClip.eventName = function to be executed; |
That's the basic syntax. You assign a function to a event of a movieclip. There are two ways of declaring the function that needs to be executed when the event is triggerd. The first is to define the function on the same spot as where the event is assign. The second is to first define the function and then assign the function to the event. The first one is best if you only need to assign certain commands only once. The second one is best if you need to use a function more than once. Here's a example of the first way:
| _root.onEnterFrame = function () {
trace("_root.onEnterFrame triggered"); }; |
And here's a example of the second way:
| myFunction = function () {
trace("myFunction called"); } _root.onEnterFrame = "myFunction"; |
I think the first example is fairly straightforward. You make a function and assign it to the enterFrame event of the _root movieclip. The second one is a bit more complex. Like I said before, the name of a function is a adress to the function. Think of it like a key. If you give the key to someone, they can open the door. If you open the door for them, the result only comes out. So you need to give the key (the name) of the function to the event so that they can open the door each time the event is triggerd. Some events give parameters to the handling functions. Like the onLoad event of the XML object. The parameter is if a file is loaded with succes or not. In that case you need to give the handling function a parameter:
| _xml.onLoad = function (succes) {
} |
or
| loadFunc = function (succes) {
} _xml.onLOad = "loadFunc"; |
It's as easy as that. Now that you know that, you can start using the events:
onEnterFrame - Triggered each time a new frame is displayed.
onLoad - Triggered when the movie has finished loading.
onKillFocus - Triggered each time the movieclip loses focus (a object has focus when it's been clicked on. Like in a textfield when the cursor is there).
onMouseDown - Triggered when the mouse is pressed.
onMouseUp - Triggered when the mouse is released.
onMouseMove - Triggered when the mouse is moved.
onSetFocus - Triggered each time when a movieclip recieves focus. The parameter given is the movieclip/button that last had the focus.
onUnload - Triggered when the movie is unloaded.
Don't forget that movieclips also have button event's like onPress and onRelease.
If you want to use key events in a movieclip, you will need to use a little trick because movieclips aren't informed when a key-event is called. So you need to make sure that they do. You do it with this simple line of code:
| Key.addListner(mc); |
After this line of code, you can use key events on movieclips (onKeyPress).
Drawing with ActionScript
New in Flash MX: The drawing API. With these new set of functions one can draw on the stage at runtime. Ideal for a simple drawing programme or something in that area. So let's get coding. I find it a good programming practice to make a seperate movieclip for drawing in. You can easily create a movieclip at runtime with: MovieClip.createEmptyMovieClip("instancename", depth). When using this function, you must NOT give two movieclips the same depth, or they will get a conflict. That means that only one, or even none of the two movieclips are shown. The simplest way to solve this is to make a variable for each movieclip in which you plan to add movieclips at runtime. The variable holds the depth for the next movieclip. Each time a movieclip is made, the variable will be incremented. Drawing is easily done with drawing methods that belong to the movieclip class (remember what that is?). There are two functions that actualy draw a line. Those are lineTo(), and curveTo(). The first one draws a streight line to the given x and y coordinates. The second one draws a line to the given coordinates but, you give two extra coordinates. Those exert a force on the line and deform it to make it curve. A little sample program later. There is one more function you need to actualy be able to draw. That is moveTo(). If you only use lineTo() or curveTo, it will draw from the last point that was drawn to. After a movieclip is cleared or if it hasn't been drawen in yet, the starting point is 0, 0. So if you want to change that, you need to use moveTo. Before showing some code there is one more function you need to know. That is lineStyle. With lineStyle() you define what the line looks like. If you don't define the lineStyle Flash will draw a line, that is there for the computer, but that is not visible. Finaly here's a piece of code:
| drawing_mc = _root.createEmptyMovieClip("draw_mc", 0);
drawing_mc.lineStyle(3, "0xFF0000", 100); drawing_mc.moveTo(100, 100); drawing_mc.onEnterFrame = function () { lineTo(Math.random()*550, Math.random()*400); } |
This program draws a line to a random point each time the onEnterFrame event is called. Nice to demonstrate. As you see the createEmptyMovieClip function has a return value. That return value is the movieclip on the stage. So if you put it in a variable, you can acces it via that variable. The lineStyle function needs 3 parameters. The first is the thickness of the line, the second is a number from 0 to 2^24 or a string with a hexadecimal number in it and the third is the alpha (=see-throughness) of the line. The moveTo() funciton needs two parameters, the x and y value where the drawing pointer needs to be moved to. The lineStyle has two parameters, the x and y value that needs to be drawen to (after that the drawing pointer is moved to those coordinates). Now for curveTo(). First create 3 movieclips that can be dragged. With the instance name drg1, drg2 and drg3. This is the code:
| on (press) {
this.startDrag(); } on (release) { stopDrag(); } |
Now use this code:
| _root.createEmptyMovieclip("draw_mc", 0);
draw_mc.lineStyle(1, "0x006600", 100); draw_mc.onMouseMove = function () { draw_mc.clear(); draw_mc.moveTo(_root.drg1._x, _root.drg1._y); draw_mc.curveTo(_root.drg3._x, _root.drg3._y, _root.drg2._x, _root.drg2._y); } |
As you see, you can also access the newly created movieclip with it's instance name, it's all up to you! The clear() function doesn't need any parameters. It just cleares all the drawen lines out of the targeted movieclip. You know moveTo so now curveTo(). The first two parameters are the x and y coordinates of the point that deformes the line. The second two are the x and y coordinates where the line needs to be drawen to. Use this program to get a feel of how the curveTo function acts. You can also fill your newly created drawings. Do that with the functions beginFill() and endFill(). beginFill needs two parameters, the color in a number from 0 to 2^24 or a hexadecimal value. This function indicates that the shape created with moveTo, lineTo and curveTo needs to be filled. After using beginFill() you need to end the fill with endFill(no parameters needed). Otherwise it will keep on filling objects. Here's a little test:
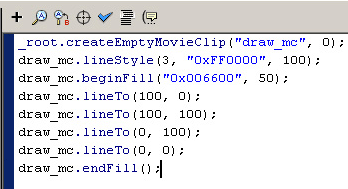
| _root.createEmptyMovieClip("draw_mc", 0);
draw_mc.lineStyle(3, "0xFF0000", 100); draw_mc.beginFill("0x006600", 50); draw_mc.lineTo(100, 0); draw_mc.lineTo(100, 100); draw_mc.lineTo(0, 100); draw_mc.lineTo(0, 0); draw_mc.endFill(); |
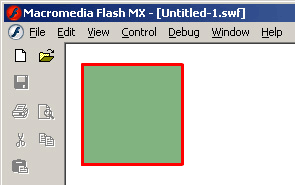
Try it.
Prototypes
Prototypes are extremely usefull for using stuff, easily. Prototypes are extentions on normal classes, like the MovieClip class. You could extend the movieclip class in such a way, that you had another drawing API function. Let's say, drawCircle() or drawRightAngle(). You could also use just a normal function, only then you need to add another parameter. Another good thing about prototypes is that they are very newbie friendly. If you create a prototype, a newbie just copies and pastes it, and then he/she can easily use it. First let's make our prototype: drawRightAngle().
| MovieClip.prototype.drawRightAngle = function(xmin, ymin, xmax, ymax) {
this.moveTo(xmin, ymin); this.lineTo(xmax, ymin); this.lineTo(xmax, ymax); this.lineTo(xmin, ymax); this.lineTo(xmin, ymin); }; |
First you define the type of object you want to extend (in our case MovieClip, mind the capitals), then you use the keyword prototype, then type the function name, and then define it as a function. Now you have a nice new prototype and you can use it as follows:
| my_mc.drawRightAngle(0, 0, 100, 100); |
Leave the keyword prototype out of the call, because the function is part of the MovieClip class now. The targeted MovieClip is referred to as this in the prototype. You MUST use 'this' in a prototype. Prototypes aren't limited to MovieClips. You can create a prototype for every class. Like the array or string class:
| Array.prototype.getFirstElement = function () {
return this[0]; } |
or
| String.prototype.getFirstChar = function () {
this.subStr(0, 1); } |
Use it like this;
| firstchar = my_str.getFirstChar();
firstelement = my_arr.getFirstElement(); |
It's as easy as that!
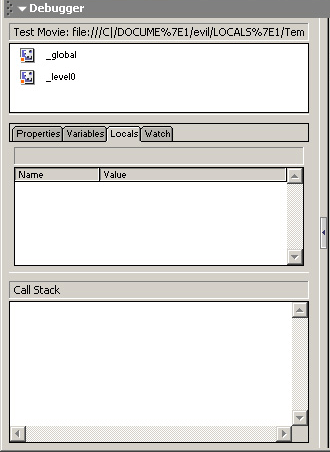
The Debugger
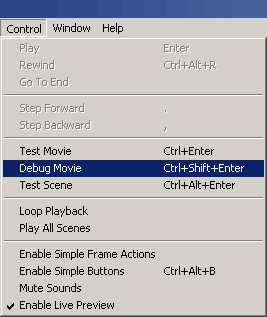
Whenever scripting a large program, you will imediately run into stuff that don't work. If you get a syntax error, things are pretty easy to repair. Like a little semicolon that's missing or something like that. But sometimes Flash doesn't display any error, and nothing happens. The debugger is a good solution to those problems. To use the debugger, choose Debug Movie from the control menu. In the debugger you can see and change variables and properties at runtime. To make the debugger stop at some point so you can inspect/change you variables, you need to establish breakpoints. When you click on the blue line on the left of the actions window a red dot appears. This is a breakpoint. When you debug a movie Flash stops at that line of code so you can instpect stuff. Like if you forgot to increment a variable, you could see if a variable changes or not. To view or change variables or properties you click on the properties or variables tab on the left side. To add breakpoints at runtime choose a script from the drop down menu on the right.