


Introduction
Macromedia Flash is the vector based industrial standard authoring tool for producing artwork, animations, interactive movies and rich internet applications.
The Flash package contains a variety of media to help the user learn the program quickly, which includes Introductory Lessons, Short Tutorials, Online Help (F1) that opens in Web browser, a built-in ActionScript Reference panel and Dictionary. In addition, there are third-party resources available to Flash designers and developers.
However, a beginner level user may find it difficult to search a topic from this vast help database and to grasp some of the fundamental concepts, which I would like to cover in this article. Please note that all the topics are not covered here, but I will be detailing all major aspects required to give a solid foundation to start working on Flash. Wherever possible, I will also point out the related lessons available in FlashMX package.
Though most of the concepts explained here work identically on all versions of Flash, I've written this article from Flash MX point of view.
Well, now let us dive directly into the subject. Here we go!
The user interface
Flash user interface consists of a Stage and a set of Panels.
Stage
Stage or Workspace is the rectangular area, where the content for individual frames in the movie is composed.
Content can be newly drawn or imported from external sources.
Panels
The number of panels varies from Flash version to version. I will be explaining four panels here, which are most relevant for our discussion.
- Tools Panel
- Timeline Panel
- Library Panel
- Properties Panel
Tools Panel
If the Tools Panel is not visible, choose Window > Tools
Anyone who is familiar with common graphical tools would be able to identify the tools in the tools panel. Point the mouse over each of them to view the tooltips and respective keyboard shortcuts.
The tools panel is divided into 4 categories.
- Draw/Edit Tools - consist of tools for drawing and editing purposes.
- View Tools - consist of tools for viewing the entities drawn on the workspace.
- Colors - consist of line (stroke) and fill color selectors displaying the currently chosen colors
- Options - displays advanced options/modes for using the selected draw/edit tool.
For an introduction to drawing in Flash
Choose Help > Lessons > Illustrating in Flash.
FlashMX - choose Help > Lessons > Illustrating in Flash
FlashMX 2004 - choose Help > How Do I > Draw in Flash
Timeline Panel
If the Timeline Panel is not visible, choose Window > Timeline
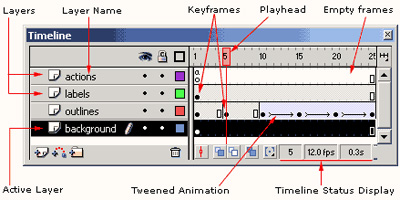
Timeline organizes and controls a movie's content over time in layers and frames. The major components of the Timeline are layers, frames, and the playhead.
As shown in figure above, a normal timeline consists of mainly the following components
- Layers
- Frames
- Tweens
1. Layers:
Layers are like transparent film sheets stacked on top of each other, each containing a different image that appears on the Stage. The upper layers are represented on the top of lower layers. Layers help to organize the artwork in a document. Layer names are listed in a column on the left side of the Timeline. In the layer names area, the active layer will be highlighted. Frames contained in each layer appear in a row to the right of the layer name. The header at the top of the Timeline indicates frame numbers. The red colored playhead indicates the current frame displayed on the Stage and while animating, as time progresses, the playhead keeps moving to the right.
For an introduction to layers:
FlashMX - choose Help > Lessons > Understanding Layers
FlashMX 2004 - choose Help > How Do I > Work with Layers
2. Frames:
Flash movies divide lengths of animation time into discrete units termed as frames. Each frame is set to be displayed for a certain fraction of time. The number of frames played per second is known as Frame speed of the movie. By default, for a flash movie the frame speed is set to 12 frames per second. The status display at the bottom of the Timeline indicates the selected frame number, the current frame rate, and the elapsed time to the current frame.
In the timeline figure, there are some frames marked with black dots. They are known as Keyframes. A keyframe is used to define a change in an animation or include frame actions to modify a movie. Flash can tween, or fill in, the normal frames between keyframes to produce smooth animations.
3. Tweens:
Tweened animations are those where the user defines the starting and ending frames (keyframes) and Flash generates the content for the frames in between. To create tweened animation, create starting and ending frames. Then use motion tween or shape tween (from properties inspector) and let Flash create the animation for the frames in between. Flash varies the object's size, rotation, color, or other attributes between the starting and ending frames to create the appearance of movement.
For an introduction to tweens:
FlashMX - choose Help > Lessons > Creating Tweened Animation
FlashMX 2004 - choose Help > How Do I > Creating a Timeline Animation
Library Panel
If the Library Panel is not visible, choose Window > Library to view a panel as shown in the figure.
Library panel holds various design elements (also known as Assets) used while building the animation/application. These building blocks in short are known as Symbols.
Symbols:
Symbols are re-usable building blocks for a Flash animation. The Library panel is where you store and organize symbols created in Flash, as well as imported files, including bitmap graphics, sound files, and video clips. Depending on the purpose of usage, Flash categories symbols into three depending on the behavior. These are Graphic, Button and Movieclip. Each time a symbol is dragged on to the stage, an 'instance' of the same gets created. An Instance is an exact copy of a symbol, which gets created on the stage and forms a part of the Flash movie.
The properties of these instances may be altered, but the original symbol inside the library won't get affected. But, to edit a symbol itself, double-click on its icon in the library to open it in edit mode on the screen. Any changes done to a symbol will automatically be reflected on all its instances.
For an introduction to symbols:
FlashMX - choose Help > Lessons > Creating and Editing Symbols
FlashMX 2004 - choose Help > How Do I > Creating Symbols and Instances
Properties Panel
If the Properties Panel is not visible, choose Window > Properties
Properties Panel is also known as Property Inspector. Select a frame in the timeline and all the related editable properties are listed here. While starting a new document, the document properties are listed. To view the properties of any element on the stage, just select it with the arrow tool. The Property Inspector also changes to give quick access to frequently used features of the tool or asset currently been working with.
Flash documants and flash movies
Flash documents (files with .fla filename extension) contain all the information required to develop, design, and test interactive content. Flash documents are not the movies the Flash Player displays. It displays Flash Movies (filenames with .swf extension, published from the .fla files), which contain only the information needed to display the movie.
Conclusion
The basic concepts required to start working on Flash is covered. I hope this article would help a beginner to get a feel about the user interface and design aspects. However I would suggest some detailed reading on the above mentioned topics, using the search facility in the online help of the Flash package.