


Adobe Photoshop CS2 is an image editor created by Adobe Systems. It's software has many valuable features, and is possibly one of the best ones out there. Today, we will learn how to use its basic functions.
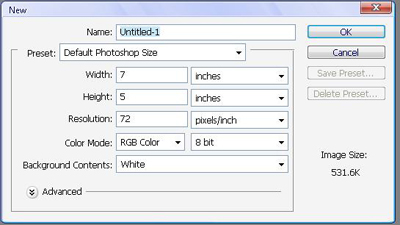
First, we will start by creating a new file:
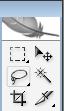
These are the first six buttons you will see in your menu. The selection tool,
![]() ,is used to select a part of the document. This is generally useful when you wish to either: delete a portion of the document, but not all of it, or edit a specific portion of it. If you click the
,is used to select a part of the document. This is generally useful when you wish to either: delete a portion of the document, but not all of it, or edit a specific portion of it. If you click the
![]() and hold it, you will see different selection types which you may use to your benefit. There is the:
and hold it, you will see different selection types which you may use to your benefit. There is the:
![]() , which selects in a circular shape, the
, which selects in a circular shape, the
![]() , which splits the document horizontally, and the
, which splits the document horizontally, and the
![]() which does it vertically.
which does it vertically.
The move tool,
![]() , will do exactly as it is named, it will move your image to wherever you wish to relocate it.
, will do exactly as it is named, it will move your image to wherever you wish to relocate it.
The lasso tool,
![]() , will come in useful when you wish to select something that is not a rectangle or circle. Nevertheless, an even better tool to do this is the
, will come in useful when you wish to select something that is not a rectangle or circle. Nevertheless, an even better tool to do this is the
![]() , which will be very useful when tracing an object with many sides. Finally, if you wish to select a truly "odd" object which seems too time consuming with the lasso and polygon lasso tool, you want to use the magnetic lasso tool.
, which will be very useful when tracing an object with many sides. Finally, if you wish to select a truly "odd" object which seems too time consuming with the lasso and polygon lasso tool, you want to use the magnetic lasso tool.
![]() . This wonderful tool will trace the object on its own while you drag your cursor throughout the image you wish to select. Once you are done tracing it, as you may notice this tool does it practically on its own, (continue holding the mouse click), press enter. The image will now be selected for your use.
. This wonderful tool will trace the object on its own while you drag your cursor throughout the image you wish to select. Once you are done tracing it, as you may notice this tool does it practically on its own, (continue holding the mouse click), press enter. The image will now be selected for your use.
The magic wand tool,
![]() , is really useful to select a background out of an image. Don't you just hate when your image has a white background and you wish to make it transparent, for a logo, or sig, etc? Well use this tool, and click on the white area, and press delete. Magic!
, is really useful to select a background out of an image. Don't you just hate when your image has a white background and you wish to make it transparent, for a logo, or sig, etc? Well use this tool, and click on the white area, and press delete. Magic!
The crop tool,
![]() , is like a selection tool, except it will take the section you cropped, and make it a new document. Therefore, everything that was not cropped gets deleted. This is useful when you have made your document too big, just select a smaller size, press Crop!, and your document should become smaller.
, is like a selection tool, except it will take the section you cropped, and make it a new document. Therefore, everything that was not cropped gets deleted. This is useful when you have made your document too big, just select a smaller size, press Crop!, and your document should become smaller.
The last tool, I personally don't recommend, as for starters, it may be a little complicated to understand its use.
Confused? Are you not seeing some of the buttons? Remember, there's only six buttons in the menu to the left, but clicking and holding some of them will bring out different types.

Here we have eight more tools, but for right now, I rather only introduce six of them, as the spot healing brush,
![]() , and the clone stamp tool,
, and the clone stamp tool,
![]() , are really not necessary for starters.
, are really not necessary for starters.
The brush,
![]() , can be really useful. When clicked on, you will see the brush menu at the top.
, can be really useful. When clicked on, you will see the brush menu at the top.
![]()
This menu has various features, which include the modes of painting, type of brush, and the brush itself. Right now the most important is the brush
![]()
so click and hold it until you see the drop down menu
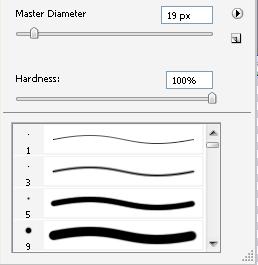
Within this menu you can edit the size, by variating the Master Diameter. Also, you can edit if the brush will be faded or strong, by changing the hardness. Below these two features, you will see a significantly long list of brushes. If you scroll down, you will see infinite types such as stars, grass and more. Feel free to play with these until you find the brush that fits your needs!
The Art History brush,
![]() , will be truly useful when you have already painted above old work. Using the art history brush will clear the above paint, and reveal what is underneath. It can come in handy at times ;)
, will be truly useful when you have already painted above old work. Using the art history brush will clear the above paint, and reveal what is underneath. It can come in handy at times ;)
The eraser tool,
![]() , does the very simple task of erasing, as you may know. This is a very easy to use tool, and its size can be changed in the same menu where the brush features were.
, does the very simple task of erasing, as you may know. This is a very easy to use tool, and its size can be changed in the same menu where the brush features were.
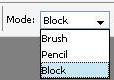
The block mode will work like a simple eraser, while the Brush/Pencil mode will be more creative, as you may choose the size and form of the eraser.
Then we have a pretty common button. The gradient tool,
![]() , is mainly used to create a blend with two or more colors. As seen in the image, the Gradient can go from white to black, and you'll see some grey in between, as part of the blend. You can do this with as many colors as you'd like, and whichever colors you'd like. There are also different designs near the top of the page
, is mainly used to create a blend with two or more colors. As seen in the image, the Gradient can go from white to black, and you'll see some grey in between, as part of the blend. You can do this with as many colors as you'd like, and whichever colors you'd like. There are also different designs near the top of the page
![]()
which can prove themselves useful. If you click and hold the gradient tool, you will see one of the most common tools on any image-editing/creating software. The paint bucket.
![]() , I assume the paint bucket must be pretty easy and clear to use, as to which colors to use, it is explained below.
, I assume the paint bucket must be pretty easy and clear to use, as to which colors to use, it is explained below.

The foreground/background tool helps you choose which color you want to use. For instance, when using the gradient, the foreground will always be first (wherever you first click and drag). The two arrows flip the FG/BG colors, and the bottom left button re-establishes the colors to black and white. To change it, simply double click.
The blur tool
![]() will, as its name says it, blur the image. It will generally make it 'softer'. If you click and hold the blur tool, you will also see the sharpen tool
will, as its name says it, blur the image. It will generally make it 'softer'. If you click and hold the blur tool, you will also see the sharpen tool
![]() which does practically the opposite, making the image rougher. You will also see the
which does practically the opposite, making the image rougher. You will also see the
![]() tool which will mix the area being smudged. It's as if you combined two colors in a pot and started mixing them, that's kind of what the smudge tool is all about.
tool which will mix the area being smudged. It's as if you combined two colors in a pot and started mixing them, that's kind of what the smudge tool is all about.
Finally, the dodge tool
![]() will, in a way, desaturate the page, making it look a bit lighter. As contrast, the burn tool
will, in a way, desaturate the page, making it look a bit lighter. As contrast, the burn tool
![]() , will make things look darker, as if you were 'burning' the image. The sponge tool
, will make things look darker, as if you were 'burning' the image. The sponge tool
![]() has both features to de-saturate or saturate the image as you may see at the top of the page (after clicking in the sponge tool).
has both features to de-saturate or saturate the image as you may see at the top of the page (after clicking in the sponge tool).
In these eight tools, the Path Selection Tool
![]() is the one that is really not important for beginners. Then we have the Text tool,
is the one that is really not important for beginners. Then we have the Text tool,
![]() , and its pretty much like any other text tool, I will explain some more features to the text tool in another tutorial.
, and its pretty much like any other text tool, I will explain some more features to the text tool in another tutorial.
The Shape tool
![]() is used to create basic shapes, and if you click and hold the shape, you will see many others.
is used to create basic shapes, and if you click and hold the shape, you will see many others.
Nevertheless, sometimes you need a custom-made shape, so we have the useful pen-tool,
![]() , which can create any shape you want as long as you make it, press enter to finish making the shape.
, which can create any shape you want as long as you make it, press enter to finish making the shape.
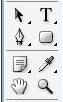
The
![]() notes tool can really serve purpose if you wish to put reminders in the images.
notes tool can really serve purpose if you wish to put reminders in the images.
Then, the eye dropper tool,
![]() , is useful as you can use it to select a color in the drawing if you don't know precisely what it is.
, is useful as you can use it to select a color in the drawing if you don't know precisely what it is.
The hand tool,
![]() , can be helpful when you wish to move an image around if you don't like its current location.
, can be helpful when you wish to move an image around if you don't like its current location.
The zoom tool,
![]() is, as the name states, to zoom into the image.
is, as the name states, to zoom into the image.
That's it, thank you for your time, I hope this tutorial helped you!
