Step 1
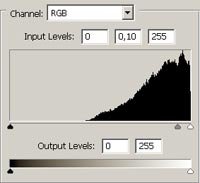
Create a new 450X450 px document with a white background. Press D to reset colors. Now apply Filter > Render > Clouds and then Filter > Render > Difference Clouds. Apply Image > Adjustments > Invert or press Ctrl+I. Then apply Image > Adjustments > Levels with the following settings (move a blur center):
Step 2
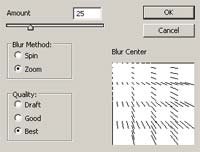
Apply Image > Adjustments > Color Balance with the following settings: Color Levels - 0, 40, 100; Tone Balance - Midtones, Preserve LuminosityON. Apply Filter > Blur > Radial Blur with the following settings:
Step 3
Duplicate a layer and set the blending mode as "Lighten". Apply Filter > Distort > Twirl with the Angle:+300. Merge down two layers (Ctrl+E).
Step 4
Duplicate a layer and set the blending mode as "Lighten". Apply Filter > Distort > Twirl with the Angle:-600. Merge down two layers (Ctrl+E).
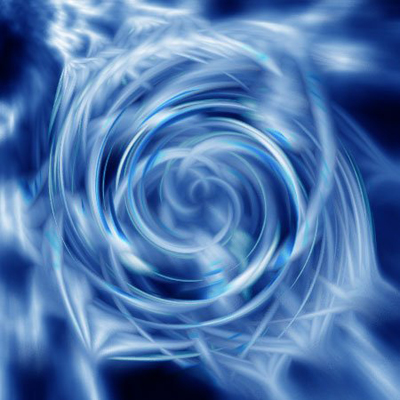
Step 5
Duplicate a layer. Apply Filter > Distort > Twirl with the Angle - +300. Set the blending mode as "Pin Light" and then apply Image > Adjustments > Color Balance with the following settings: Color Levels - 0, 0, -45; Tone Balance - Midtones, Preserve Luminosity - ON. Merge down two layers (Ctrl+E). And that's it.