Take out the gradient tool, and set your foreground to #FFFFFF and your background to #A2A2A2.
Click at the top of the canvas, and drag down to the bottom while holding shift to get a 90 degree gradient.
Press control-shift-alt-n to make a new layer.
Take out the rectangular marquee tool and select fixed size from the style drop down menu.
Make the size 800 px by 120 px and make the selection about 10 pixels down from the top of the canvas.
Set your foreground color to #FF0000, make sure you are on the new layer, and press alt-backspace with the selection active to fill the selection.
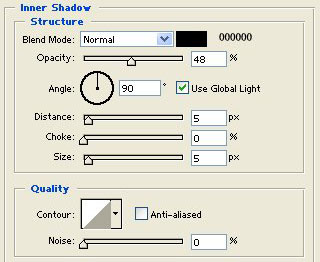
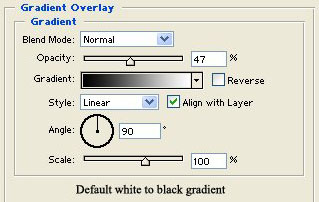
Apply the following blending options to the layer you filled the selection on:
Inner Shadow:
Gradient Overlay:
Now press control-shift-alt-n to create a new layer
Take out the rectangular marquee tool and make a fixed selection of 800 px by 60 px on the top part of the red banner we just made.
Set your foreground color to #FFFFFF and press alt-backspace to fill the selection with white.
Set the opacity of that layer to around 18%
Press control-shift-alt-n to make a new layer.
Take out the rectangular marquee tool and make a fixed selection of 800 px by 50 px about 3 pixels below the red banner.
Set your foreground color to #FF0000 and press alt-backspace while the selection is active.
Right click the banner layer and select copy layer style.
Right click the layer where we made a 800 px by 50 px red bar and click paste layer style.
Right click the layer mentioned on the line above and select blending options.
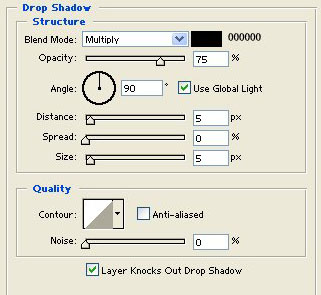
Uncheck inner shadow and apply the following blending option
Drop Shadow:
Press control-shift-alt-n to create a new layer.
Take out the rectangular marquee tool and make a fixed selection of 800 px by 25 px on the top of the 800 px by 50 px red bar we made.
Set your foreground color to #FFFFFF
Set the opacity of this layer to around 18%.
Press control-shift-alt-n to create a new layer.
Take out the rectangular marquee tool and make a fixed selection of 700 px by 550 px, 50 px from the left/right of the canvas, and about 22 px from the bottom of the canvas.
Apply the following blending options to this layer:
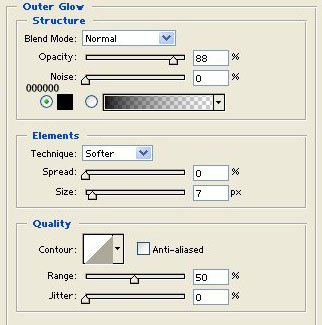
Outer Glow:
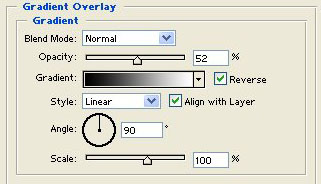
Gradient Overlay:
Press control-shift-alt-n to create a new layer.
Make a fixed selection of 700 px by 60 px on the top part of the layer that we just applied blending options to.
Make sure the selection is centered and at the top part of the above mentioned layer, just touching the outer glow.
Set your foreground color to #FF0000 and press alt-backspace while the selection is active to fill it.
Right click on the layer we filled a 800 px by 50 px selection with red on and select copy layer style.
Right click the layer we filled with red on the top part of the 700 px by 550 px box and select paste layer style.
Right click the above mentioned layer and select blending options.
Now uncheck the drop shadow check box and press ok.
Press control-shift-alt-n to create a new layer.
Make a fixed selection of 700 px by 30 px on the top part of the 700 px by 60 px red bar we made recently.
Set your foreground color to #FFFFFF and press alt-backspace while the selection is active to fill it.
Set the opacity of this layer to around 18%.
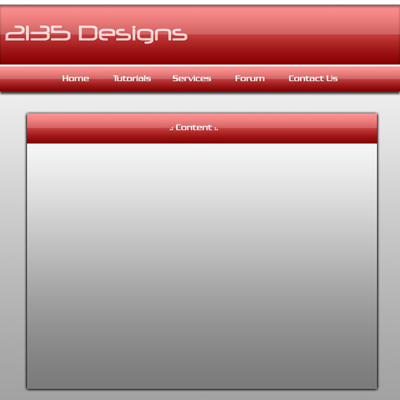
You are now done and can add text to each of the red bars (800 px by 120 px is the banner, 800 px by 50 px is the nav bar, and 700 px by 50 px is the content box header)
You should end up with something like this: