


Step 1
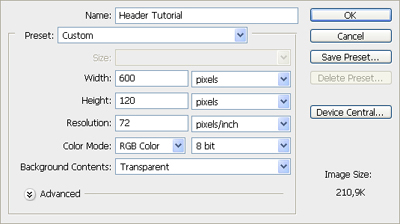
Okay, so let's get this started. First of all make new document, by going to File -> New or simply click ctrl+N. Choose your size depending on your templates size where you are making this for. Size used for this banner is 600x120 pixels. Set the Background Contents to Transparent.
Step 2
Select rectangular marquee tool (
![]() ) from the tools menu. Now put the style of the tool to fixed size and select area of 729x63.
) from the tools menu. Now put the style of the tool to fixed size and select area of 729x63.
Select the area from the top of the first layer of the new document.
Now use gradient tool (
![]() ) and add gradient from olive green (b4c845) to little lighter green (cade33). Make the darker part coming from top.
) and add gradient from olive green (b4c845) to little lighter green (cade33). Make the darker part coming from top.
Simply drag the darker color coming from the up and make this gradient just for the selected area.

Step 3
Select again rectangular marquee tool (
![]() ) and select area of 42x42.
) and select area of 42x42.
Use the size of 42x42 and select area from the next layer. Use color between red and brown (c65b3f) and make square of selected size. Then press Ctrl + T and rotate it. Then add Stroke layer to it, with 6pxl stroke and select white color. Then add little drop shadow to it with default settings.

Step 4
Make new layer and repeat that last step, but now make square of gray color (7b7b69). Move it to right side of the previous square.

Step 5
Now repeat that step again to a new layer. Use rectangular marquee tool, make the square, rotate it, add stroke and drop shadow. Just like in the 3rd step. Now use color of olive (8b9c2e). Move this square right side of the last made one.

Step 6
Again repeat that step once more. This time use color of yellowish (d8da2b). Again move this right side of the last made square.

Step 7
Duplicate the first layer, where you made the gradient map to half of the banner. From the layers panel move the duplicated layer to top and move it to fill the bottom of the tag, so half of the squares will be hidden.

Step 8
Use horizontal type tool (
![]() ) and make texts under the half squares. So the squares will be the buttons. Use font called Silkscreen expanded. Modify the blending modes of the text layer.
) and make texts under the half squares. So the squares will be the buttons. Use font called Silkscreen expanded. Modify the blending modes of the text layer.

Now it should look something similar to this

Step 9
Next create a bar of 2pxl wide. Set the left side color to black and right side color of white, so there will be 1pxl of both colors. Make each of them between the squares.

Use lasso tool (
![]() ) and select area around the bar, add some feather from the options. Add vector mask (
) and select area around the bar, add some feather from the options. Add vector mask (
![]() ) from the layer window (If your layer window isn't open, open it from Windows - Layers), then lower the fill of this layer to 41%.
) from the layer window (If your layer window isn't open, open it from Windows - Layers), then lower the fill of this layer to 41%.

Step 10
Select rounded rectangle tool (
![]() ) and make white rounded shape to the empty spot of the banner. Use white color.
) and make white rounded shape to the empty spot of the banner. Use white color.

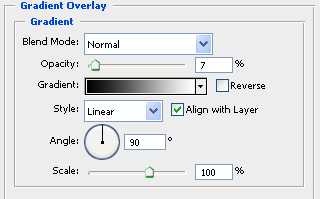
Edit the blending options now and add first drop shadow using this settings:

After that add gradient overlay using these settings:
Now it should look something similar to this:

Step 11
Use next the horizontal type tool again, and lets add some text to the shape we just made. In this banner the text what was used is Century Gothic. Color of the font is gray (6a6a6a).

Step 12
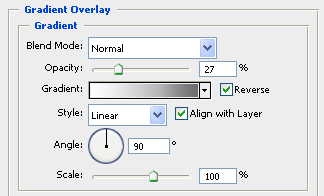
This is the final step. Now duplicate the text layer and flip the duplicated layer by Edit - Transform - Flip Vertical. Then move it down to under the original "SigTutorial" text. After that edit the fill of this layer and lower it to 0%. Then add gradient overlay to blending options like this:
Then your final outcome should look similar to this:

Hope you enjoyed it and learned something new!