
Step 1.
Open a photo and duplicate the layer (apply Layer > Duplicate Layer...). Choose the Elliptical Marquee Tool and make a round selection (holding Shift). Press Ctrl+Shift+I to inverse a selection and then press DEL. Apply Select > Deselect.

Step 2.
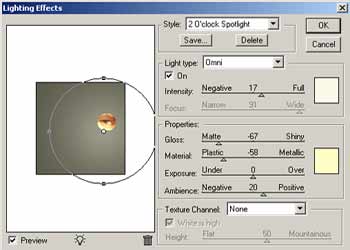
Apply Edit > Free Transform... and make a selection larger. Apply Select > Load Selection... and then apply Filter > Distort > Spherize (Amount->65%). Apply Select > Deselect. Apply Filter > Render > Lighting Effects... with the following settings:

Step 3.
It's time to make a magnifier effect for the photo. Apply Select > Load Selection... and then create a new layer. Apply Select > Modify > Expand (3 pixels) and fill this selection with any colour (apply Edit > Fill...). Apply Select > Modify > Contract (5 pixels) and press DEL. Choose Line Tool (weight->5px) and draw a short line. And that's it. See how you applied a magnifier effect to the photo using Adobe Photoshop 7:
