


Alright, so lets get started. Some of the things you will need today is well for one your hands, Kristen ITC Font, and a background to start on. If you don't have the Kristen ITC Font, try to look for something similar on DaFont. I used a darkish blue background with a pattern overlay, use mine if you wish to achieve the same results.

Lets add our text, i used the tittle of the website along with a slogan. The color used in mine #ffd506.

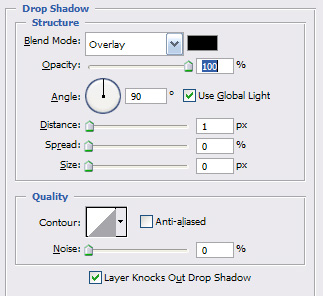
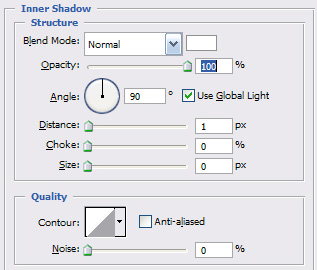
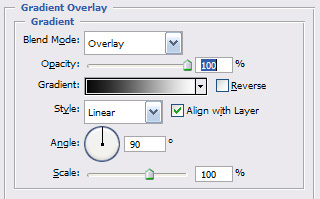
Now that we have our text, lets add some effects! I have listed below all the effects used to achieve the results displayed below:
Drop Shadow
Inner-Shadow
Gradient Overlay
Results:

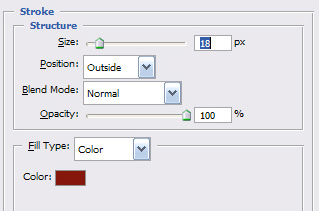
In this, you may use two techniques of outling the background for the text. The one i am going to use is adding a stroke big enough to cover the text's surrounding. The other way is to actually grab the pen tool and create your own shape surrounding the the text. Using Method I, go to Layer - Layer Style - Stroke of the text and apply the following:
Results:

Now since you cannot take a selection of the stroke, you will to duplicate the text layer, rasterize it, and turn into a smart object. Then, create a selection of it and fill the background with #821900.
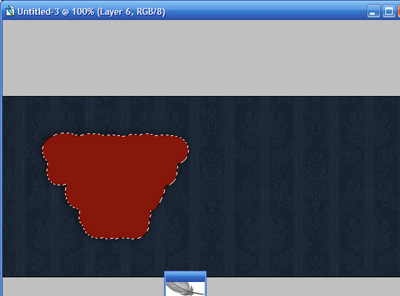
Alright, now that we have our text's background. Lets work on some of the effects. Grab your dodge tool, and set the size to 150. Stroke the top of the background with 80% Exposure. Work on it until you get something like this:

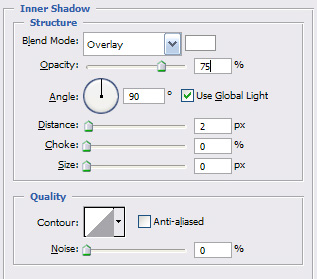
For our final set, apply the following Inner/Drop-Shadow settings to the background:

And there you have it, the juicy looking/cartoonish text effect.
