Step 1. At first, create a psd document. File-New. You can fill it with the gradient from #53676b to #405053 create a new layer

Then press U and select the ellipse tool. Hold the Shift key and draw a circle. Paths-Fill path-#cdcdcd. Delete this path.

Step 2. Now, let's make this sticker more attractive.
Select the layer of the sticker. Then Layer - Layer Style - gradient overlay from #eeeeee to #cdcdcd. Scale 72% Angle -79°. Opacity 100% Style Linear. Create a new layer under the sticker, select the sticker and press Ctrl+E.
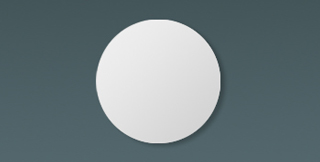
Step 3. With the Polygonal lasso, select a part of the layer (the part should look like a saucer) and cut it (Right click on the selection - Layer Via Cut).
Here comes the magic part of our lesson.
Select the Free Transform tool (Ctrl+T) and move this piece as as stated below. After that, move it 1 px down. Here you can play with the settings to get an accurate shadow.
Layer - Layer Style - Gradient Overlay - Fill it with this gradient from white to black. Set the opacity 66% Angle -50° scale 25%. Drop Shadow - Opacity 39%. Distance 1px Spread 0% Size 5 px. Select the layer with the sticker Layer - Layer Style - Drop Shadow. Opacity 24% Distance 6px Spread 0% Size 5px.

Finished!
It wasn't so hard, was it?
Download psd from here.