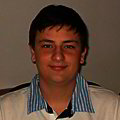
At first, let's open our photo. I used this photo.
I flipped it: Edit-Transform-Flip horizontal.
Image-Adjustments-Hue/Saturation: Saturation-0.
Filter-Sharapen-Unsharp mask: Amount 140%, Radius 0.3.
Add some blue color using Hue/Saturation: tick 'colorize', set hue to 190 and saturation to 10.
Tip: Use Blur Tool to slightly blur some parts of the photo.
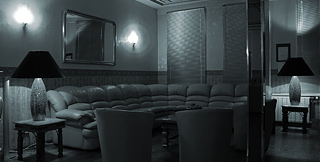
Now the REC. Select Type Tool and type [ REC] in the right top corner. Font-Arial, Style-Blod, Size 14pt.
Create a red circle using Elliptical Marquee tool. Fill it with color #ae0000.
How to add cluter:
1. Download this pattern. Create a new layer and fill it with white color. Go to Layer-Layer Style-Pattern Overlay and fill it with the pattern you've downloaded. Scale 100%.
2. Create a layer below the clutter and press Ctrl+E
3. Select-Color Range, click on the white part (Fuzziness-66%) and then delete it. Filter-Blur-Blur more.
4. Blending mode-Multiply, Opacity 43%
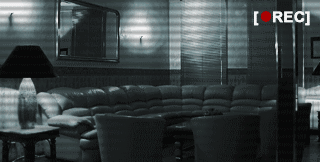
Now the animation. We are going to make 11 frames. How to to make a frame? Select the Move Tool and move the clutter 4 px down. Save it GIF format. Repeat 11 times. Now, select the layer with the photo and go to Filter-Blur-Motion blur. Set the distance to 13 px. Save it as 12th GIF frame.
You will need a GIF animator program. You can use this one.
Install it. Now, in this program, Press Ctrl+I and add the 11 frames. Frame properites-Delay 0.1 sec. Select the frames and press Ctrl+C. Then press Ctrl+V twice and add the 12th frame (delay 0.1 sec). File-Save as…
That's all!
P.S. Bond. James Bond.