

Step 1.Go to New File and change the properties of the canvas. Width: 500px Height: 400px. Background Colour: #003399
Step 2. Now click on your Text Tool (T) and change the properties in the properties panel. Font: Arial Black, Size:66, Colour: #3399FF (Of course you can change the properties to your likings to create your own unique style of text). Click on the canvas and type in your desired words.

Step 3. Select the text and >Right Click>Break Apart (Ctrl+B) twice to break the text into it's raw form.

Step 4. Click anywhere on the canvas to deselect the text. Now select the Ink Bottle Tool (S). In the properties panel, change the stroke setting to Black and Solid with a thickness of 4 and then using the Ink Bottle Tool click on each individual text to make an outline.

Step 5.Using the Selection Tool (V), carefully select only the blue part of the text avoiding the outing. Just click on one blue part and hold down Shift to select another part. After that is done, press F8 to convert that into a Graphic.

Step 6. Press delete on your keyboard to delete that graphic you just made and you'll be left with only the outline of your text.

Step 7. Now select all of that outline by using the Selection Tool (V) or just use the short cut (Ctrl+A).

Step 8. While the text are still selected, use the Paint Bucket Tool (K) and in the Colour Panel (Shift+F9) change the Stroke to Linear with colour Black and White. You'll notice the outline colour now goes from black on the left to white on the right. We don't want that so go to the Gradient Transform Tool (F) and rotate the gradient until it is parallel. Play around with the gradient until you get this effect:

Step 9. Press Ctrl+A to select everything and go to Modify>Shapes>Convert Lines to Fills.
Step 10. Press Ctrl+A again to select all the fills and got to Modify>Convert to Symbol (F8). Select Graphic and name it "Border".
Step 11. Open up your library (Ctrl+L) and double click into that blue chrome fill we deleted a while ago. With the blue parts selected, open up the colour mixer and change the fill to linear. Add 5 colour swatches in. From left to right the colours are : #CCCCCC, #FFFFFF, #999999, #CCCCCC, #FFFFFF.
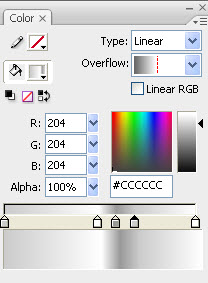
Step 12. Select all the text and use the Gradient Transform Tool (F). Rotate the gradient so it is parallel (horizontally) like so. Adjust the gradient a bit until you feel like it has a chrome look.

Step 13. Ok great! Now go back to your main scene:
![]()
and now you can drag your Chrome from the library to the stage, align it with the border by using the arrow keys to move it around and change the background colour so you can get a better look at the border. Tip: Move the chrome a bit away from the border until you achieve a professional looking 3D kind of effect!
