

Now it's very popular to use personal sites for brides or wedding couples to share photos, videos and other beautiful moments of this unforgettable day to your friends and colleagues. A wedding is a special event that requires a special design for any website dedicated to it. If you are going to get married and want to create a wedding website for you or your friends - I'll teach you how. While I'm single let's say I decided to make a present to my friends Dylan and Julie who married not long ago.
So, this tutorial will teach you how to make a website and perform all necessary customization on the basis of a website template. At the end you will also read our recommendations concerning domain name and hosting provider.
Choosing a template design
As always I recommend you to review our website templates where you may find both wedding web templates and wedding flash templates. All of them are created with consideration for the latest trends in the web design industry. You may be sure that you will get a design of premium quality. My choice is template #22851 isn't it as bright as wedding supposed to be?
After purchase you will find HTML-version and source PSD file of the main page, fonts which are used in the template and some screenshots in the archive.
In case of a low-budget project, you may take advantage of free web templates that will help you solve both problems: time and money. FreeTemplatesOnline.com offers quality free web page designs that can be easily customized and used as a basis for your website.
Template customization
Now it's time for template customization. First, you should install necessary fonts (usually they are placed in "sources/fonts" folder- in this tutorial you'll find more detailed description. After that open .psd file in Photoshop and let's learn how to make necessary customization.
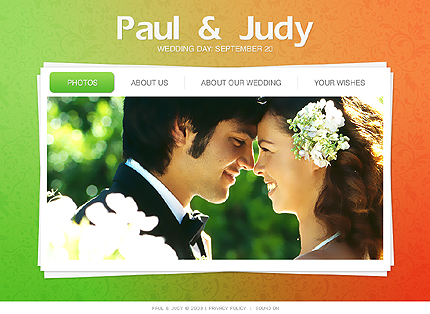
Next thing we going to do is change name and wedding date. Enter you names or names of your friend and date instead of default (sure if you are not Paul & Judy by chance):
![]()
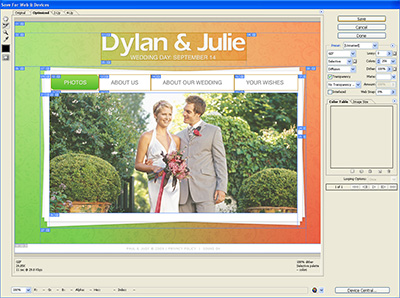
And change wedding day to right one as well. By the default all our web templates saved without texts. That's why after making this changes we need to replace existing images by "File" → "Save for Web & Devices" command. Select all the menu buttons and name of the page (you don't need to change settings - everything is already done by coder) and select folder with site images:
At one change "Paul & Judy" at the footer of page in HTML editor and remove "Privacy policy" - we don't need this section at all. If you're experience difficulties with HTML code I recommend you to read a category HTML & CSS Tutorials at Web Design Library.
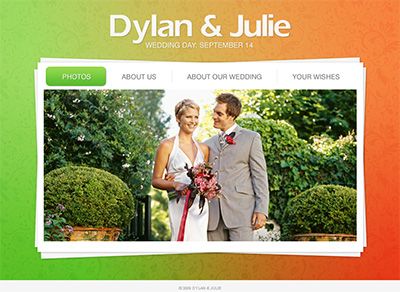
Then put your best photo in center. Pay attention to the size of the photos - they need to fit dedicated section accurately to prevent harming your layout. That's all for the first page. Let's look what we have:
Then let's customize other pages.
About us
Write a few paragraphs about yourself to let her colleagues and buddies to know a little about him and inversely.
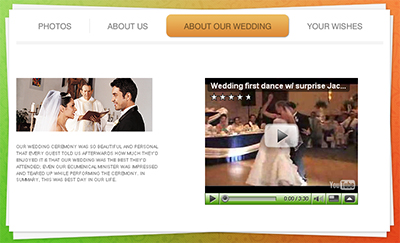
About our wedding
Describe your emotions and share your feeling about this day to every visitor of your website! You can use texts, audio or even insert embed code from YouTube or any other video hosting networks.
Your wishes
Let people express their feelings too. You can add a guestbook to this page or just contact form. I last case you can manually select congratulations to put on this page, while in first way it would be made automatically. Whatever you choose - for its implementation you need to have some PHP programming skills and while I don't have them I recommend order it from their website. They said that it will cost you about $60 - for any type you choose.
So that's it. We have a ready website, but wait… we have forgotten main thing - your PHOTOS!
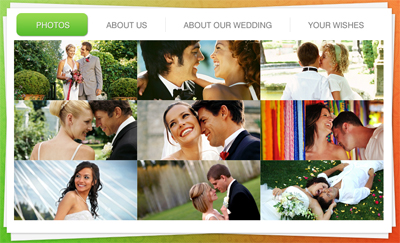
Photos
So I offer you modern and stylish way to show up your photos with the help of Slimbox 2 - JavaScript script that allow you to overlay images on the current page. It's a snap to setup and works on all modern browsers. To start download it from the official site and unpack into your templates folder.
Not you should follow usage instructions to setup Slimbox 2. After create folder "photos" and put there your photos in 2 variants - original size and smaller copy to show them on the page like a thumbnail. Then copy index.html and call it "photos.html". Put your thumbnails instead of big photo like I did:
Then you should activate Slimbox 2 by adding rel="lightbox-wedding" code to your links, like here:
Repeat this step with all your photos you have inserted on this page. If you did all steps right, then your page should look like on this screenshot:
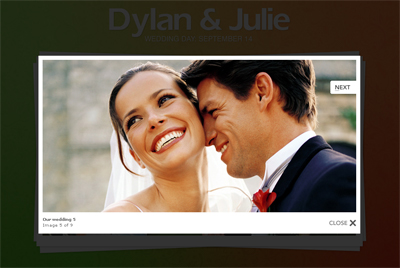
All the photos should open in splash window.
That's it! Your great stunning colorful bright perfect personal wedding website cost just for $67 + $60 = $127 and a few hours of your time! Thus spend less you get high quality professional wedding template which will be your pride for long time.
In case you don't want to spend your time and examine to HTML & CSS you can always order professional customization from TemplateTuning.
Choosing a domain name and hosting provider.
Code creation is finished. Now register a domain name. You can find related materials in the appropriate section of Webdesign.org. For example your names like www.DylanAndJulie.com would be just excellent. After registering a domain name you need to find a good hosting company and upload all files to the server. You will learn everything about hosting here.
If you experience any troubles with registering a domain name or hosting you can always contact TemplateTuning.com professionals.
Now share the link with your friends and family!
My congratulations to you and good luck!
You can visit sample website to see the final result or compare your code.