


It seems that as time goes by, the gel effect is becoming more popular on everything, now we will create a round button
1. Make a new image, we find about 100 x 100 px is fine, with a white background
2. Fill the background with a soft blue [ we used #CCDDEE ]
3. Click Layer > New layer, and name it circle
4. Grab the Eliptical marquee tool, and give it a fixed size of 75x75 px - click your screen and drag it about with your mouse the center it
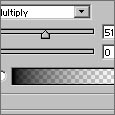
5. Grab the gradient tool, and give it these values..
![]()
6. Drag your pointer from the bottom right, to the top left [ still keepign inside your ant lines ]
7. Hold CTRL and press D to deselect
8. Click Layer > Layer style > blending options - and give it these settings
9. Create a new layer, and name it highlight
10. CTRL Click the thumbnail of "circle" layer on the layers palate
11. Click select > modify > contract - and contract it by 2 px
12. Press D to reset your colours, and press X to swap them [ white is now infront ]
13. Hold ALT and press backspace to fill the layer white
14. Click select > feather - and feather it by about 15 pixels
15. Grab any marquee tool, and click DOWN on your keyboard about 15-16 times, and hit delete twice

Thats it! if you would like to add text to your button, add it between the colour, and highlight layer, to keep the highlight on the text