
You read the advice on virtually every design blog populating the cyberspace landscape, and if you haven't, you don't read enough design blogs. Kidding, but seriously, people say it all the time, 'If you want to be taken seriously as a designer, you cannot use the Bevel or Drop Shadow tools in Photoshop'. What most of these advice givers really mean to say, is that you should not use the default settings for these tools. Here I am going to show you a side-by-side comparison of the default settings and some custom settings after taking you through the tutorials to achieve the desired effects.
I will start each section with some basic definitions taken from the Photoshop help files, to provide you with a better understanding of exactly what each setting does when you manipulate it. From there I will move on using an image to walk you through how to tweak the default settings to get a more natural and subtle effect for your images.
Bevel
Styles
- Inner Bevel creates a bevel on the inside edges of the layer contents;
- Outer Bevel creates a bevel on the outside edges of the layer contents;
- Emboss simulates the effect of embossing the layer contents against the underlying layers;
- Pillow Emboss simulates the effect of stamping the edges of the layer contents into the underlying layers
Techniques
- Smooth blurs the edges of a matte slightly and is useful for all types of mattes, whether their edges are soft or hard. It does not preserve detailed features at larger sizes.
- Chisel Hard uses a distance measurement technique and is primarily useful on hard-edged mattes from anti-aliased shapes such as type. It preserves detailed features better than the Smooth technique.
- Chisel Soft uses a modified distance measurement technique and, although not as accurate as Chisel Hard, is more useful on a larger range of mattes. It preserves features better than the Smooth technique.
- Depth specifies the depth of the bevel. The higher the level, the deeper and more pronounced the bevel will be.
- Size specifies the amount of blur or the size of the shadow.
- Soften blurs the results of shading to reduce unwanted artifacts.
- Angle determines the lighting angle at which the effect is applied to the layer
- Altitude sets the height of the light source. A setting of 0 is equivalent to ground level, 90 is directly above the layer.
- The Use Global Light setting allows you to set one "master" lighting angle that is then available in all the layer effects that use shading: Drop Shadow, Inner Shadow, and Bevel and Emboss. In any of these effects, if Use Global Light is selected and you set a lighting angle, that angle becomes the global lighting angle. Any other effect that has Use Global Light selected automatically inherits the same angle setting. If Use Global Light is deselected, the lighting angle you set is "local" and applies only to that effect. You can also set the global lighting angle by choosing Layer Style > Global Light.
- Highlight Mode is where you set the Blend Mode, color and opacity for the bevel highlights.
- Shadow Mode is where you set the Blend Mode, color and opacity for the bevel shadows.
Inner Bevel Example
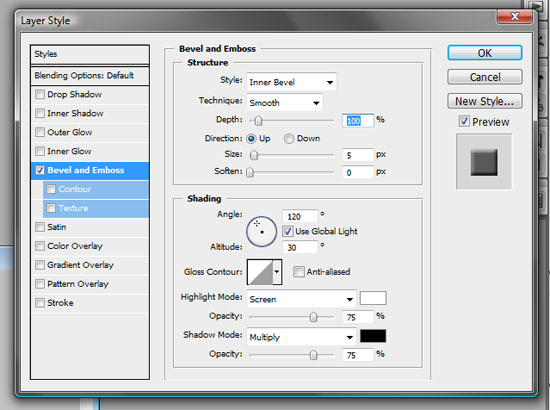
For the first example, I am going to go over use of the Inner Bevel tool. This will add a 3D, button type effect to an object.
Here you can take a look at the default settings followed by the image they are applied to. Notice how amateurish and unnatural this image looks. Point at the mediocre image and berate it with scornful laughter…sorry, I lost track of where I was going with that. Oh yes, the default settings making the image look poorly put together.

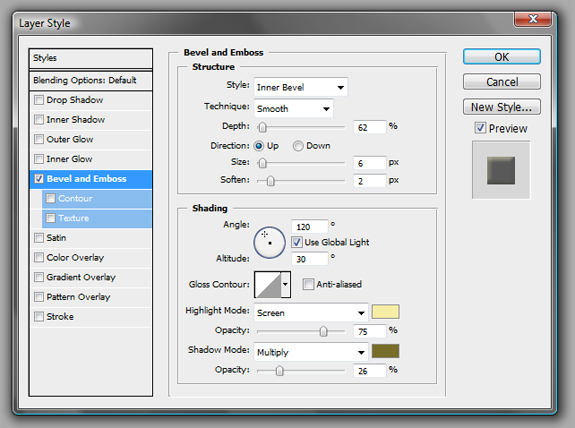
The first thing I am going to do is change the shadow color from the default black, and the highlight color from the default white, to shades that better match the object. Then I will bring the shadow opacity down to 40 to make it a bit less harsh. In the image below, you can already see a big improvement. But we are not quite there yet.

Next, adjust the depth, size and soften settings until you have the natural look you want. Finally, you will want to make sure that you adjust the shading angle to match the light source in your image.
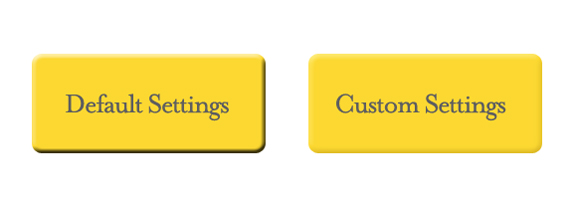
You can see the settings I decided on below, followed by the final image. Always remember that you will want to adjust all settings specifically for the image you are working with.

Now let us take a look at the images side-by-side. You can see a huge difference just from the few adjustments we made. There is no arguing that the final image looks much better.
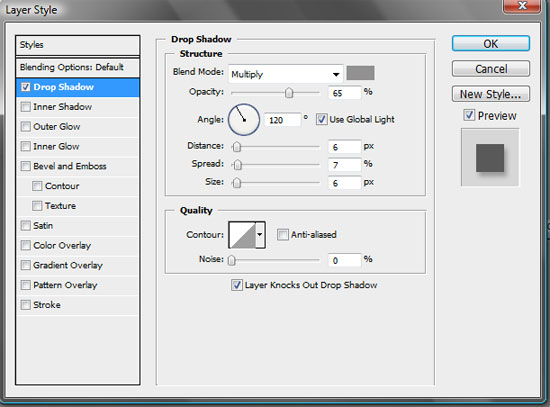
Drop Shadow
- Blend Mode determines how the layer style blends with the underlying layers. You can get detailed information about the different blend modes in An Explanation of Photoshop Blend Modes
- Opacity sets the opacity / transparency of the layer effect.
- Angle determines the lighting angle at which the effect is applied to the layer.
- Distance specifies the offset distance for the shadow.
- Spread expands the boundaries of the matte prior to blurring.
- Size specifies the amount of blur or the size of the shadow.
- Anti-alias blends the edge pixels of a contour or gloss contour. This option is most useful on shadows with a small size and complicated contour.
- Layer Knocks Out Drop Shadow controls the drop shadow's visibility in a semitransparent layer.
Drop Shadow Example
Once again, we begin with a peek at the default settings along with their result on the default image.
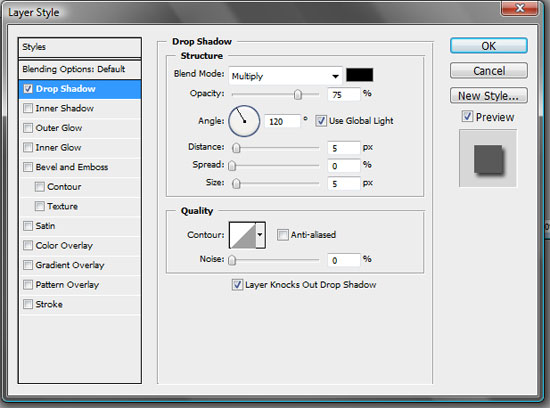

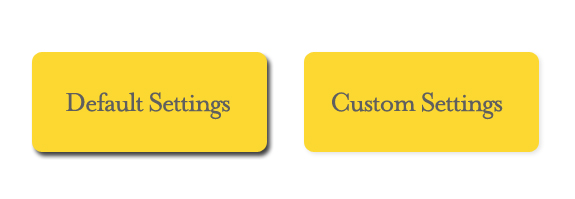
This time when we change the shadow color, it will be dependent on the color of the background rather than the color of the object we are working with. Since our background is white, the black shadow is way too much. Instead we want to make it a nice soft gray.

Next adjust the distance, spread and size until you get the subtle shadow that matches what your light source would cast. Then adjust the opacity until it looks natural and adjust the angle to make sure it matches the direction of your light source.
You can see the settings I decided on below along with the final image. Once again, remember that all settings will vary depending on the image you are working with.

And once again, the side-by-side to show you the drastic difference just a bit of tweaking can achieve.
Wrap Up
You can see in the two comparison images above how much of a difference a day makes, wait, that's not right… how much of a difference is made with just a little bit of extra work. The conclusion I have come to after all of this, is I would change that pearl of advice that is often uttered to simply say, never use the default settings for effects in Photoshop. They all need to be customized to better fit and blend with your image.