

Part I
Custom gradients are the key to many of the coolest Photoshop tricks and effects. If you produce photo-realistic work or simulated 3D, gradients are vital. Capturing those subtle shadings that exist in reality requires precise gradients.
The Gradient tool, which shares space in Photoshop's Toolbox with the Paint Bucket, is actually a collection of tools grouped together in one icon. After selecting the Gradient tool, take a look at the Options Bar. You'll see buttons that allow you to select from among the five variations of the Gradient tool. (All five tools can use any gradient color scheme.)

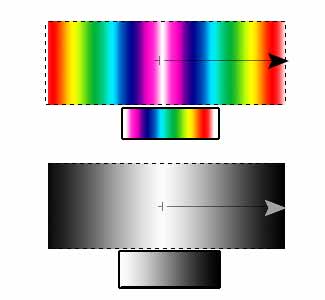
LINEAR GRADIENT TOOL
When you drag a gradient, the colors will be distributed perpendicularly to the angle of drag.
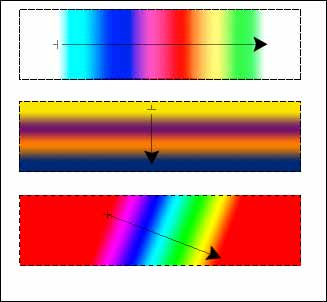
Notice that the distribution of the gradient within the selection starts at the point from which the gradient is dragged and ends at the point where the mouse button is released. In the top example, the gradient begins and ends with transparency. The gradient itself is therefore restricted to the area over which you have dragged. In the middle and lower examples, the gradients begin and end with colors. The area before the beginning of the drag is filled with the first color; the area past the end of the drag is filled with the last color.
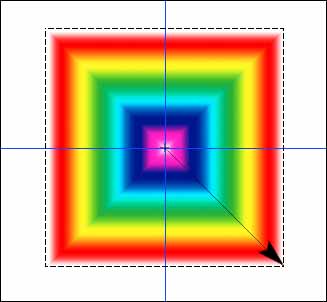
RADIAL GRADIENT TOOL
The gradient will be drawn in a series of concentric circles from the start of the drag outward to the point at which the mouse button is released.
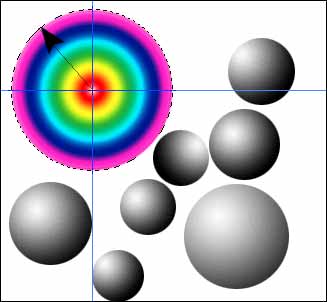
(Notice that one of the seven black-to-white gradients was dragged at an angle conflicting with the other six. This produces a visual anomaly, a conflict in the "light source" that is creating the shading.)
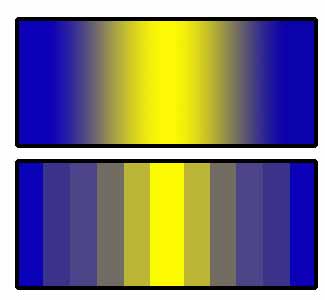
ANGLE GRADIENT TOOL
The Angle Gradient tool wraps a gradient's color pattern around the starting point of the drag. This is best demonstrated using a circular selection
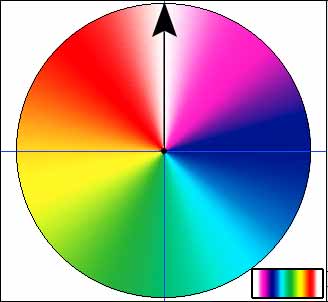
The insert in the lower right corner shows the gradient used with the Linear Gradient tool. The Transparent Rainbow gradient starts and ends with transparency. In the circle, notice how the transparency (seen as white) is both to the left and right of the line-of-drag. The colors of the rainbow are wrapped clockwise around the line-of-drag.
The Angle Gradient can be very effective for shading, when used with an appropriate color scheme. In this example, the gradient both begins and ends with black.
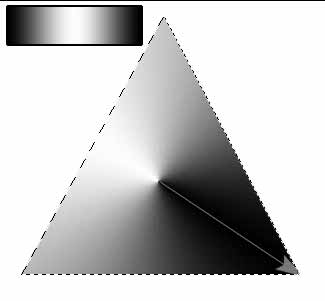
REFLECTED GRADIENT TOOL
The Reflected Gradient tool does exactly that: it reflects gradients. The same gradient will be drawn in either direction from the point from which you drag.
In the top example, the Transparent Rainbow gradient was dragged from the center. Notice that the color patterns to the left and right are mirror images. On both sides of the center point, magenta is the first color. In the lower example, a simple white-to-black gradient is used. (A linear gradient sample of each appears in the boxes below the examples.)
DIAMOND GRADIENT TOOL
The Diamond Gradient tool reproduces the gradient's color scheme in four directions from the point from which you drag. The line-of-drag establishes a corner, and the gradient is duplicated at 90-degree angles around the center point.
OTHER GRADIENT TOOL OPTIONS
In addition to selecting how the gradient will be created, you are offered the choice of blending mode and opacity. All of the standard modes are available, as well as the Behind blending mode.
Other Options Bar choices for the Gradient tools include Reverse, Dither, and Transparency.
REVERSE
When checked, this option simple flips the color scheme of the gradient. (Sharp-eyed readers may have noticed that a number of Photoshop's default gradients have been reversed in the examples above.)
DITHER
Dithering allows Photoshop to subtly mix two colors where they meet. This helps prevent "banding," which can be defined as visible stripes of color. An exaggerated example shows the impact.
TRANSPARENCY
Several default gradients have built-in transparency, including the Transparent Rainbow used above. When this box is not checked, the transparent areas will be filled with the neighboring color(s).
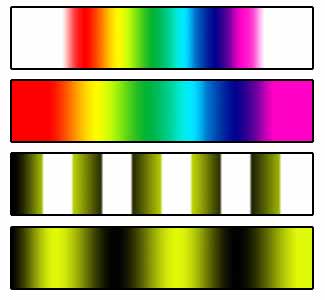
The Transparency box was checked for the first and third samples, unchecked for the second and fourth. As you can see, without transparency, Photoshop filled the extreme left and right of the Transparent Rainbow with the first and last colors. In the lower pair, the transparent areas are evenly filled with the two neighboring colors.
In the next installment of this series, we'll look at editing the color schemes of existing gradients.
 Pete
Bauer is the Help Desk Director for NAPP, as well
as a Contributing Writer for Photoshop User and Mac Design
magazines. His books include "Special Edition Using
Adobe Photoshop 7" (with Jeff Foster), "Special
Edition Using Adobe Illustrator 10," "Sams Teach
Yourself Adobe Illustrator 10 in 24 Hours" (with Mordy
Golding), and "Special Edition Using Adobe Illustrator
9." Pete writes documentation for a variety of computer
graphics related products, as well as testing software
for a number of companies. As a computer graphics efficiency
consultant, Pete specializes in customized training programs.
He is based in Columbus, Ohio, and can be contacted via
Pete
Bauer is the Help Desk Director for NAPP, as well
as a Contributing Writer for Photoshop User and Mac Design
magazines. His books include "Special Edition Using
Adobe Photoshop 7" (with Jeff Foster), "Special
Edition Using Adobe Illustrator 10," "Sams Teach
Yourself Adobe Illustrator 10 in 24 Hours" (with Mordy
Golding), and "Special Edition Using Adobe Illustrator
9." Pete writes documentation for a variety of computer
graphics related products, as well as testing software
for a number of companies. As a computer graphics efficiency
consultant, Pete specializes in customized training programs.
He is based in Columbus, Ohio, and can be contacted via