| To install
it, make sure Photoshop is closed. Go to your original installation
package (in my case the Creative Suite, Premium Edition) and insert the
'Resources and Extras' cd. Browse to '(Drive Letter):GoodiesPhotoshop
CSOptional Plug-InsFilters' folder and copy the '3D Transform.8BF'
file into '((Drive Letter):Program Files)AdobeAdobe Photoshop
CSPlug-InsFilters' folder. Start Photoshop and create a new document with a preset of your choice. (Ctrl + N / MAC: Command + N) Optionally, create a new empty Layer (Shift + Ctrl + Alt + N / MAC: Shift + Command + Option + N), which will default with the layer name of 'Layer 1', or you can work directly onto the default 'Background' layer. For more user control and flexibility I generally go with the new empty Layer method. To locate the '3d Transform Filter', select the new empty 'Layer 1' in the 'Layers Palette', then go to 'Filter/Render/3d Transform..' as I have captured below.
 This will prompt the '3d Transform' Filter control panel.
 General Introduction The above screen shot looks like a mini combination of the actual Photoshop canvas view and the Save For Web control panel. A standard toolbar options to the left, a 3d engine canvas view in the middle, the Camera controls, render Options and 'OK' to save render command to the right.
 If you are familiar with Photoshop's Toolbar & its Pen Tool operations then you already have an understanding of the first eight of the twelve 3dtransform Toolbar.
Like the main Toolbar, the 3d Transform Toolbar is divided into four groups. Each separated and encased by a solid outline. Below I have those groups separated by a red line and entitled by a general fuction.
 Groups 1,3 & 4 thrive on at least a single active 3d shape from within group 2. Namely, any one of the active 'Cube, Sphere or Cylinder Tools'. The remaining three Tools in group 2, namely 'Convert Anchor Point, Add Anchor Point Tool & Delete Anchor Point Tool', are disabled by default, primarily because they can only be used in conjunction with the 'Cylinder Tool'. Even then, once you draw out your cylinder, you can only apply new Anchor Points to the 'right side of the outline' of the cylinder object. Despite it's limitations, you can create some pretty interesting shapes with this. I'll show a few samples later in this tutorial once I expose you to some important tips with this filter. 3D Transform Rendering Power Tricks 1. When you start a 3D transform Render, its almost difficult to even see the objects outline. It's default color of lime green against a transparent floating layer can be difficult to work with, as demonstrated in the below capture.
 All you need to do, is add an 'Edit/Fill' color to the target layer. I usually use Black.
With the new fill layer active, go 'Filter/Render/3D Transform' and any object you draw will
now have a clearly visible outline, as captured below.
 To ensure the Black is not included in the final Render, select the 'Options' feature (encased in Red below) and from that dialog untick 'Display Background' (encased in Red below). Also toy with the Resolution/Anti-Alias options in that same dialog.
Then use the Trackball Tool The resulting output will eliminate the surrounding background color.
 Tip within a tip The final Render output will retain that background color as the shadow color for the object. Below are two example renders using the Cube Tool. One layer had a starting Black background, the other a Red.
 Create Solid Fill Shapes Using the same background tip as above, create a target layer with a Color Fill, go 'Filter/Render/3D Transform', and draw your object with any of the object tools, BUT DON'T PAN OR USE THE TRACKBALL TOOL on it. As I have captured below, though I have three objects in this example.
 Then just hit the 'OK' command and the resulting render will be a solid pixel shape conformed to the object outline drawn and the layer color used.
 Complete Renders Ever notice that when you draw an object (particularly a Sphere or Cylinder Object), apply a Trackball modification only to get a half solid fill and the remaining object transparent! Below is an example capture.
 You have to eyeball the modification to get the solid half in full frontal view, and often its a hit and miss. Here is the workaround.
As demostrated below.
 Combine with 'Solid Fill' Layers.
In a new document, click the 'Add new Fill or Adjustment Layer'
 I used a Solid Color Option. #2374A8
With that Color Fill layer active, go 'Filter/Render/3D Transform'. Draw an object & use the Track ball tool to reposition to get a similar result as below.

Using 'Fill Layers' has the advantage of changing the color fill on the fly by clicking the Color Fill Layer Thumbnail.
 Below are 'Gradient Fill' & 'Pattern Fill' samples.
 Combine with Vector Shapes
On an empty floating layer, select any one of the Shape Tools (U), with options bar feature
'Shape Layers' active, and draw a shape onto
that layer.
Next, hit the 'Add Layer Mask' icon
Then go, as in the previous tips, with that Shape Layer active, 'Filter/Render/3D Transform' and draw in an object.
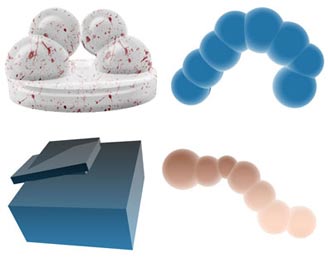
 As noted in the above Cyclinder Tool Demonstration above add & convert multiple Anchor Points to create shapes like the below.
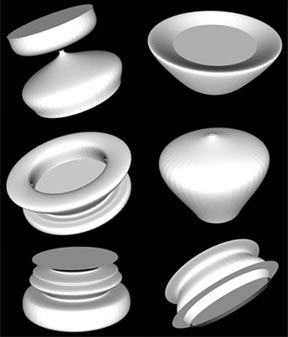 The following are multiple instances of varying objects using the above techniques.
 On a final note, if you make an error or your not content with the way your object looks and feel the need to start over. No need to exit the 3D Transform tool, simply hit the 'Ctrl + H' keys (or the DELETE key) to remove the last created object. Repeating the key stroke will remove objects in order of creation.
Hope this was a good introduction to the almost defunct filter.
|
Her
3D Transform Filter Revival
Added:Dec 03, 2004 Rating:

 Level: Experienced Software:
Photoshop
Level: Experienced Software:
Photoshop
Level: Experienced Software:
Photoshop