Before we get onto the introductions, this might seem like a whopper of a tutorial for such a small thing, but it teaches a lot about gradients, which are essential for any Photoshop user to know. Once you learn how to use these gradients well, you will be able to do so much more in Photoshop than you could before. So what are you waiting for? Get into it! Here are the instructions for the little buttons you might have seen around my site. I use it for the contact form, the poll and a few other things you might not have seen. It can be used as a submit button, a reset button, a navigation button and various other things too. Get reading and you should have your own in no time ;) If you need to use a bit finer detail during this tutorial, zoom in or out by holding ctrl and hitting + or - on the numeric keypad on your computer (thats the pad on your right with numbers and stuff ;)
1) Open up Photoshop and go to File --> New and create a new image about 100px wide and 50px high. This won't be the size of the button, but it gives us a nice open working area.
2) You should have one layer at the moment. Press D on your keyboard to reset the colours then press ctrl+backspace to fill the layer in with white. Once you have done that, go to the layers palette and click the create new layer button, which is down the bottom of the palette second from the right.(If you can't find the layers palette, go to Window --> Layers and it should appear)
3) At this stage, you should have a white rectangle with 2 layers on the page. So let's make something happen eh? With your new layer selected, get the rectangular marquee tool (M) and, in the toolbar at the top of the page, change the style to Fixed Size and give it a width of 50px and a height of 17px. You can change these sizes as you please. When you have done that, click on your image and a selection should come up. Then press D on your keyboard and then ctrl+backspace, then ctrl+d to deselect.
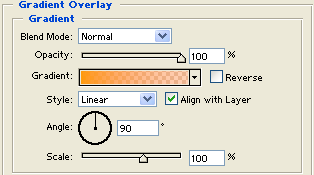
4) You should still see white, but now we will bring some colour into it. Right-click on the second layer and choose Blending Options. Then create these styles:
-Gradient Overlay with these settings:

-Stroke with these settings:


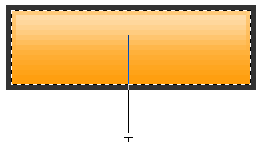
6) With the area still selected, get your gradient tool (G) and press d then x on your keyboard to invert the default colours. Select Linear Gradient in the toolbar at the top of the page (found with all the little pictures of different gradients, it is the first one) and make the gradient Foreground to Transparent. You should have white fading to clear in the little box in the top left of the screen, shown below:

Ok, so with the gradient tool, your gradient set and the area selected, click at the top of the selection and drag down about halfway through the image, shown below (Zoom 500%).

Once you have made your gradient, change the opacity of layer 3 (the one you just put the gradient on) to around 35%. At this stage you should have something like mine below:

All that is left to do is change the layer style to Overlay and change the Opacity to around 60%. If you did it all right, you should have what I have below: