|
Create a new 72 dpi, RGB image large enough to contain your text.
Hit the Grab the Horizontal Type Tool (T) |
|

|
|
|
Go to the bottom of the Layers palette and hit the Keep the default setting and move on to Inner Glow Use these settings:
Move on to Bevel and Emboss using this setting:
|
|
 |
|
|
Back to the Layers palette and hit the Hit D on your keyboard to reset your foreground- and background colors to black and white. Go first to Filter > Render > Clouds and then to Filter > Noise > Add Noise... Set the Amount to 10%, the Distribution to Gaussian and check Monochromatic. Move on to Filter > Blur > Motion Blur... Set the Angle to 0o and the Distance to 25 pixels. The next step is Filter > Sharpen > Sharpen. Go to Layer > Group with Previous (Ctrl+G). |
|
 |
|
|
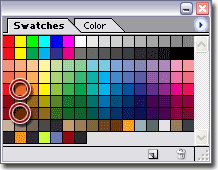
Create another new layer by clicking Set your Foreground color to Pure Red Orange and your background color to Darker Red Orange, both found among the default colors in the Swatches palette.
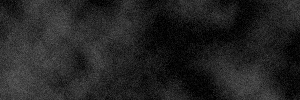
Go first to Filter > Render > Clouds and then to Filter > Noise > Add Noise... Change the Amount value to 3 pixels. Move on to the bottom of the Channels palette and hit the Go first to Filter Render > Difference Clouds and then to Filter > Noise > Add Noise... Leave the settings just like they are and hit OK. Again go to Filter Render > Difference Clouds and then back to Filter > Noise > Add Noise... Change the Amount value to 1,5%. Here's how your channel should look. |
|
 |
|
|
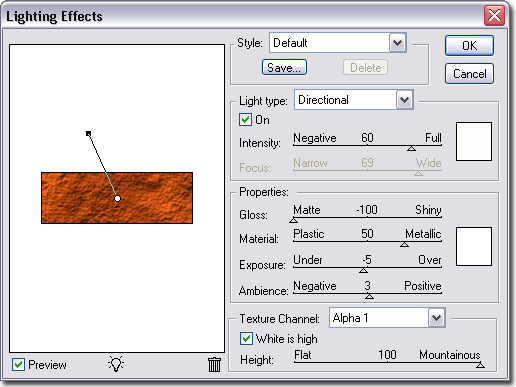
Click on the RGB channel and head back to Layers palette to check that the orange cloudy layer is active. Go to Filter > Render > Lighting Effects, and use the following settings:
Go to Layer > Group with Previous (Ctrl+G) |
|
 |
|
|
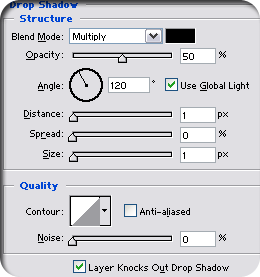
Go to the Layers palette and hit the
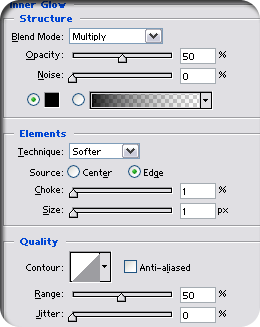
Move on to Inner Glow:
|
|
| Time to let some of the metal
texture to come front.
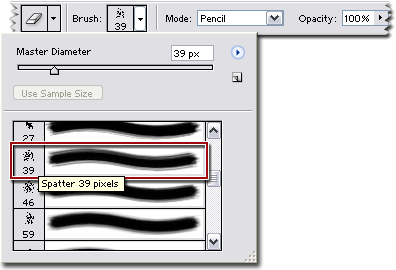
Grab the Eraser Tool (E)
Go ahead and use the Eraser Tool to remove bits and peices of the "orange rust" layer, you will get the best result if you click several times instead of dragging with the tool. |
|
Her
Rusted Text
Added:Dec 21, 2004 Rating:


 Level: Experienced Software:
Photoshop
Level: Experienced Software:
Photoshop
Level: Experienced Software:
Photoshop