

Create a neat effect by using just a lens flare and various filters. Cool background effect for headers and banners! Step-by-step instructions proceed...
1. Make an image 400x400, fill it with black, and create a New Layer (Ctrl+Shift+N).
2. On your new layer, go to Filters>Render>Lens Flare. Use the settings provided below:

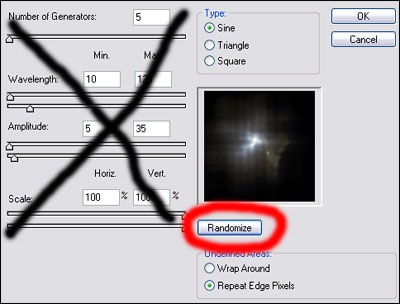
3. Go to Filter>Distort>Wave. Make sure the Type is Sine and just
click Randonize until you find something that you like. For best
results, keep somthing with the light mostly concentrated in the center.
4. Next, we want to apply an Ocean Filter. Go to Filter>Distort>Ocean Ripple and enter Size: 4 and Magnitude: 7.
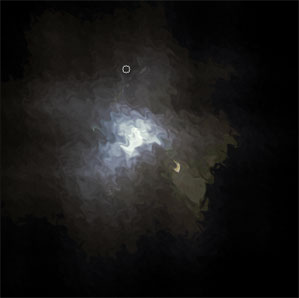
5. Now, apply a Ripple filter. Got to Filter>Distort>Ripple and
enter an amount around 250. After both ripple filters are applied, here
is what you should have or close to it:
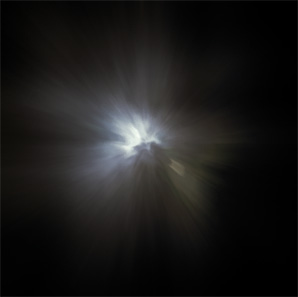
6. The last filter we will apply is a Radial Blur. Go to
Filter>Blur>Radial Blur and click Zoom and enter a number around
80. Here is what you should get:
7. We are going to hue this image now so hit Ctrl+U and check the
Colorize box. Enter these settings: Hue: 218 Saturation: 28 Lightness:
0.
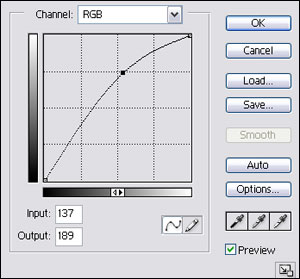
8. To make the image a little brighter, we are going to Curve it. Go to
Image>Adjustments>Curves and apply the settings below
9. My final product is below. I think it looks like a scene from space
with a nebula cloud covering the light and such. You can expand on it
and put even cooler effects around it. Maybe some stars...
