Here we will animate a button that was tutorialized in a previous teaching ^_^. If you are too lazy to complete the still button tutorial, a .psd file is provided below. Step-by-step instructions proceed..
Download the .psd file (45kb) here.
1) Open up the .psd file of your button or the downloadable one above in Photoshop.
2) Go to the Layers Palette and duplicate the original text layer by the number of letters are in your text. In my .psd, Havenfx has 7 letters so you would duplicate the original text layer 7 times.
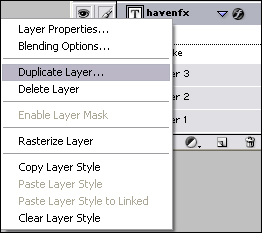
3) Each copied layer is going to be a different letter of your original
text. Select Copy #1 and delete all the text except the first letter.
Change the color to a contrasting color (#0079C5 if you're using my
.psd) and postion it directly over the original first letter. You
should have something like this.

4) Do this for the remaining layers and make sure the copied text
layers are positioned EXACTLY over the original text. Otherwise, the
effect we'll create will not look good. You should have this..

5) We are all done in Photoshop, so let's jump to Imageready. Click this button  at the bottom of the Tools Palette or press Ctrl+Shift+M.
6) With Imageready opened, you should see the Layers Palette and
Animation Palette (If not, go to Window and activate each). In the
layers Palette, you should see all of the text layer copies and the
original text layer. Well, now click the eye  beside each text copy layer, leaving the original text as the only text visible.
7) With only original text visible, go to the Animation Palette and click the arrow and select New Frame.
 Click to enlarge |
8) After selecting the New Frame and making sure that it's still highlighted, go to the Layers Palette. Click the eye
beside the first letter copied to make it visible.9) Repeat Steps 6 & 7 until all letters are visible and your Animation Palette should look something like this:
 Click to enlarge |
10) Select Frame 2 again and then click the Tweening Button
 or click the Arrow and Select Tween. Nonetheless, use these settings:
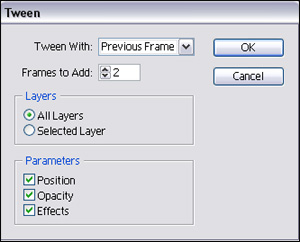
11) Now, go to the next frame where two letters are visible and Tween
that. Next Frame - Three Letters - Tween...and so on...until you're
done.
12) You can now click Play but it'll be choppy so we need to save it.
File> Save Optimized As..., choose a name, and Click Save. My
finished product came out like this:

If you are too lazy to create those text layers by yourself, you may download the .psd file and skip straight to Step 5.