HavenFX is proud to be one of the first websites to bring you the tutorial on how to make a complete navigation. This is a long tutorial that is detailed. Pay close attention so you don't get lost at points. Basic Photoshop knowledge is required. Step-by-step instructions proceed..
1) Let's open up a new image, 150 x 200. Fill this background with the color #595959, just to set a good color scheme. Make a new layer and name it "Mini Button."
2) Select the Rectangular Marquee Tool and select a small rectangle like the one displayed below. Fill it with #3E555E. (Note: In the image, the rectangle is drawn toward the top of the image. As the tutorial progresses, you might notice it go down some. This is because I didn't realize how much space I needed at the top while making this tutorial. If you want to go ahead and put it a little further down to save time, feel free to).

3) Make a new layer and name it "Mini Button Highlight." Now, go to the
Gradient Tool. Make sure your foreground color is still the same as the
rectangle (#3E555E). In the Gradient Tools Options bar at the top,
select Foreground to Transparent. Now, go to the Layers Palette
(Windows>Layers). Ctrl + Click on the "Mini Button" Layer to get the
rectangle selected. Click back on the "Mini Button Highlight" Layer.
Holding SHIFT, drag your gradient from the bottom of the selection to
around the middle. Go back to the Layer's Pallette and set the Mode on
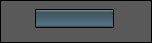
the "Mini Button Highlight" layer to Color Dodge. You should end up
with something like this when all is said and done:

4) Proceed to the Layer's Pallette again. Select the original "Mini
Button" layer and go to Blending Options (or click on the 'f'). Click
on Bevel and Emboss and apply these settings:
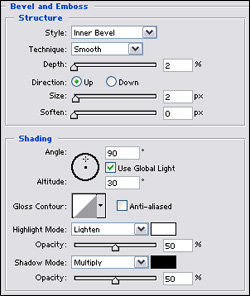
5) Don't click OK yet. Go down to Stroke and set the color to black, width to 1 px, and position: inside.
6) Select the "Mini Button Highlight" layer and hit Ctrl + E or
Layer> Merge Down. Now, to be organized, go to your Layer's
Pallette, click the file folder icon to create a new layer set. Name it
"Buttons." Go back to the merged "Mini Button" Layer and duplicate it 4
times. You should have 5 total buttons after this. Drag all the layers
onto the "Button" Layer Set. The 5 "Mini Button" layers should now be
under the "Buttons" set. You may also rename each layer to keep track
of them easier.
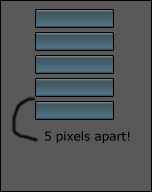
7) It may get confusing here so pay attention. All of the duplicate
button layers should be stacked on top of each other at this point. We
don't want that so we have to move it! Select one of the "Mini Button"
layers and nudge (move by keyboard arrows) that layer down 5 times
below the above button. (Ex: Nudge until the 2nd button is 1 pixel over
the bottom of the 1st button so that the black stroke line in the
middle is just one line and then hit the Down Key 5 more times. Hope
that helps!) Do this process to each button. Refer to the picture below
for a clearer reference: