A tutorial site wouldnt be complete without its plastic text tutorial, would it?.
1.
Create a new image 1000x1000 px with a white background. We need its
nice and big for better results, we will reduce the size later. First,
with the type tool, type your text as big as you can so it all fits onto the canvas. Make your text this color: R:0 G:132 B:255. Click OK when ready. Now create a New Layer (Layer 1).

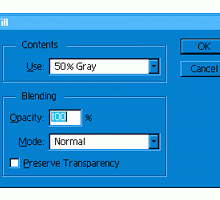
2. Holf CTRL and click on the type layer to select it. Now with "Layer 1" selected on the layers palette, go to Edit > Fill and in the pop up use the same settings as shown in the picture opposite.
3. Do not lose the selection of the text. Switch to the Channels palette, create a New Channel and fill the selection in white. Go to Filter > Blur > Gaussian Blur and enter 14. Then again, Filter > Blur > Gaussian Blur and enter 7. And again Filter > Blur > Gaussian Blur and enter 4, last time Filter > Blur > Gaussian Blur and enter 2. ok you are now done blurring. Deselect (CTRL+D) and go back to the Layers palette. Now hold CTRL and click on "Layer1" now go to Filter > Render > Lighting Effects. Match These Settings

4. You will get text similar to the pictur on the left. Now you need to Blur this layer, Go to Filter > Blur > Gaussian Blur and enter 2 for radius.

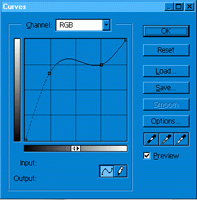
5. Next we must make some curves adjustment. So go to Image > Adjust > Curves. Match the settings as close you can to the picture on the left. The closer you get, the more realistic the effect will be.
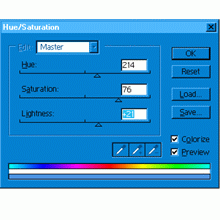
6. Ok now we can see the plastic coming along. Seeing as though I want blue plastic, I am going to make a color adjustment. Go to Image >Adjust >Hue/Saturation. Match the settings so they are the same as mine on the left. (Make sure colorizes is selected on the bottom right corner.) OK almost done!
7.
Now we are going to make a few color adjustments. To do this press CTRL+B. Make sure "Preserve Luminosity" is ticked and enter these settings:
Shadows: 0,0,-100
Midtones: 0,0, +93
Highlights: 0,0,-15
Click OK when finished, it should look like mine.

8. You are now done all you need to do is to add a drop shadow (Layer > Effects > Drop Shadow) and resize the whole image, (Image > Image Size.) And there you go. If you have any trouble with this tutorial you can just post in the forums :)