1. Start a new document, and set the foreground colour as #336EA7. Now type your text in the center (in #336EA7), leaving some space at the top and bottom. (My image was 300 X 300 pixels).

2. Right click on your text layer and select Rasterize layer. Now go to Image > Rotate > 90 CCW . Now apply the wind filter (Filter > Stylize > Wind ) with the setting "wind" and "from the right". Do this 3 times. Now you need to rotate the image back to its original position (Image > Rotate > 90 CW).

3. Right click on the layer and select Duplicate layer. Now apply the motion blur (Filter > Blur > Motion Blur-90 and distance as 45.
Now take the eraser tool and remove the blur from the top section of the text.

4. Now merge the two layers by clicking on the duplicate layer and pressing the control key and E, or you can go to layer > merge down. Now apply the Find edges filter ( Filters > Stylize > Find Edges ).
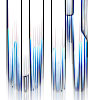
A good text effect that looks great and is still practical.