

Step 1: Create a new 500x30 document with a transparent background.

Step 2: Select a medium-gray to white graident. I used #CBCBCB for the gray. Now drag from the top to the bottom of the image on your first layer.

Step 3: Create a new layer and select your rectangular marquee tool. Create a thin rectangle selection across the entire width of the bar as shown below.

Step 4: Fill your selection with white using the paint bucket tool. Press control+D to deselect the selection. You may have to move your white bar up a little so that it is in the top section of the gray bar.

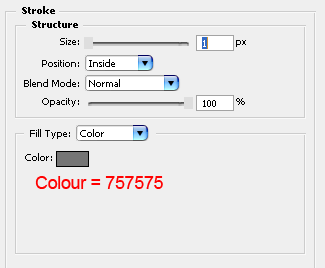
Step 5: Select your first layer (the gradient layer) and apply a 2-pixel inside stroke using layer styles (NOT Edit > Stroke).
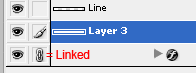
Step 6: Create a new layer and link your gradient layer to it. Now press control+E to merge the linked layers. Go to Edit > Free Transform (or control+t) and drag the sides of the gradient layer outwards, so that you can't see the stroke on these sides. Press enter to complete the free transform and the tutorial!
Linking:
Final Product:
![]()