1. Create
a new 300x300 pixel document with a resolution of 100 and name it Solar
Wind. Now press D and
fill the document (with Black). Next, create a
horizontal type mask, press X and then
fill (with white), all of this on the one layer.

2. Now, apply a gaussion blur with settings [Radius: 3px]. Then apply a solarize filter. Now apply auto levels.

3. Next we
are going to add the 'solar wind' to your image. Add
wind with settings
[Method: wind, Direction: From the Left]. Then
rotate the canvas 90 ° and apply the wind filter (Ctrl-F)
again with same settings. DO the last sentence twice more, then
rotate the canvas 90° CW and your back to the start.

4. Now add a glowing edges filter with settings [Edge Width: 1, Edge Brightness: 8, Smoothness: 6].
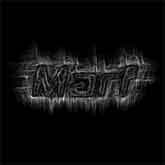
5. Lastly, you can add some color by creating
a
new layer. Then
fill it with a color of your choice. Then change the
blending
mode to 'color'. You want to make sure that this 'color' layer appears at the top of the layer list in the layers window. Voila!