


A tunnel made out of spokes you'll never complete.
 |
1. Create a new 1000x1000 pixels document with a black background colour and a white foreground colour. |
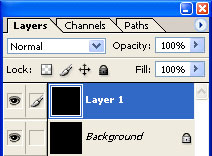 |
2. Duplicate the current layer (Ctrl+J). |
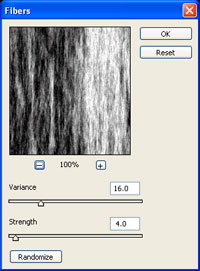 |
3. On the new layer, apply a "Fibers" filter (Filter> Render> Fibers) with the following settings:
Variance: 16
Click OK. |
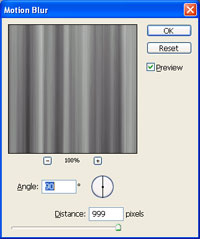 |
4. Apply a "Motion Blur" filter (Filter> Blur> Motion Blur) with the following properties:
Angle: 90º
Click OK. |
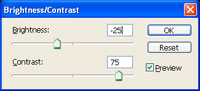 |
5. Use the "Brightness/Contrast" tool (Image> Adjustments> Brightness/Contrast) to apply the following properties:
Brightness: -25
Click OK. |
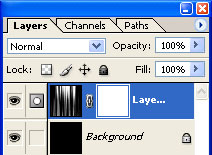 |
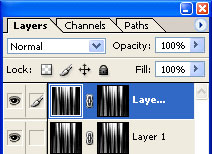
6. Add a layer mask (Layer> Add Layer Mask> Reveal All) to the current layer. |
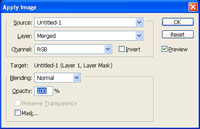 |
7. With the layer mask selected, use the "Apply Image" tool (Image> Apply Image) to apply the following properties:
Source: filename
Click OK. |
 |
8. In the "Actions" pallet (Window> Actions), create a new action and specify a "Function Key". |
 |
9. With the action recording, Duplicate the current layer (Ctrl+J). |
| 10. Use the "Transform" tool (Ctrl+T) to set the "Angle" to "5º". | |
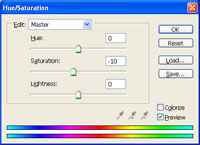 |
11. Use the "Hue/Saturation" tool (Ctrl+U) and set the "Saturation" to "-10". Click OK. |
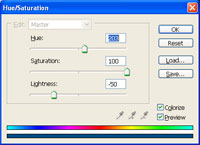 |
12. Stop recording the action and use the "Hue/Saturation" tool (Ctrl+U) to apply the following properties:
Colorize: Checkmarked
Click OK. |
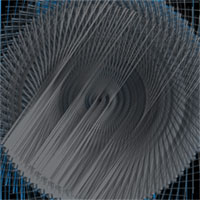 |
13. Stop recording the action. Press the function key you've defined in step 2 many times, waiting for the action to be completed before you press the function key again. The tunnel will never end. |
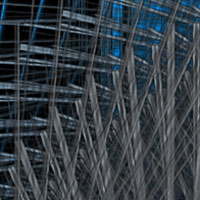 |
14. Here is a cropped area of a high resolution version. |