1. Begin with a new file, 400x50, I choose #7E7D7D as my background color for this tutorial. Then set your foreground color to #D0D0D0. Now create a new layer in the layers palette.
2. Take the Rounded Rectangle Tool and make a shape similar to the one below.

3. Now go the layers palette and right click on layer 1, chose Blending Options, then apply this settings.
And now should it look something like this.

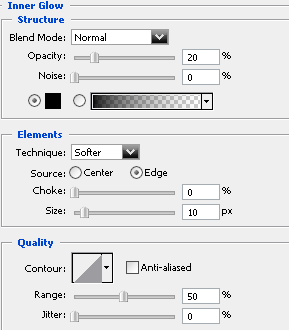
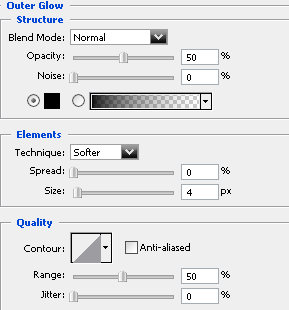
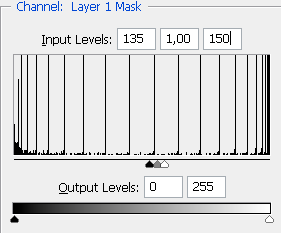
4. Now hold down Ctrl and click on layer 1 in the layers palette to get a selection, then click on the Add layer mask icon under the layers palette, then go to Filter>Blur>Gaussian Blur and set the Radius to 4 pixels, then press Ctrl+F, now hold down Alt and click on Layer mask thumbnail, then press Ctrl+L and apply this settings.
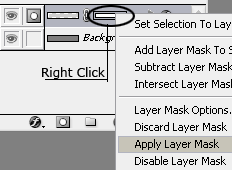
5. Press OK, then right click on the Layer Mask Thumbnail and choose Apply Layer Mask.
6. Now hold down Ctrl and click on layer 1 to get a selection, then create a new layer, and now fill that layer with white.
7. Then press Ctrl+D to deselect, then take the Elliptical Marquee Tool and draw out a shape similar to the one below, then press delete.


8. And now change the Opacity to around 25%, then add some text to the navigationbar and you are done!
This is what I came up with.

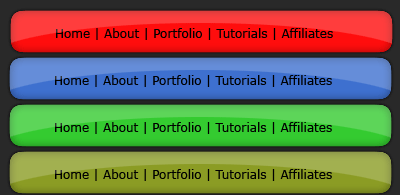
Below can you see some other examples with different colors. An easy way to change the colors is to select Layer 1 and press Ctrl+U and play around with the settings.