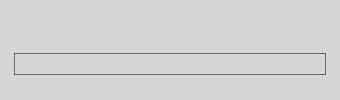
1. Ok, new image. Anything around 400x100 will do nicely. Also, #D6D6D6 background colour
2. Set #626262 as your foreground colour.
3. Create a new layer.
4. Using the 1px Pencil tool, draw a rectangle near the middle of your document.
5. Stay focused. Create a new document, 3x3 pixels with a TRANSPARENT background.
6. Zoom in a bit, and draw a diagonal line using the 1px Pencil tool. Look at mine if you are confused.

6. Then go to Edit > Define Pattern and give it a nice name.
7. You can close this document now, and return to your other masterpiece.
8. Zoom into around 300-400%
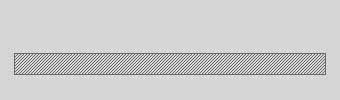
9. Using the Rectangular Marquee tool, select the area inside the grey box you drew earlier.
10. Create a new layer.
11. Now go to Edit > Fill, select Pattern, and look for the one you just created. Set Blending mode to normal and opacity to 70%.
12. Create a new layer.
13. Zoom in a bit, and now draw another rectangle on top of the existing grey one.
14. Using the Rectangular Marquee tool select the inside of the box and fill it with white (#FFFFFF), like mine...
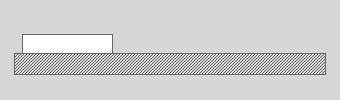
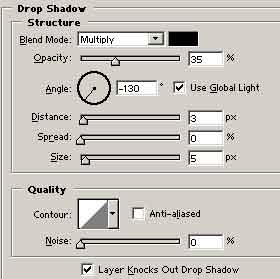
15. Right click on this layer, and select Blending Options, then select Drop Shadow and copy my settings.
16. Duplicate this layer a couple of times to make some seperate buttons.
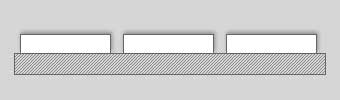
17. Now it's just time to add some text to your buttons. I am using a font called Silkscreen, and using the colour #777777.
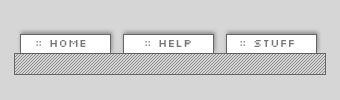
18. There you have it! A simple, trendy and very clean looking nav. Here is my final: