

Using layer blending modes is a quick and easy way to composite images. Copy one image over the other and change the upper layer's blending mode and/or opacity, and you've got a great image! But you can finesse the appearance of the composite by using multiple blending modes.
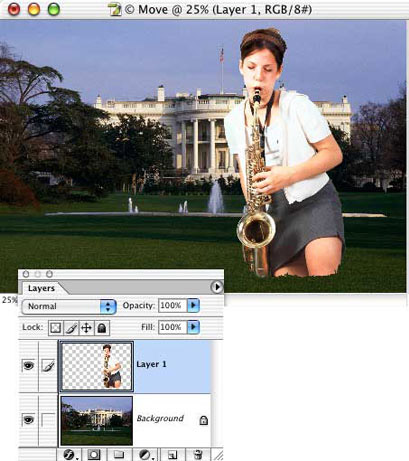
In this example, we'll work with a background image from PhotoSpin.com (#PS020030) and a foreground image from Hemera's Photo-Objects 50,000 Volume II collection. The convenient alpha channel in the foreground image makes it a breeze to copy it to the background image. Control-click (Windows) or Command-click (Mac) on the alpha channel's thumbnail in the Channels palette to load the channel as a selection. With the composite channel (RGB) active in the Channels palette, copy. Switch to the background image and paste. Use the Edit> Transform commands to scale, rotate, and otherwise adjust the size and location of the new layer.
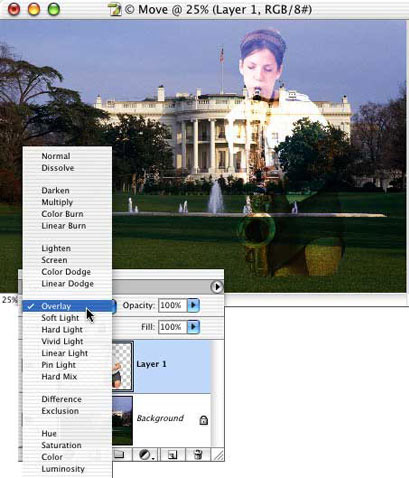
Changing the upper layer's blending mode from Normal to Overlay gives us a nice look. (The appropriate blending mode depends, of course, on both your desired appearance and the content of the layer.)
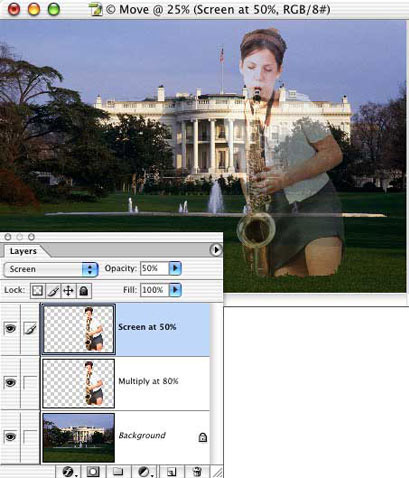
We can control the appearance of the composite much better if we make a couple of copies of the upper layer and use different blending modes and opacities for different parts of the image. In this case, one copy uses the Multiply blending mode and an opacity of 80%. This adds the darker parts of the upper image to the composite. Another copy of that layer uses the blending mode Screen and an opacity of 50%, adding the lighter areas of the upper image. The effect is much more pleasing to the eye, preventing the white blouse from "blowing out" while retaining detail in the bell of the horn and the skirt.
We can even take it further. By creating another duplicate of the layer and adding a layer mask, we can emphasize the saxophone itself. With everything on this copy of the layer hidden except the horn, the Normal blending mode and 100% opacity allow the saxophone to stand out clearly in the image.
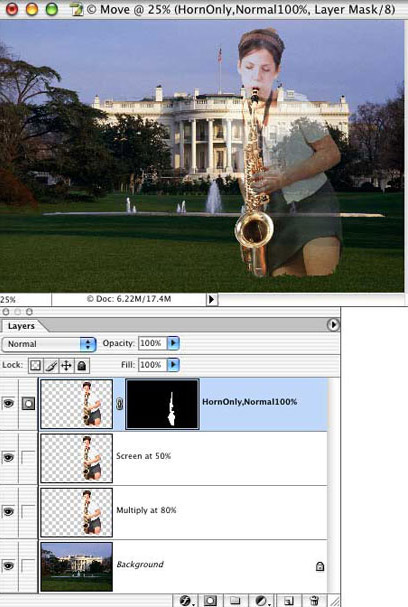
Using copies of the layer and layer masks, you can isolate the various parts of an image and customize the blending mode and opacity for that specific element, giving you incredible control over the appearance of your composite image.
 Pete
Bauer is the Help Desk Director for NAPP, as well
as a Contributing Writer for Photoshop User and Mac Design
magazines. His books include "Special Edition Using
Adobe Photoshop 7" (with Jeff Foster), "Special
Edition Using Adobe Illustrator 10," "Sams Teach
Yourself Adobe Illustrator 10 in 24 Hours" (with Mordy
Golding), and "Special Edition Using Adobe Illustrator
9." Pete writes documentation for a variety of computer
graphics related products, as well as testing software
for a number of companies. As a computer graphics efficiency
consultant, Pete specializes in customized training programs.
He is based in Columbus, Ohio, and can be contacted via
Pete
Bauer is the Help Desk Director for NAPP, as well
as a Contributing Writer for Photoshop User and Mac Design
magazines. His books include "Special Edition Using
Adobe Photoshop 7" (with Jeff Foster), "Special
Edition Using Adobe Illustrator 10," "Sams Teach
Yourself Adobe Illustrator 10 in 24 Hours" (with Mordy
Golding), and "Special Edition Using Adobe Illustrator
9." Pete writes documentation for a variety of computer
graphics related products, as well as testing software
for a number of companies. As a computer graphics efficiency
consultant, Pete specializes in customized training programs.
He is based in Columbus, Ohio, and can be contacted via